
Import from Excel
Turn your spreadsheets into techpacks, size charts, and SKUs with barcodes, using saved templates.
Under review. This page is published while we check it against the live app, so some details may have changed.
Screenshots may be out of date.
Vestis can read your spreadsheets and turn them straight into data you'd otherwise type by hand: techpacks, size charts, and SKUs with barcodes. This guide covers all three.
What you can import
- Techpacks. A spec sheet becomes a style: style details, materials, colourways, size chart and any sample fittings, all in one go.
- Measurements (size charts). A spec workbook becomes a size chart in your measurement library.
- SKUs & barcodes. A spreadsheet of codes and barcode numbers gets added to styles you already have.
Techpacks and measurements start by choosing a template. They then follow the same steps:
- Choose a template: the saved template that matches your spreadsheet, or + New template for a format Vestis hasn't seen
- Upload your Excel file (or files). Vestis checks each file against the template you chose
- Check what we found: new format only
- Review what will be created or changed
- Import
A template is how Vestis remembers a file format: the first time you bring in a new format, Vestis asks you a few questions, then saves your answers. The next file in that same format goes straight through, no questions asked. Nothing is ever picked for you: the Template field starts empty, and the drop zone stays locked until you choose one.
(SKUs & barcodes work a little differently. They use a Barcode template, covered in Part 3.)
Where to find the buttons:
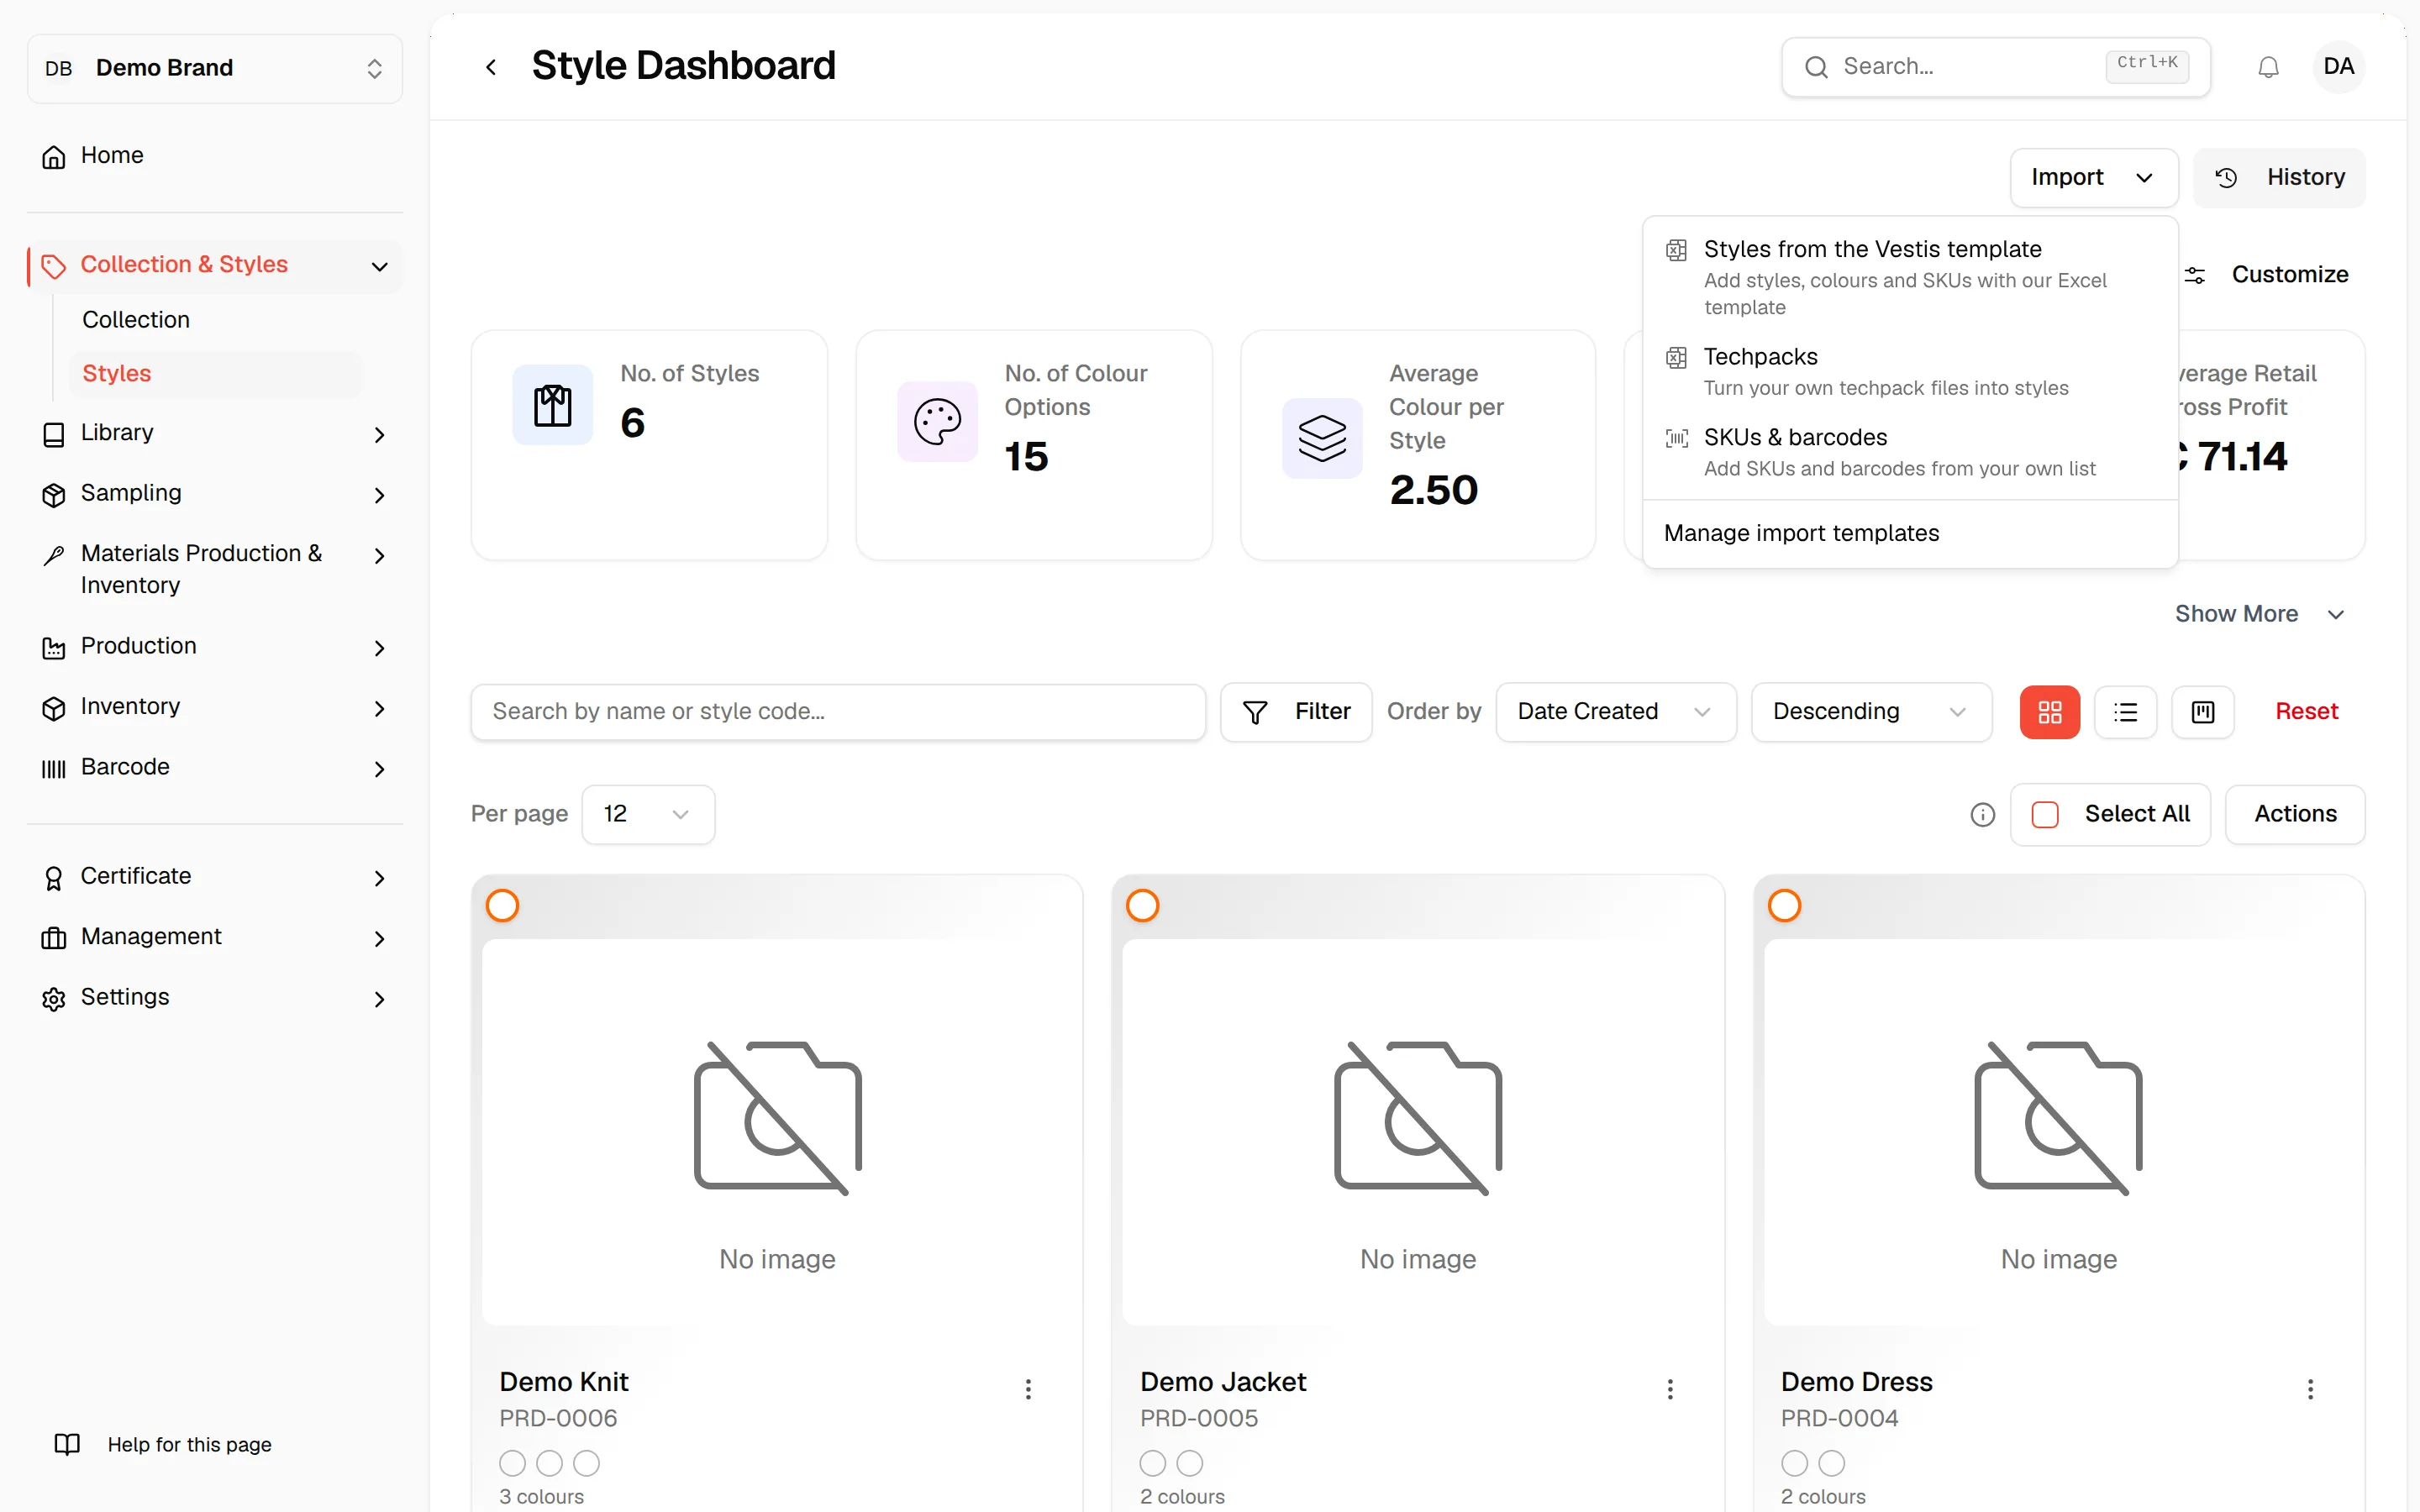
- Styles page → Import: Techpacks and SKUs & barcodes
- Library → Measurements: Import from Excel
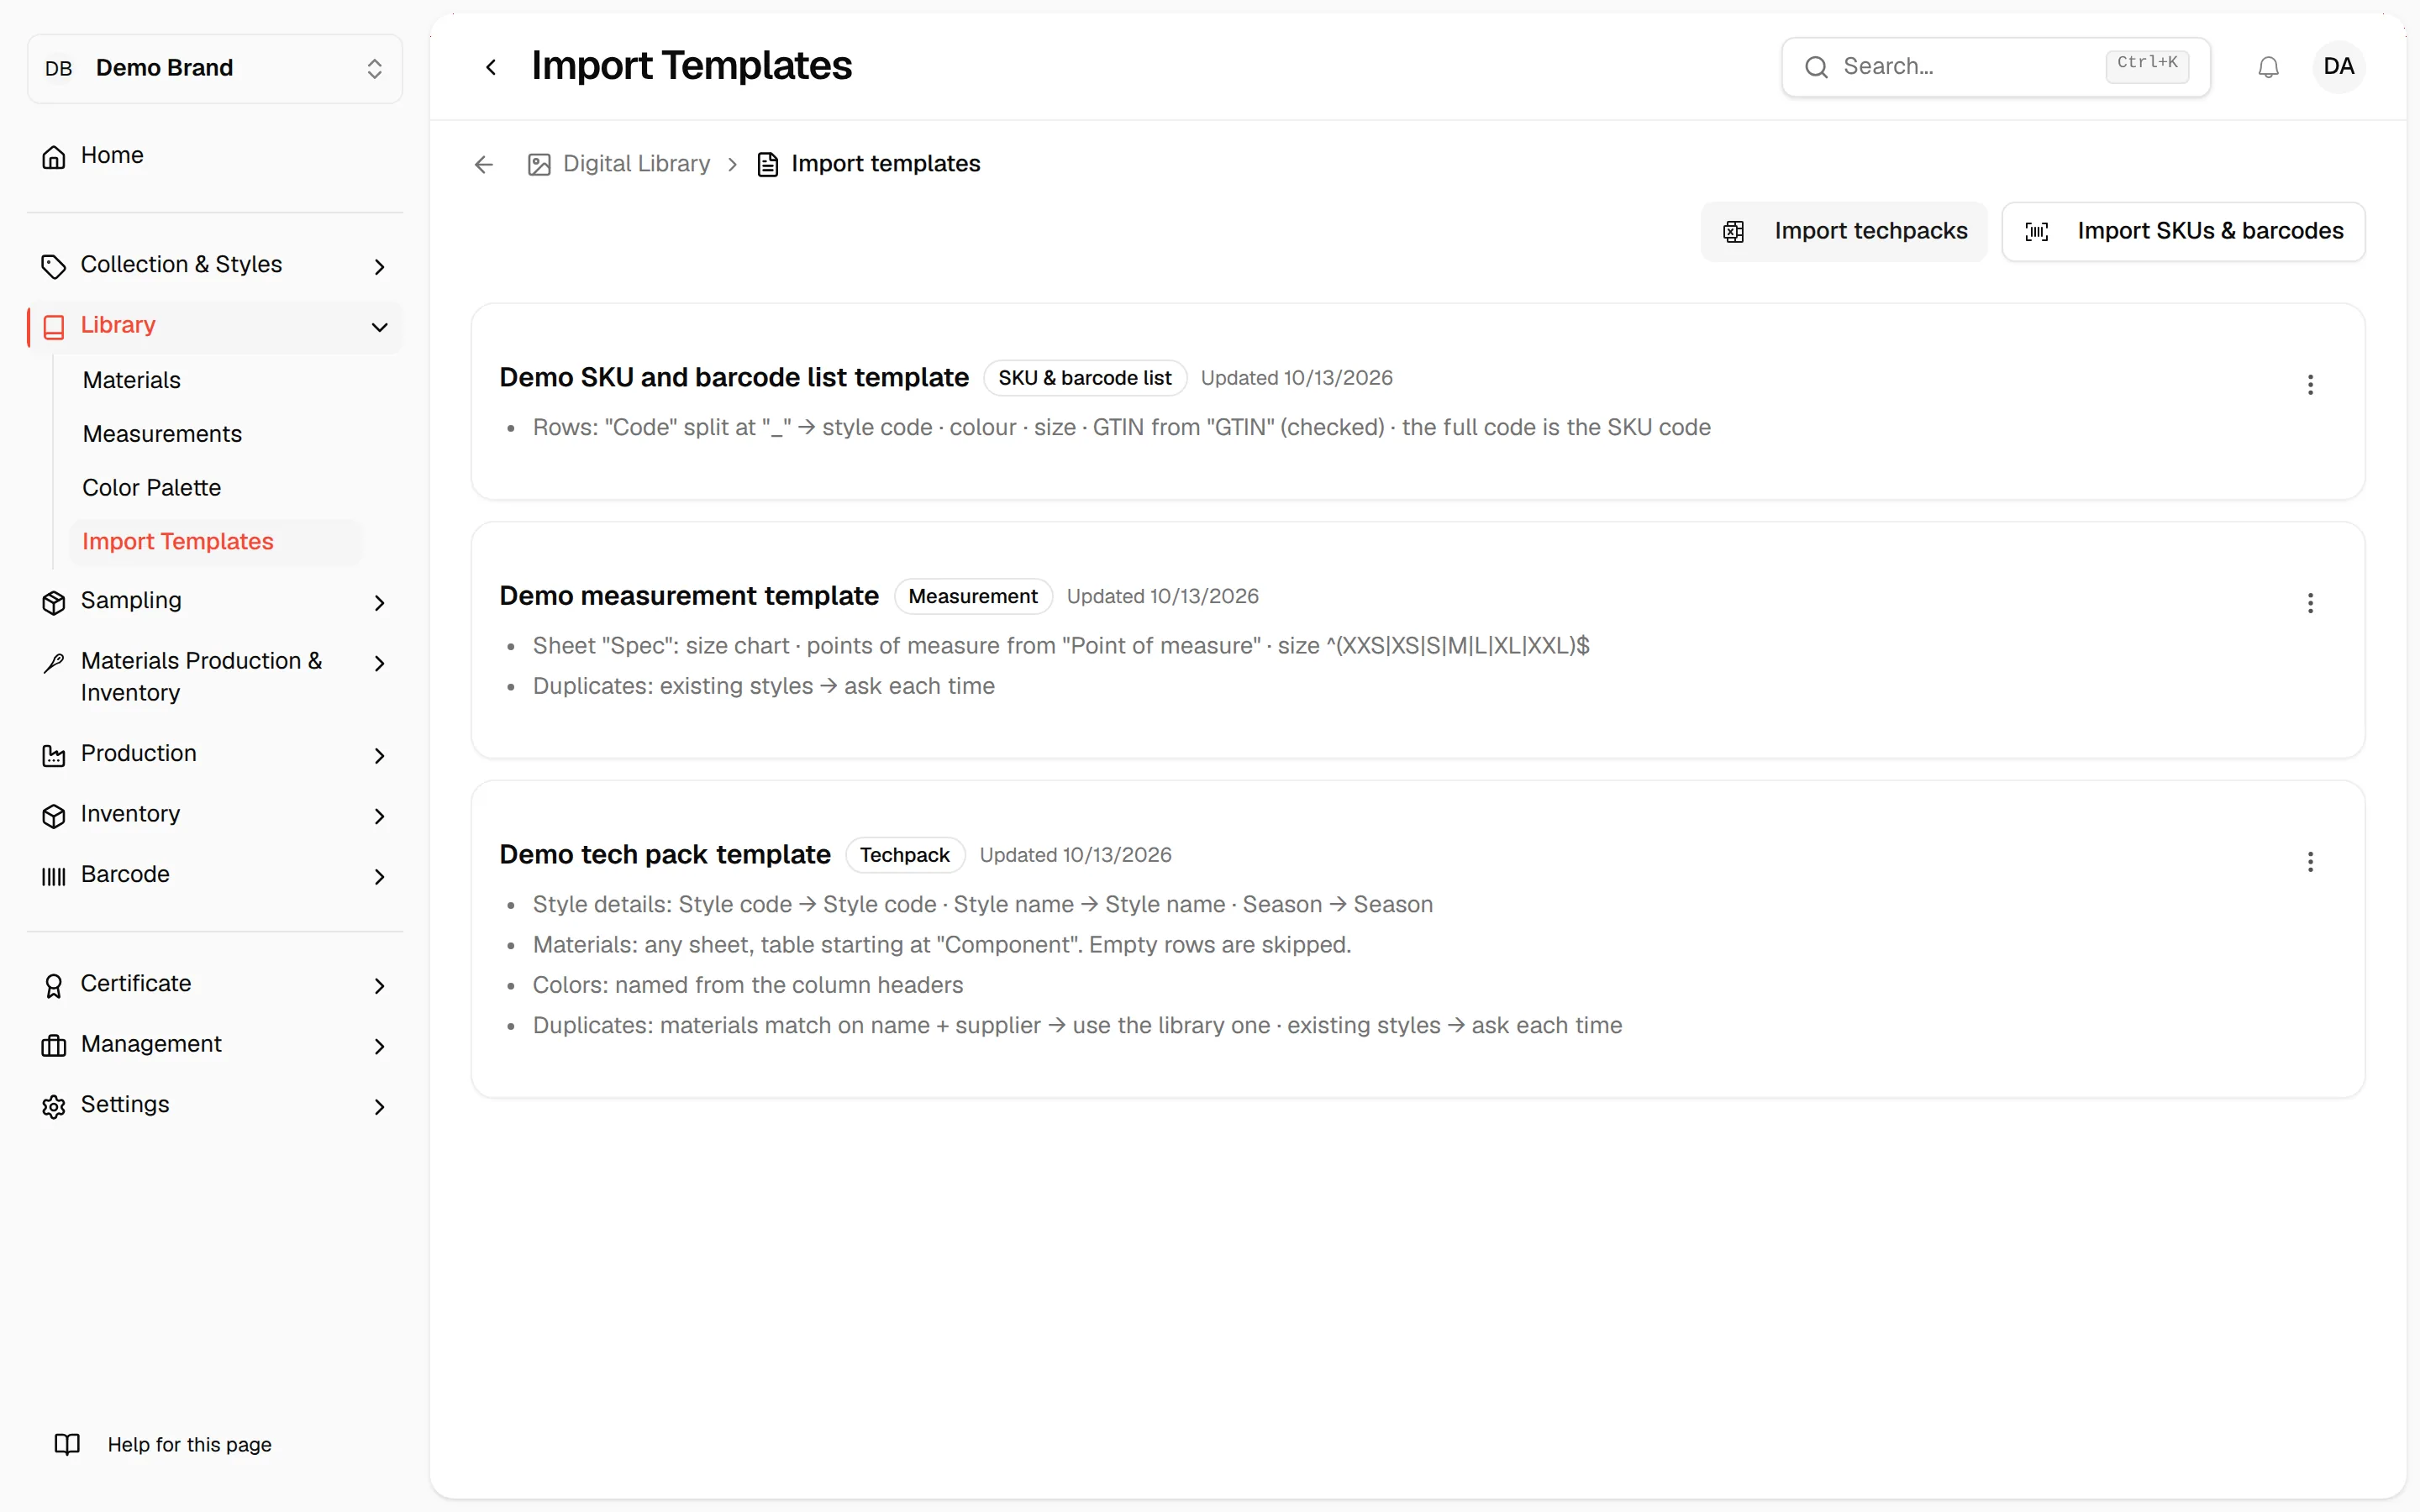
- Library → Import Templates: manage every saved template in one place, and start any of the three imports from here too
Sample files come with this guide so you can try the whole thing before using your own: sample-layout-a.xlsx, sample-layout-b.xlsx, sample-grading-rules.xlsx (a grading rules sheet, see Part 2), and sample-sku-list.xlsx.
Before you start
- Files must be
.xlsx. Older.xlsfiles, PDFs, and Google Sheets exports are not read. Save the file as.xlsxfirst if you need to. - You can drop up to 10 files at once when importing techpacks. They all start with the template you chose, and you can switch a single file to another template if it needs one.
- Have a collection ready before importing techpacks. Every style you bring in gets added to one collection.
- Don't see the buttons? Ask Vestis support to turn the feature on for your brand.
Part 1 — Techpacks
Vestis can read your techpack spreadsheets and turn them straight into styles: style details, materials, colourways, size chart and any sample fittings, all in one go. You start by choosing a template. The first time you bring in a new spreadsheet layout, you choose + New template and Vestis asks a few questions. After that, it remembers the layout as a template and every future file in that same format goes straight through.
Two example spreadsheets come with this guide, sample-layout-a.xlsx and sample-layout-b.xlsx, so you can try the whole thing yourself before using your own files.
Example 1: Layout A, the first time
Layout A is a typical single-style spec sheet, with a Design Sheet, a materials sheet called Content Sheet, a sample-fit sheet, and a graded size chart.
1. Choose a template, then upload
Go to Styles, click Import, then Techpacks. (You can also start from Library → Import Templates.)
The dialog opens with an empty Template field that says "Choose a template…". It lists every techpack template your brand has saved, plus a last option, + New template. Nothing is picked for you, and the drop zone says Choose a template first until you pick one.
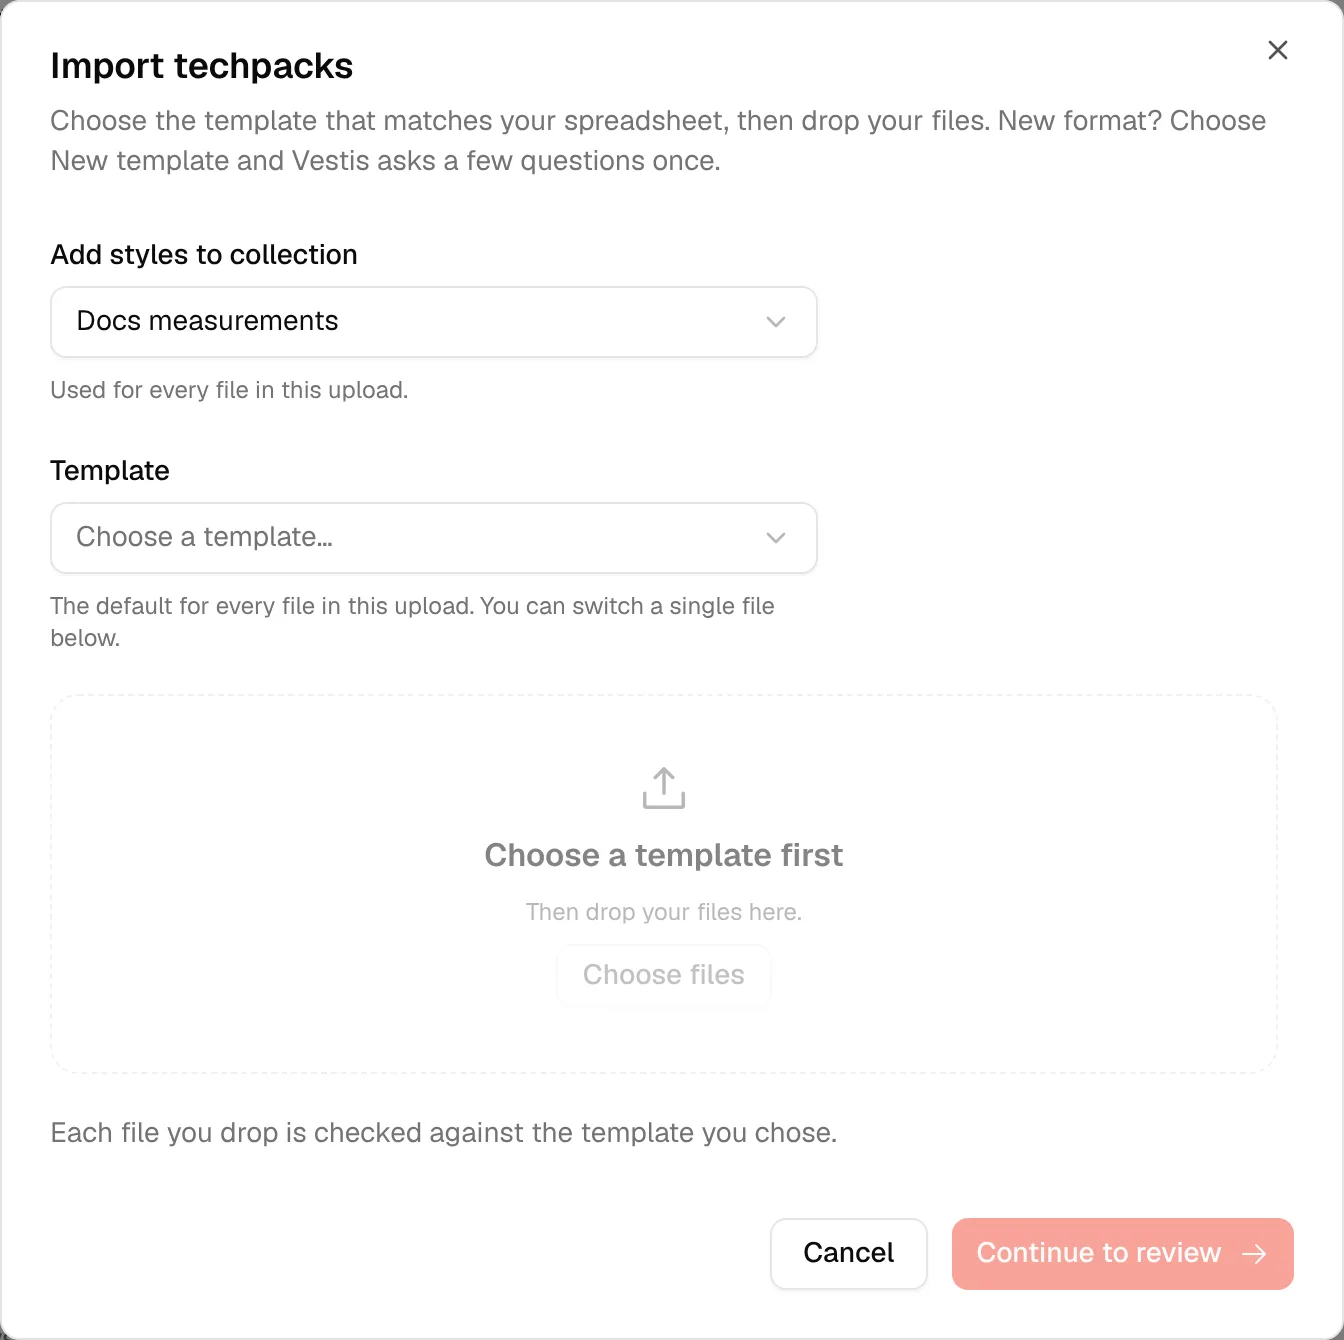
Pick a collection under Add styles to collection: this is used for every file in this upload. Then, under Template, choose + New template, since Vestis has never seen this layout. The drop zone unlocks. Drop sample-layout-a.xlsx in, or click Choose files.
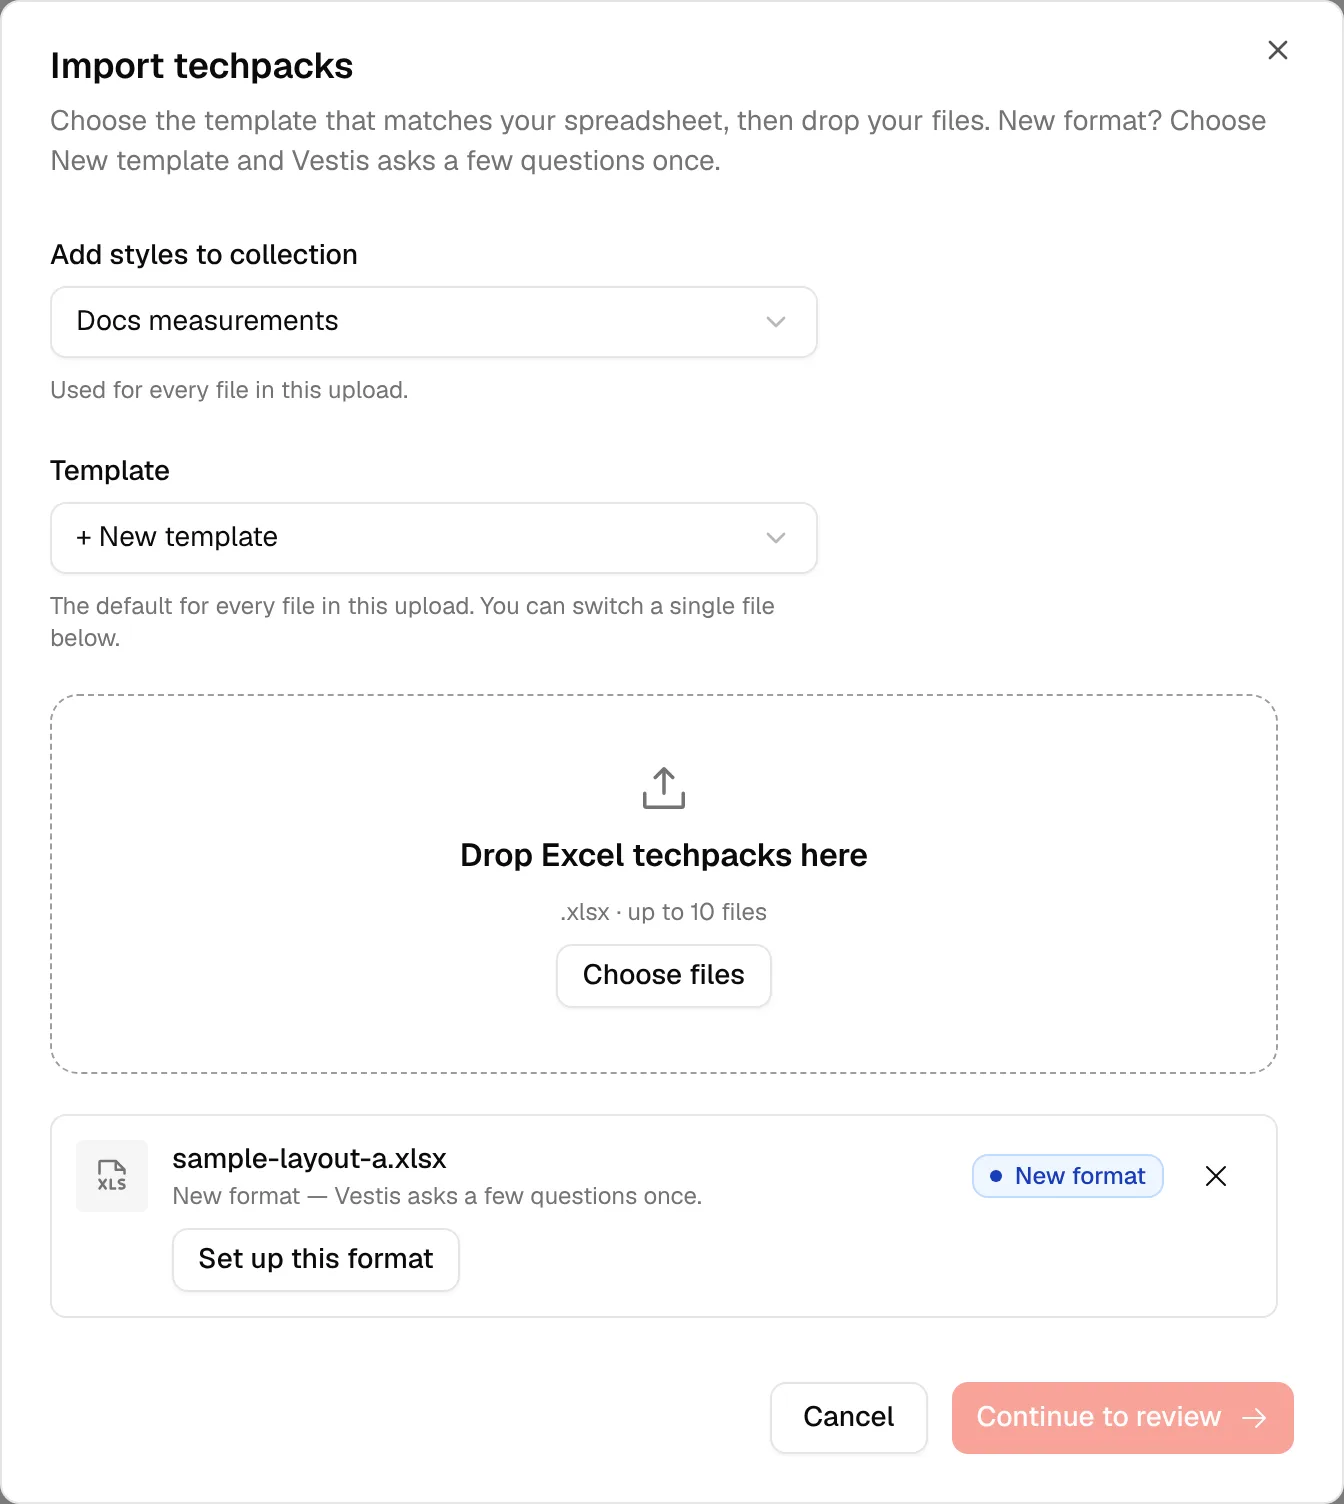
Each file you drop gets one status row. Because you chose + New template, this one says New format, with "Vestis asks a few questions once". Click Set up this format.
Good to know. Nothing is saved to Vestis yet. Uploading only reads the file so the next screen can show you the real spreadsheet.
2. Check what we found
This screen only shows up when you set up a new format (or choose to edit a template). Every answer is already filled in from the file, so you're checking them, not typing them from scratch.
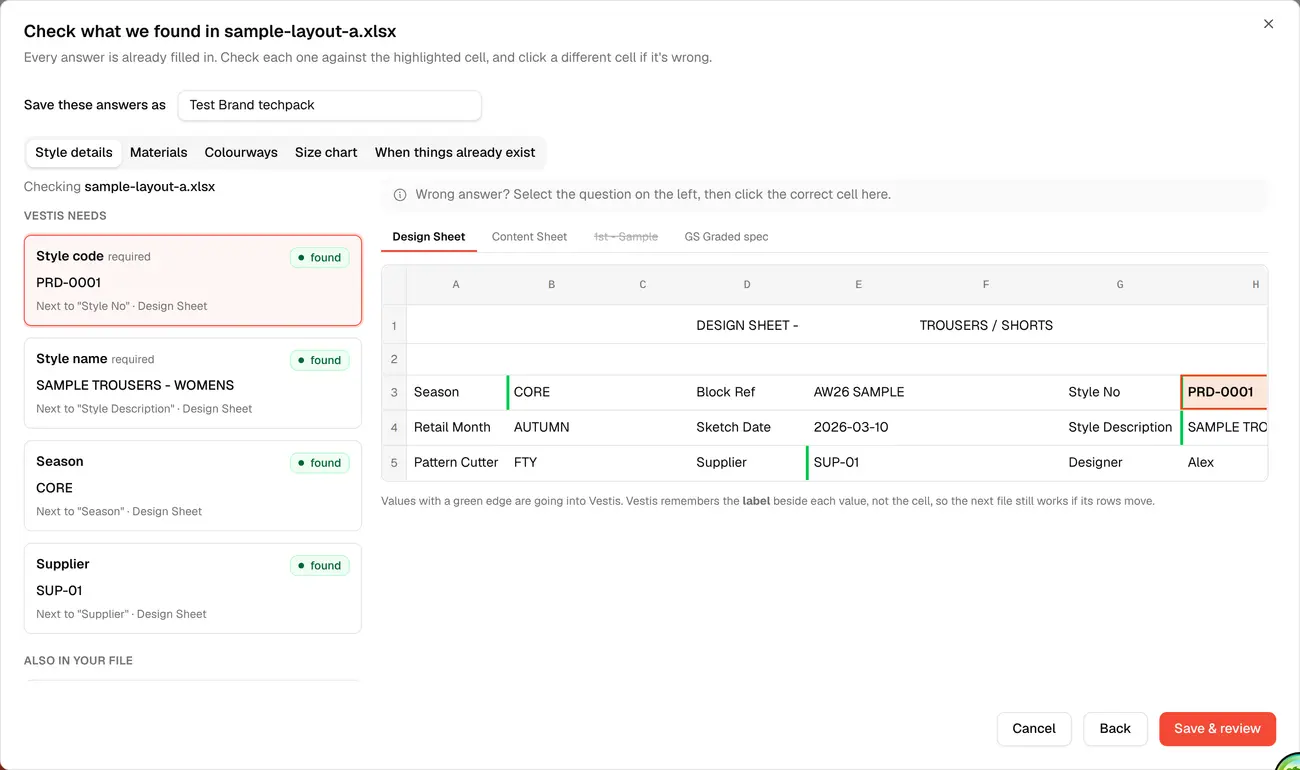
On the left, each question shows the answer Vestis found, and where it found it. For example, style code PRD-0001 was found "Next to 'Style No' · Design Sheet". On the right, the sheet itself, with the matching cell outlined.
If an answer is wrong, click the question on the left, then click the correct cell in the sheet on the right. Vestis remembers the label next to the value, not the cell it sits in, so if next month's file shifts everything down a row, it still finds the right answer.
Underneath the required questions is Also in your file: anything else Vestis spotted that isn't required. Each one has a Save to choice (which field on the style it goes to) or Don't import.
At the top, name this set of answers under Save these answers as. Use a name for the file format, like "Layout A techpack", not the file's own name. This is the name you'll pick from a list every time you use this layout again, so pick a name you'll remember later. We'll call it Layout A techpack.
There are five tabs here. Style details is the first, and the other four are below.
Materials
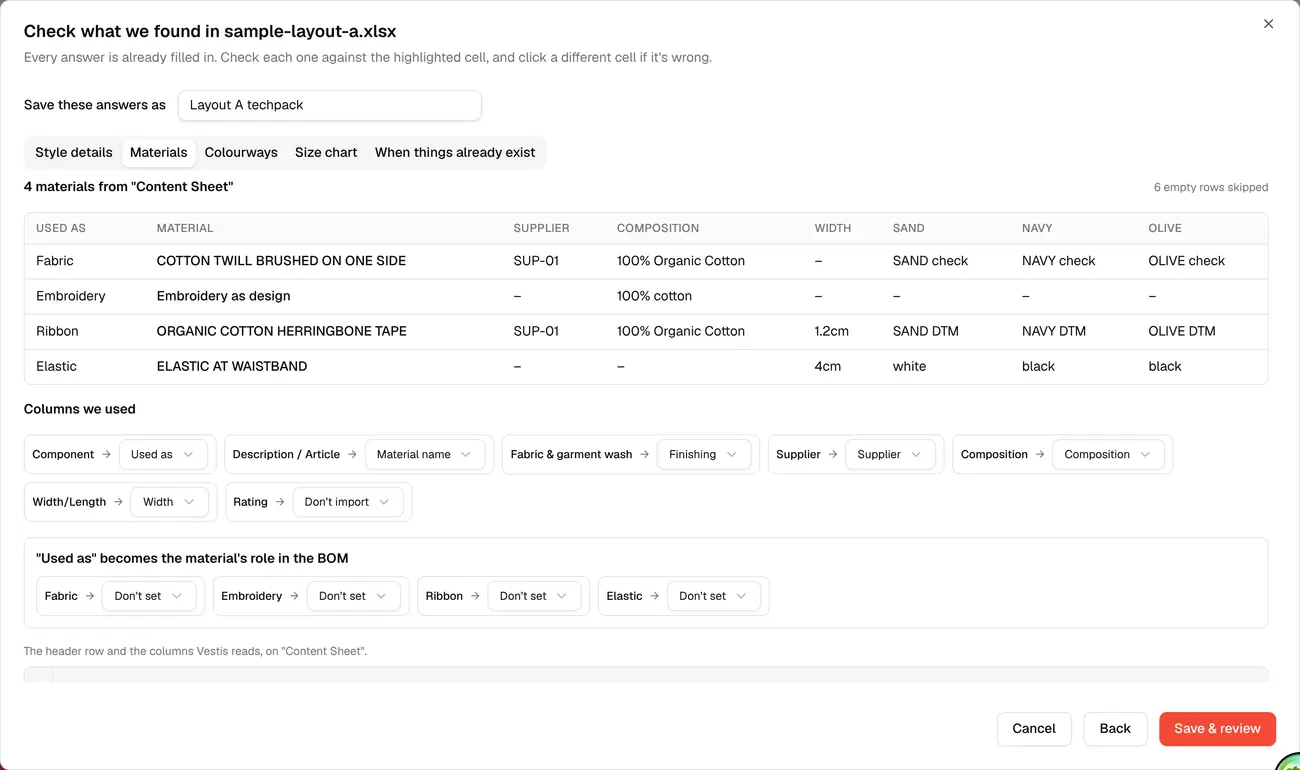
This shows the materials table Vestis found on the sheet, with the columns lined up: material name, supplier, composition, width, and one column per colourway. Rows with nothing in them are skipped automatically and counted at the top.
Columns we used shows exactly which column in your file became which column in Vestis. If Vestis picked the wrong column, change it here. You don't need to re-upload.
Further down, "Used as" becomes the material's role in the BOM lets you set a Material Type for each different value in the "Used as" column (Fabric, Ribbon, Elastic, and so on), so every material lands in the right part of the bill of materials.
Colourways
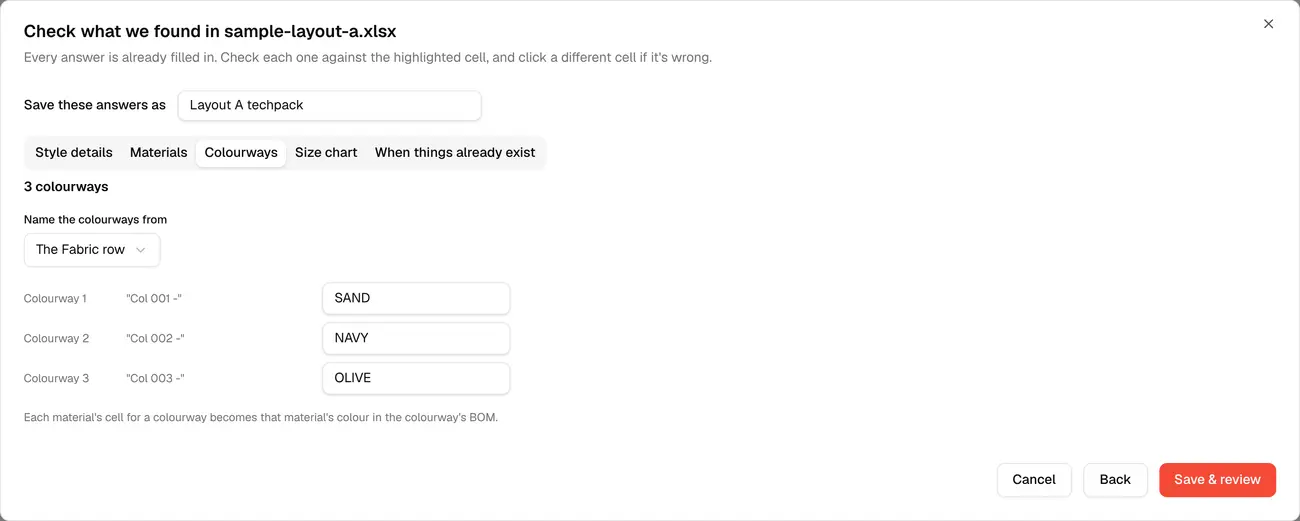
Under Name the colourways from, choose where the colourway names come from:
- The Fabric row: reads the names off the main fabric's row (this is what Layout A uses: "SAND check", "NAVY check", "OLIVE check" become "SAND", "NAVY", "OLIVE")
- The column headers: reads the names straight from the column headings
- I'll type them: you type fixed names once, and every file with this template uses those same names, whatever its own file calls them
You can rename any colourway here before saving. Each material's cell under a colourway becomes that material's colour in that colourway's bill of materials.
Measurements
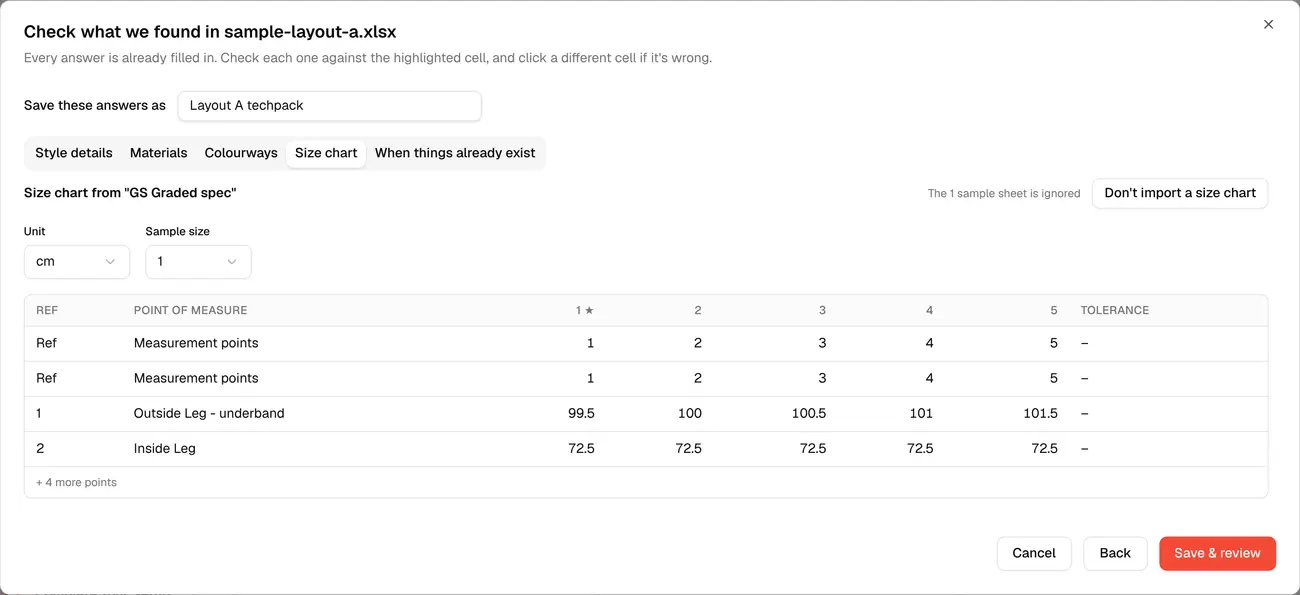
Vestis found the size chart on the "GS Graded spec" sheet: five sizes, points of measure, and a tolerance column. Check Unit (cm or inches) and which size is the Sample size: this is the size the grading is built from.
Good to know. Layout A's techpack also has a sample-fit sheet ("1st - Sample"), so this tab is really called Measurements, with a card for the size chart and a card for the sample fitting — see "Measurements from your techpack" further down for what that looks like. A file with only a graded sheet and nothing else keeps the plain Size chart tab shown above.
When things already exist
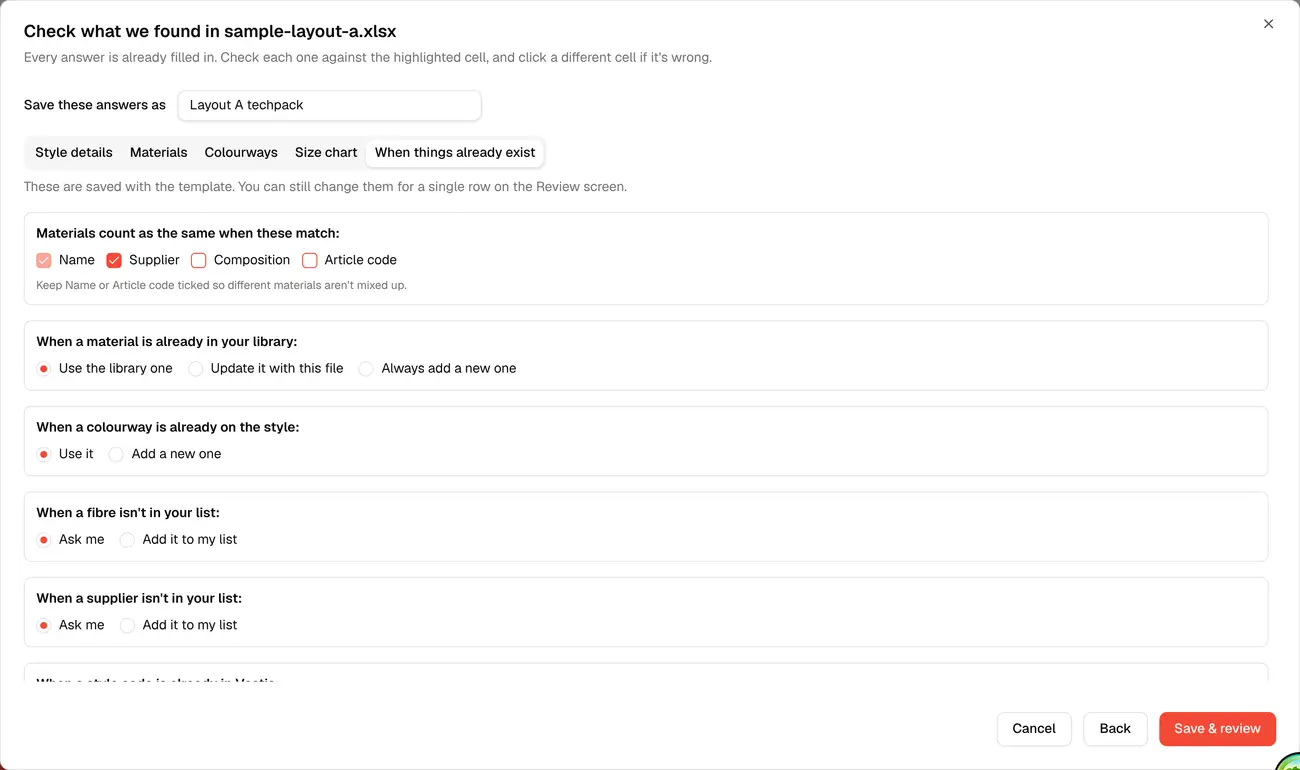
These choices are saved with the template, so you only set them once. You can still change any of them for a single file on the Review screen later.
- Materials count as the same when these match: tick which fields (Name, Supplier, Composition, Article code) decide whether a material in the file is the same one already in your library. Keep Name or Article code ticked, or different materials can get mixed up.
- When a material is already in your library: use the library one, update it with the file, or always add a new one. Use the library one is the safest default.
- When a colourway is already on the style: use it, or add a new one.
- When a fibre isn't in your list: ask you each time, or add it automatically.
- When a supplier isn't in your list: same choice, for suppliers.
- When a style code is already in Vestis: ask each time (recommended so you always see what's changing), update it, or skip it automatically.
When you're happy, click Save & review.
3. Review
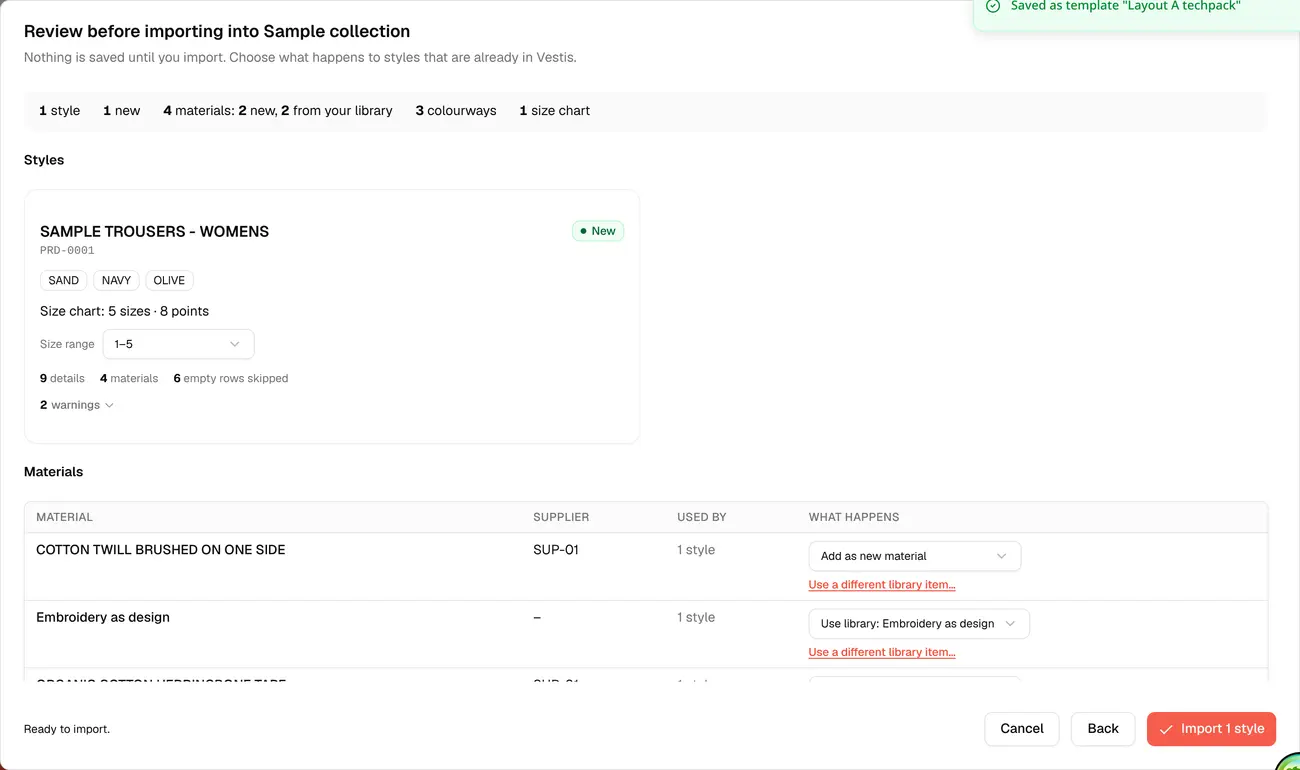
The top bar sums up the whole file: how many styles, how many are new versus already in Vestis, how many materials are new versus already in your library, colourways, and the size chart.
Each style shows its colourways, its size chart size, and how many details, materials, and warnings it has. Warnings are worth a look before importing, but they don't block anything. They're calling out a detail to double-check, like a column that didn't quite line up.
The Materials table below shows what happens to each material: added as new, matched to something already in your library, or matched to a fibre or supplier that needs a decision. Use Use a different library item… if Vestis matched the wrong thing.
When the footer says Ready to import., click Import 1 style.
4. Import
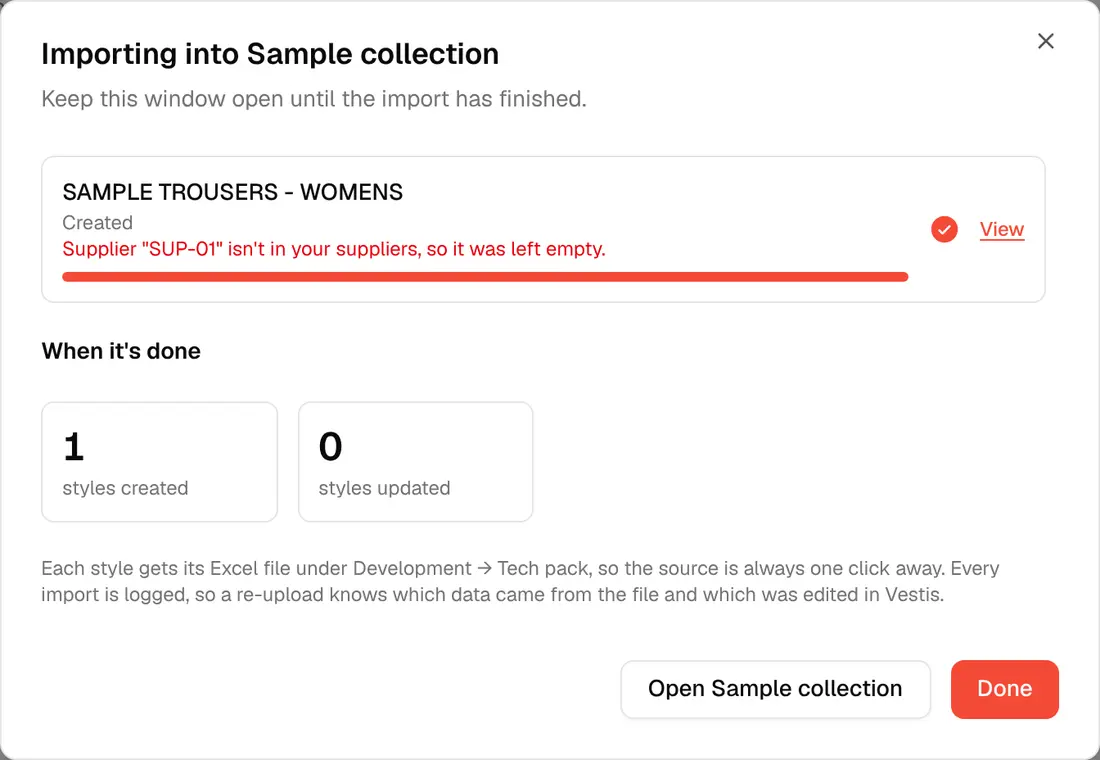
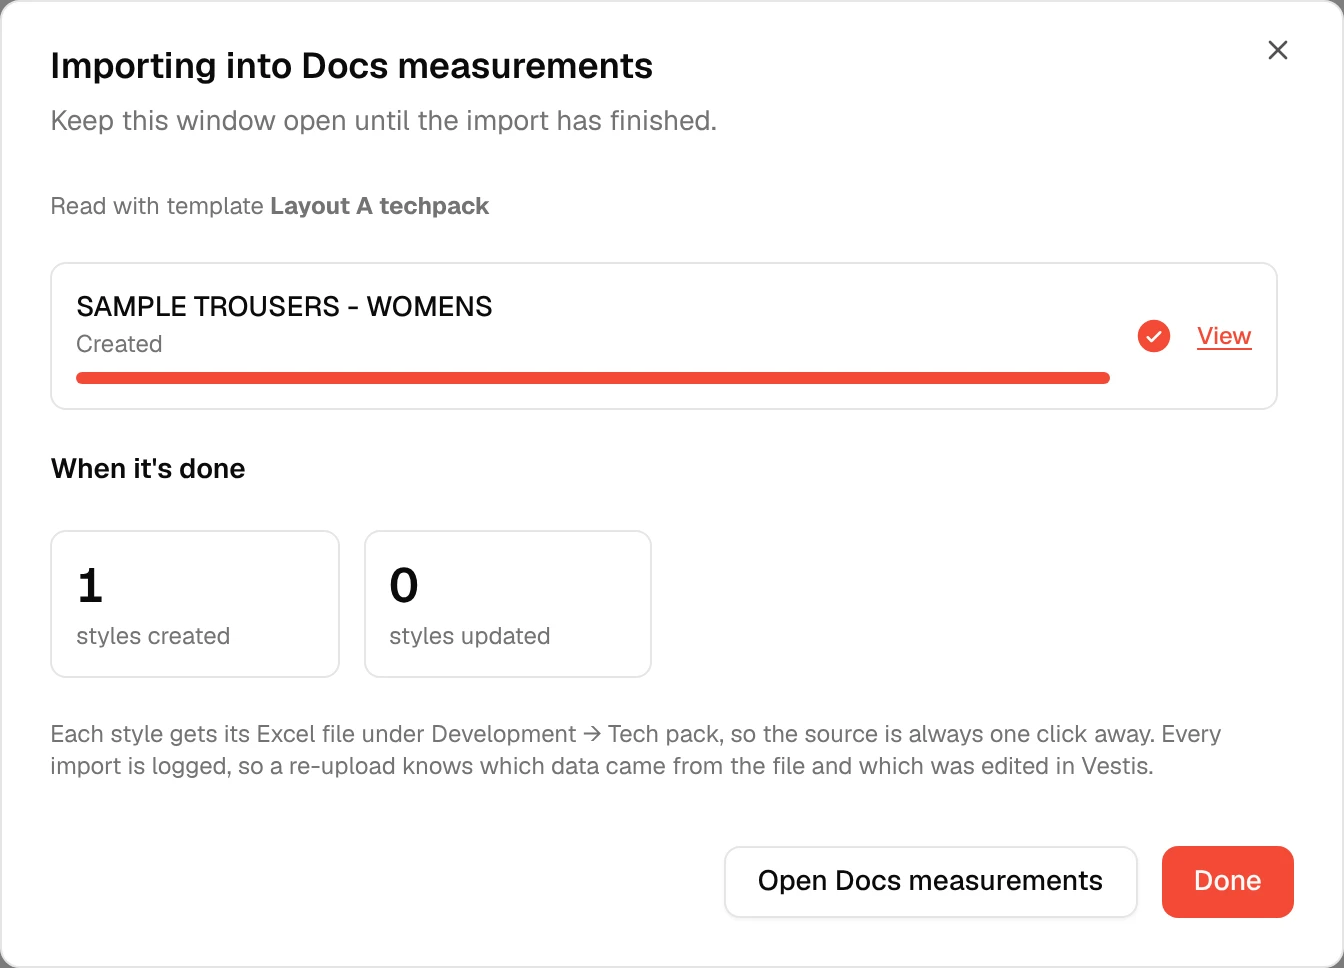
Keep this window open until it says done. Each style gets a View link straight to itself. Underneath, a short note: every style gets its Excel file attached under its Development tab, so the source file is always one click away. Every import is logged too, so a re-upload later knows exactly which data came from the file and which you changed by hand in Vestis.
Good to know. A line in red under a style is a note, not a failed import. In the picture above, the supplier "SUP-01" isn't in your supplier list yet, so the style was created with the supplier left empty. Add the supplier in Vestis, then import the file again with Update to fill it in.
Where to find it on the style
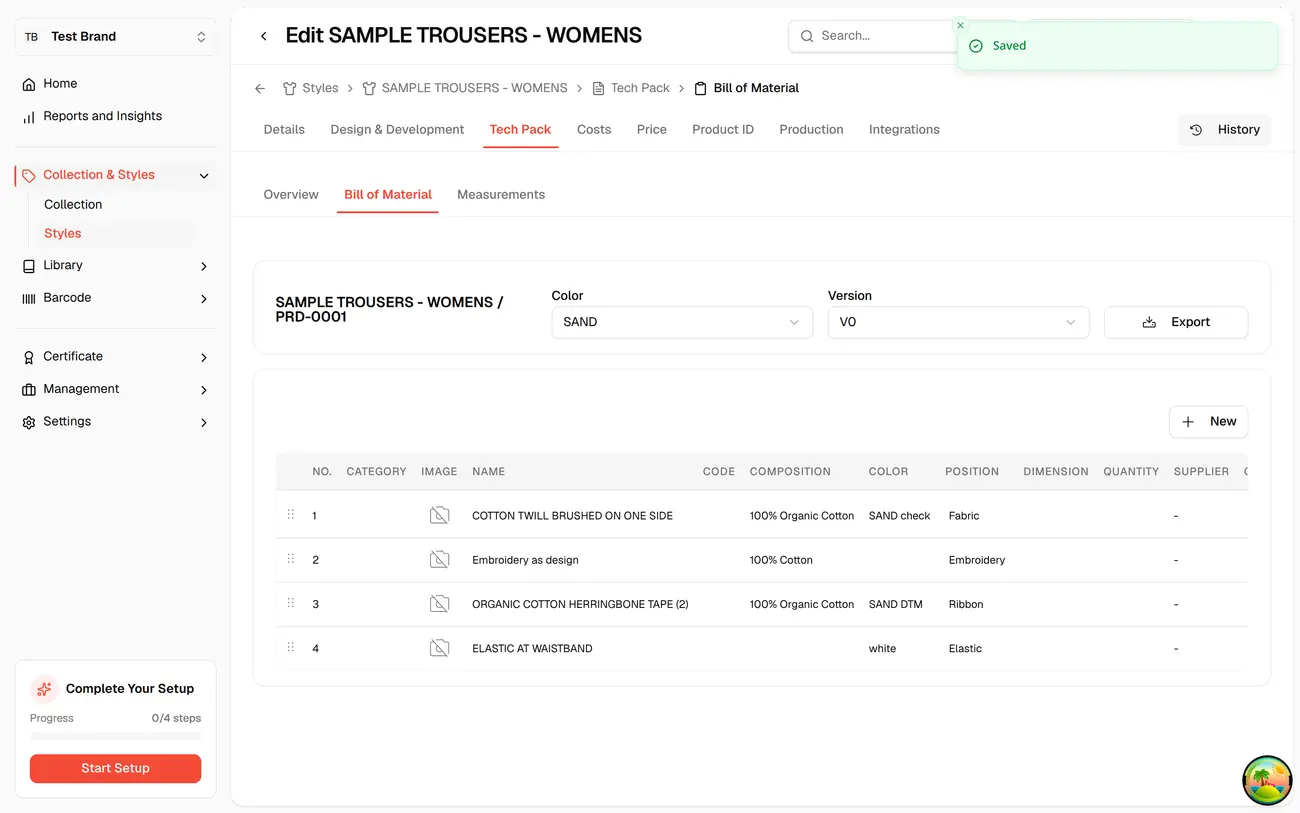
Materials and colourways land on Tech Pack → Bill of Material. Pick a colourway from the dropdown to see its version of the BOM.
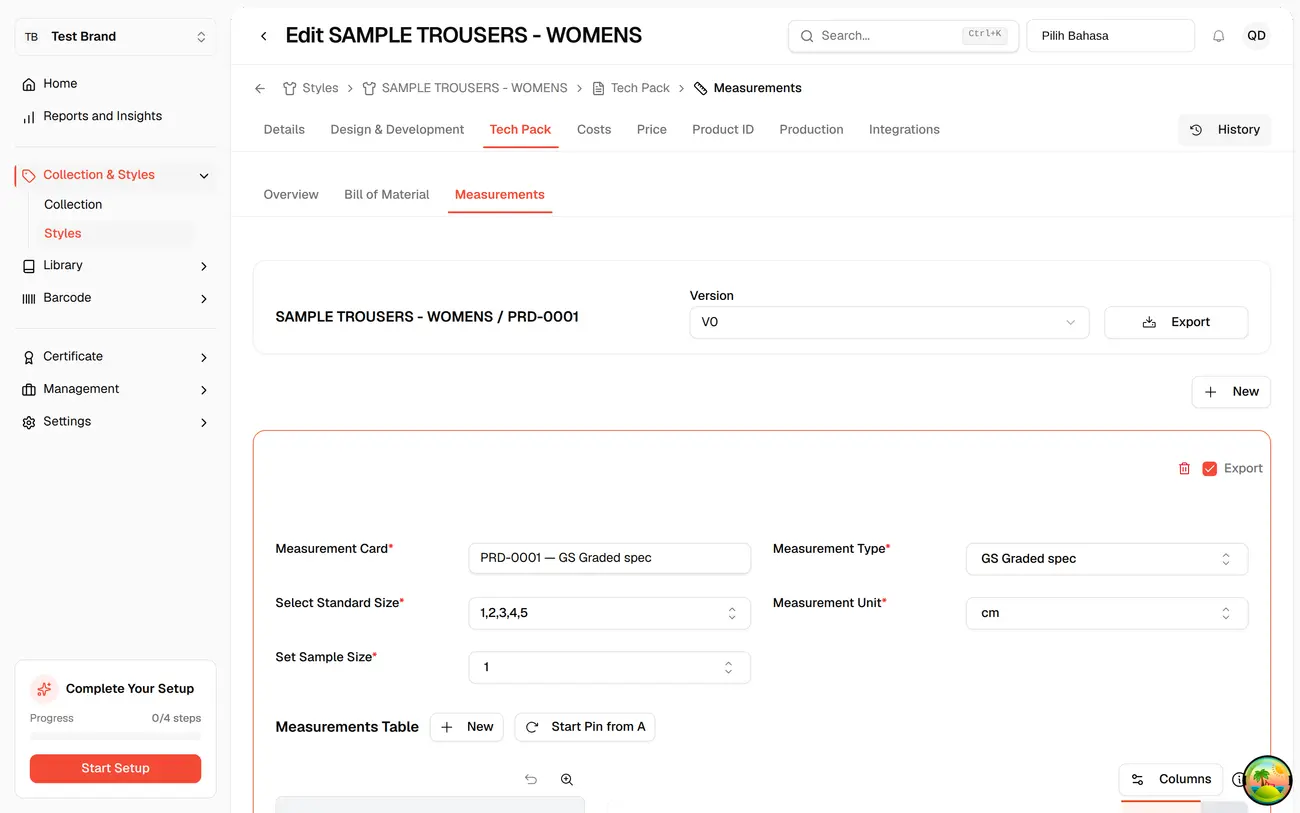
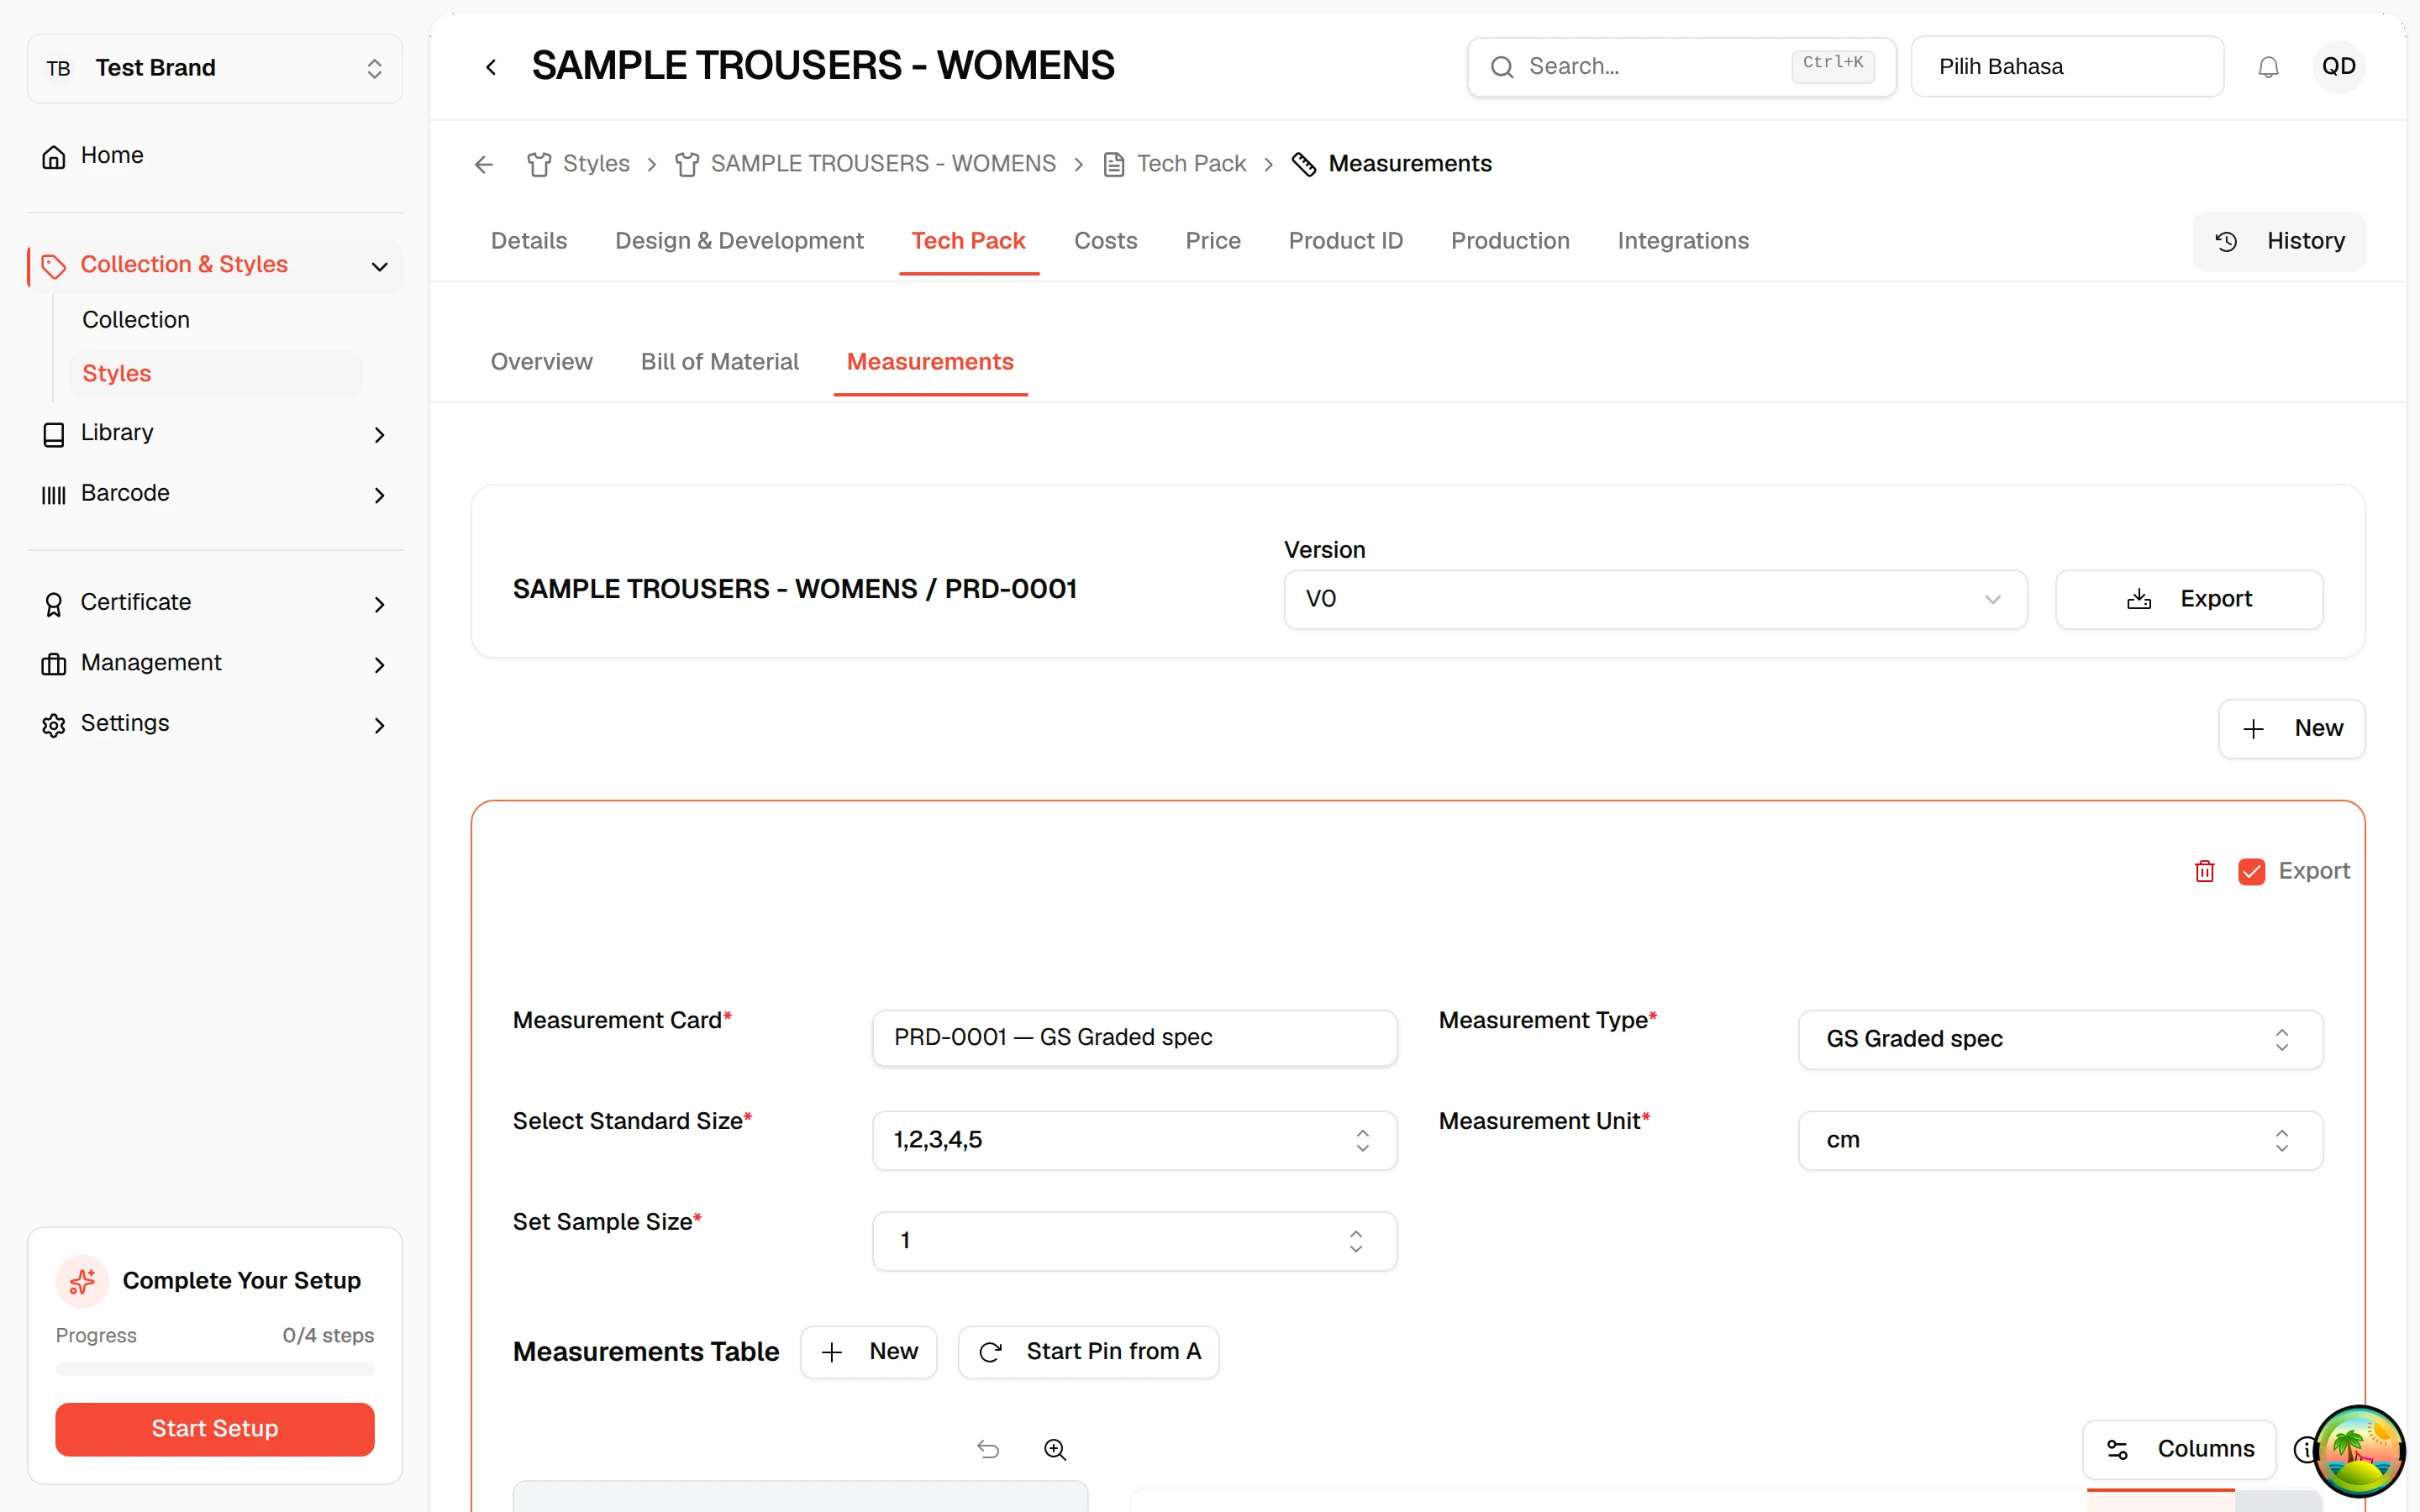
The size chart lands on Tech Pack → Measurements.
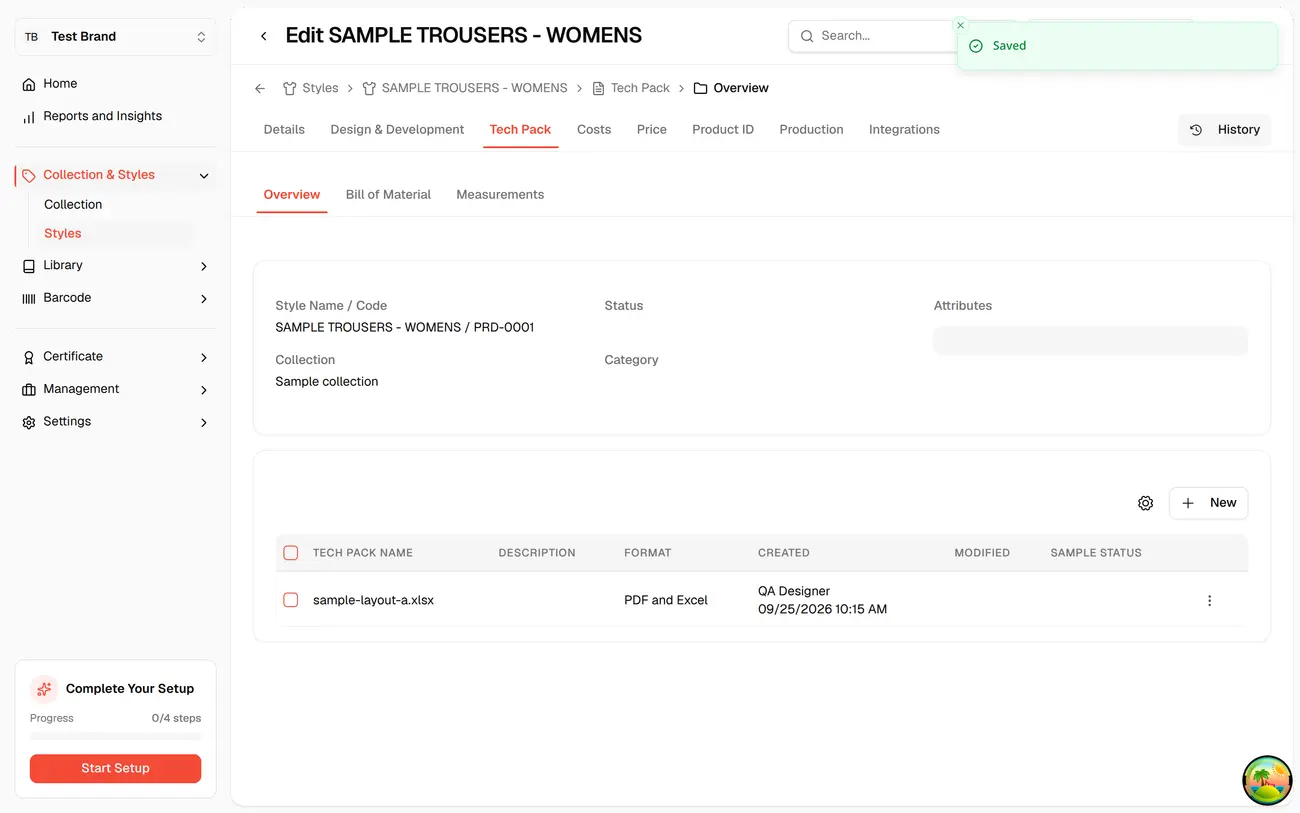
The original Excel file lands on Tech Pack → Overview, listed as a Tech Pack file you can open any time.
Measurements from your techpack
A techpack usually carries more than one measurement sheet: the graded size chart, plus a sheet for each sample fitting round (a first sample, a photo sample, and so on). Vestis reads every one of them. Every measurement sheet in your file becomes its own measurement card on the style, so a first sample's numbers sit right next to the size chart they're being checked against, not buried in a separate file.
| Sheet in your Excel | What Vestis makes | Where you find it |
|---|---|---|
| "GS Graded spec" (or any sheet with a full size range) | A size chart card | Tech Pack → Measurements |
| "1st - Sample" | A sample fitting card, for that one round | Tech Pack → Measurements |
| "Photo - Sample", "SMS - Sample" | One more sample fitting card each | Tech Pack → Measurements |
| "Sample request 1" (a label : value layout's sample sheet) | A sample fitting card, size read from the sheet's own "Sample size" line | Tech Pack → Measurements |
| A cover page, a colour list, anything with no measurement table | Nothing — skipped | — |
1. Upload, then check the Measurements tab
Upload your techpack the same way as any other: choose a template (or + New template for a layout Vestis hasn't seen), then drop the file in (see Example 1 above). When you set up a new format, the Check what we found screen has a Measurements tab alongside Style details, Materials and Colourways.
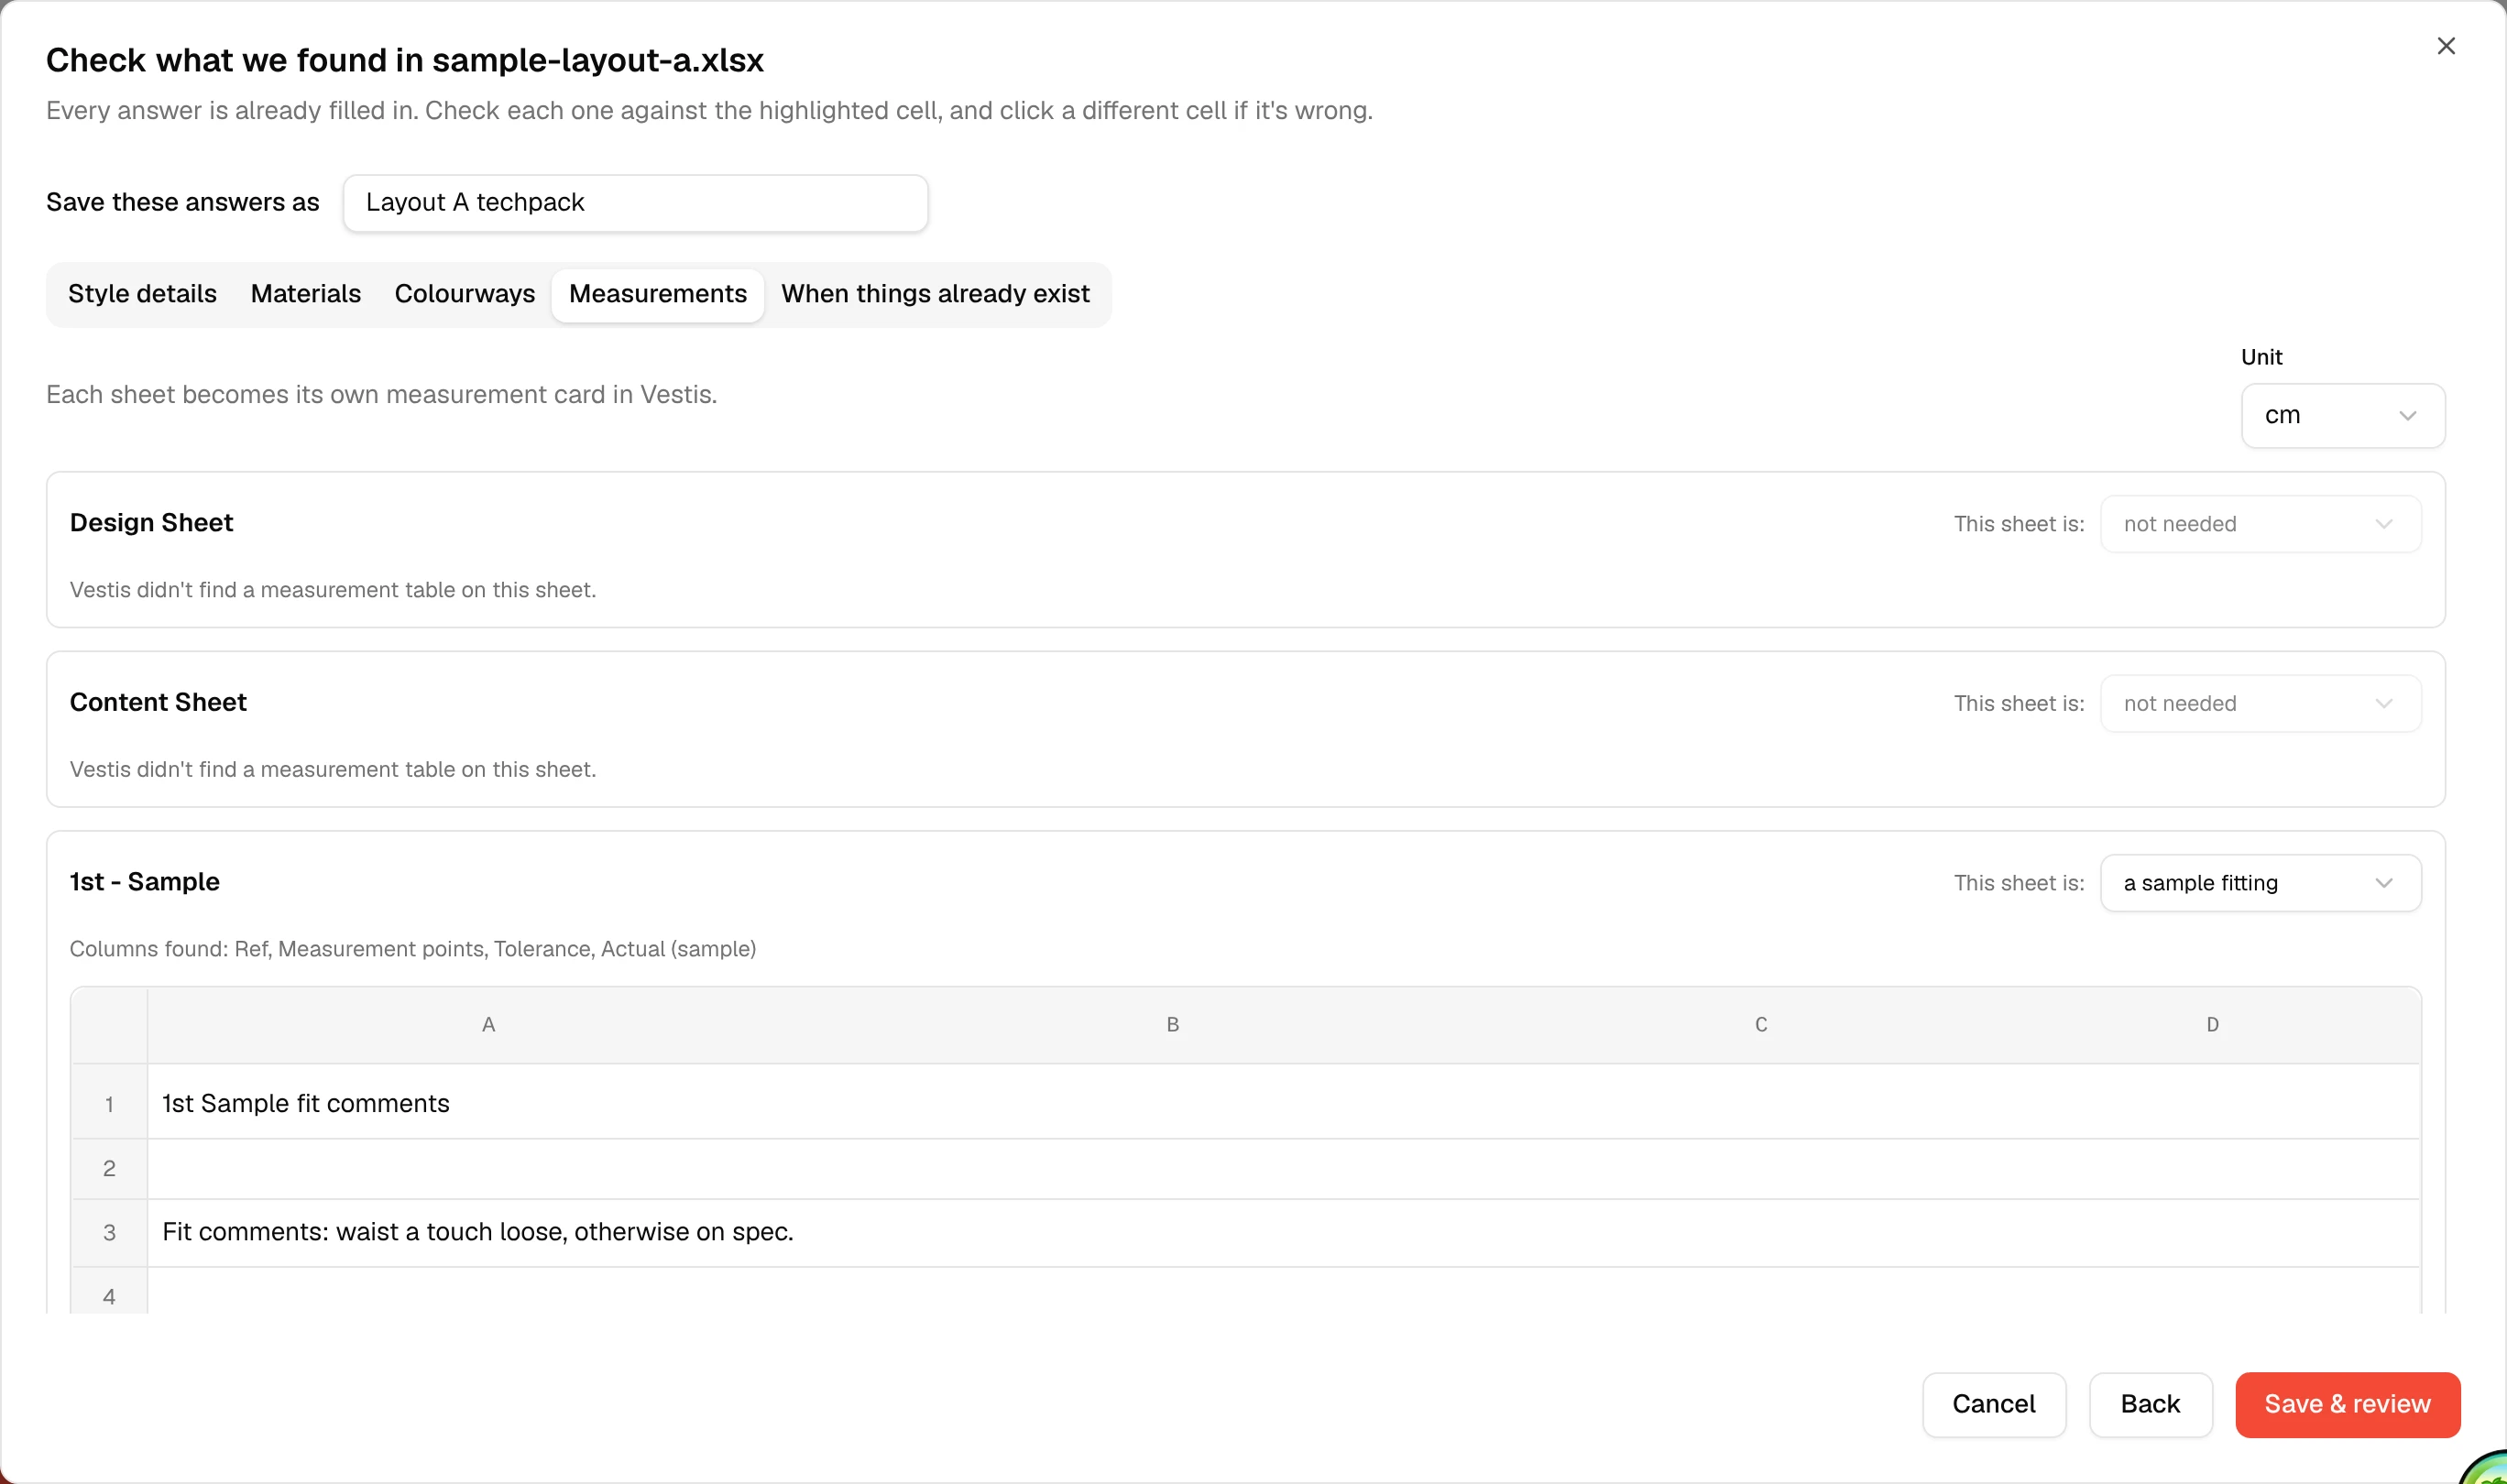
Every sheet in the file gets its own card here, and This sheet is: says what Vestis thinks it holds:
- a size chart: the full size range with target measurements — this is the sheet Tech Pack → Measurements builds its main card from.
- a sample fitting: one fitting round, like a first or second sample. Vestis reads the size the garment was actually cut to (from the cell above the value column, or from a "Sample size" line on a label:value sheet), plus every point of measure and its actual value.
- grading rules: how each measurement changes from one size to the next, instead of full numbers.
- a guide: instructions or a diagram for another sheet.
- not needed: nothing to bring in — Design Sheet and Content Sheet default to this, since neither has a measurement table.
Scroll down and the graded sheet shows up as its own card, read exactly the way the old size-chart-only import always read it: sizes, points of measure, tolerance, and the sample size.
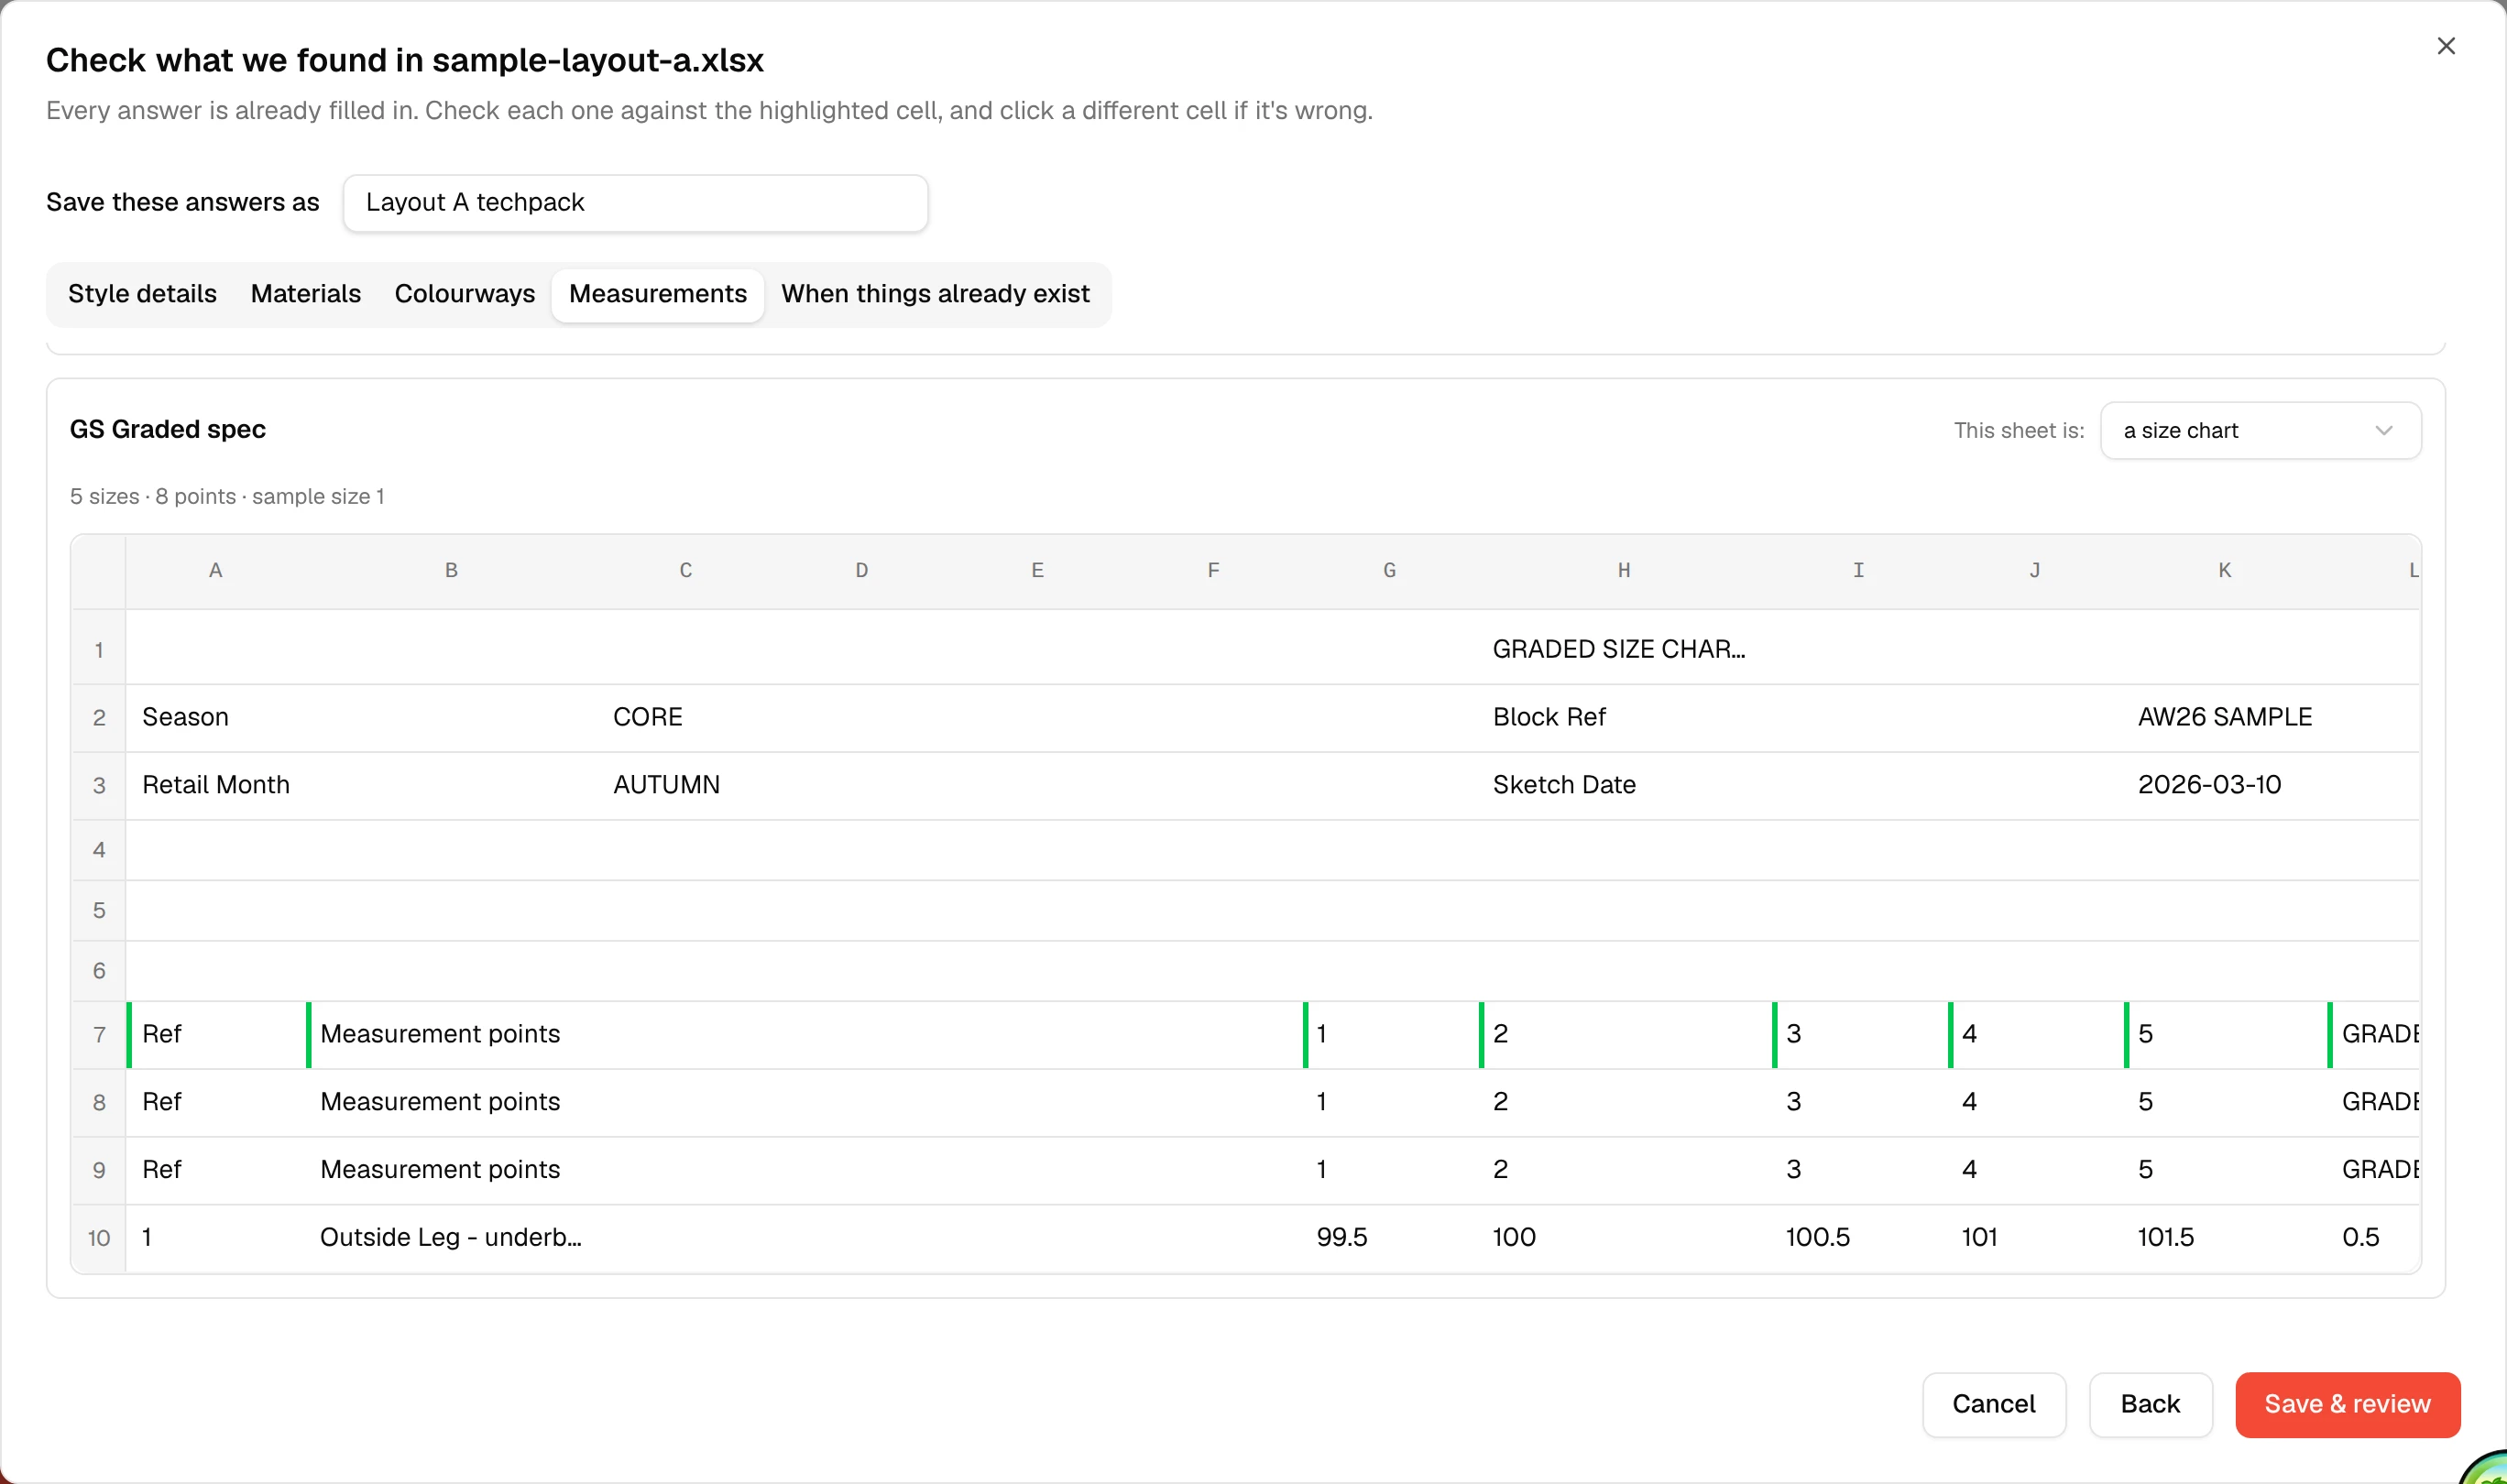
Unit (cm or inches) sits once at the top of the tab and applies to every card on this sheet, the same as it always has for the size chart alone.
2. Review
The Review screen's style card sums up every measurement sheet the file carries in one line:
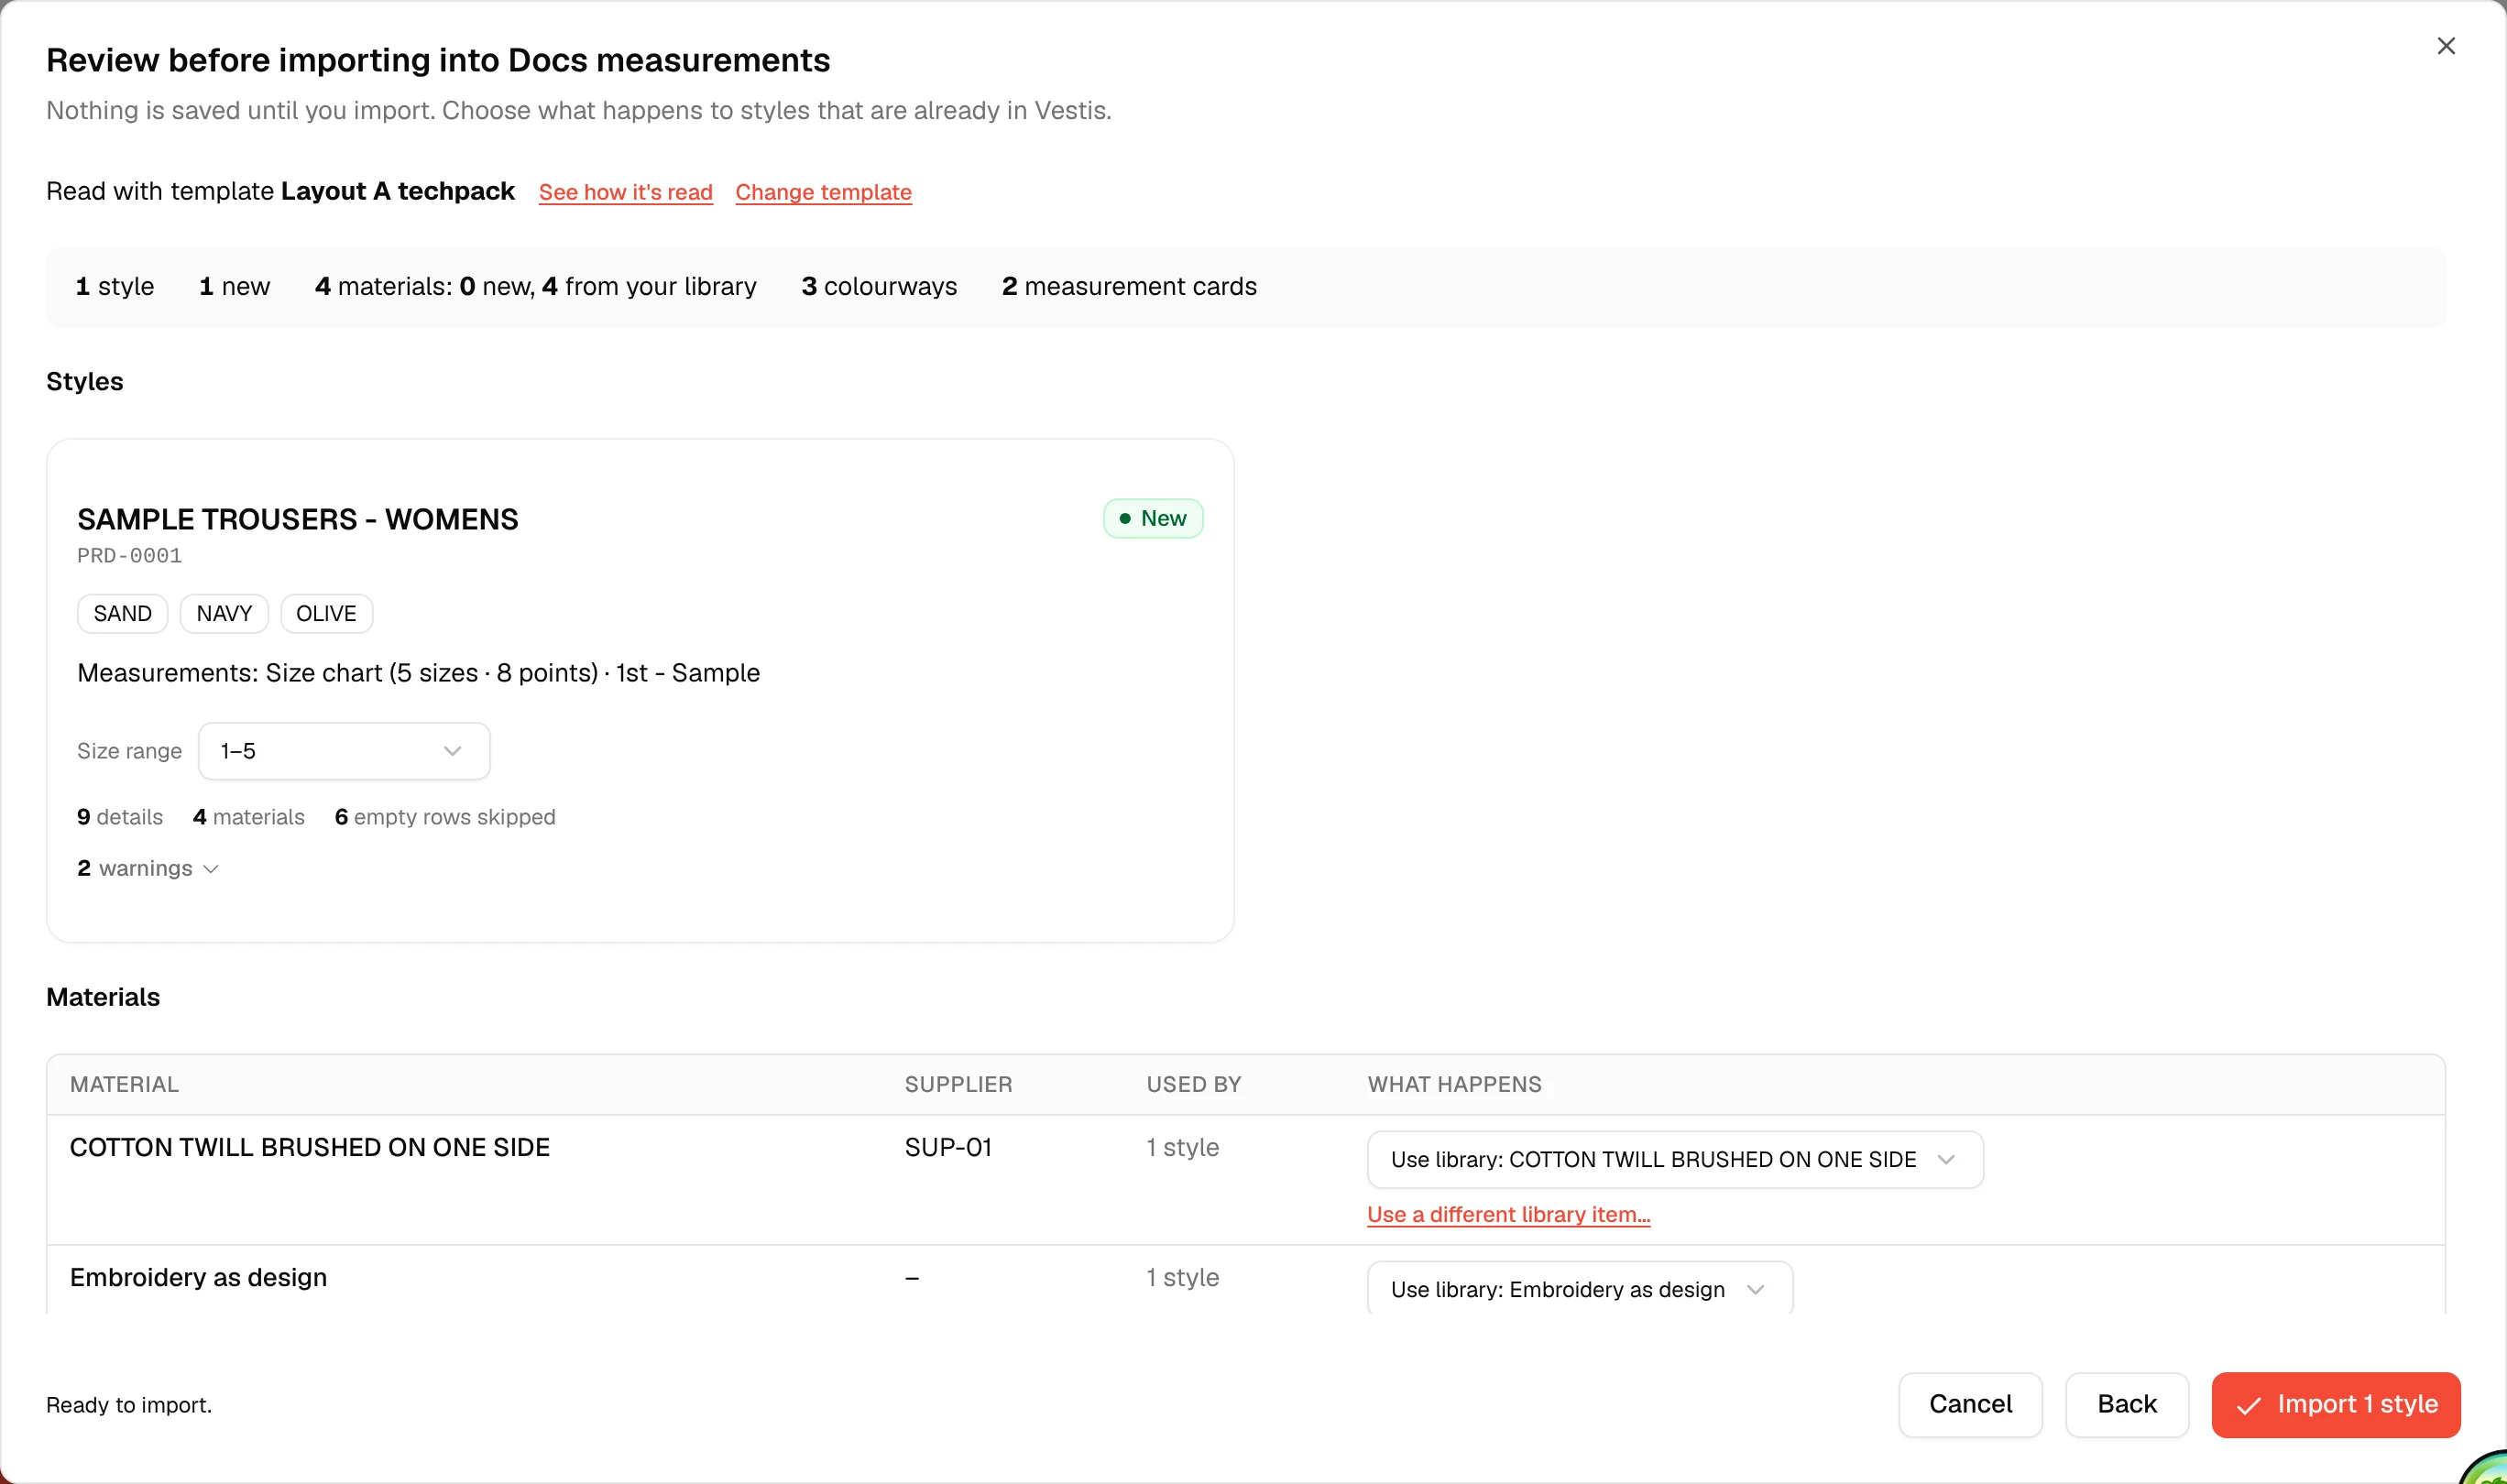
Measurements: Size chart (5 sizes · 8 points) · 1st - Sample — the size chart plus every sample fitting sheet, all in the count. Click Import 1 style when you're happy.
3. Where the cards land
Every measurement sheet lands on the style's Tech Pack → Measurements tab, each as its own card. Pick a card from the Measurement Card dropdown to switch between them.
The size chart card looks exactly as it always has: sizes across the top, one row per point of measure.
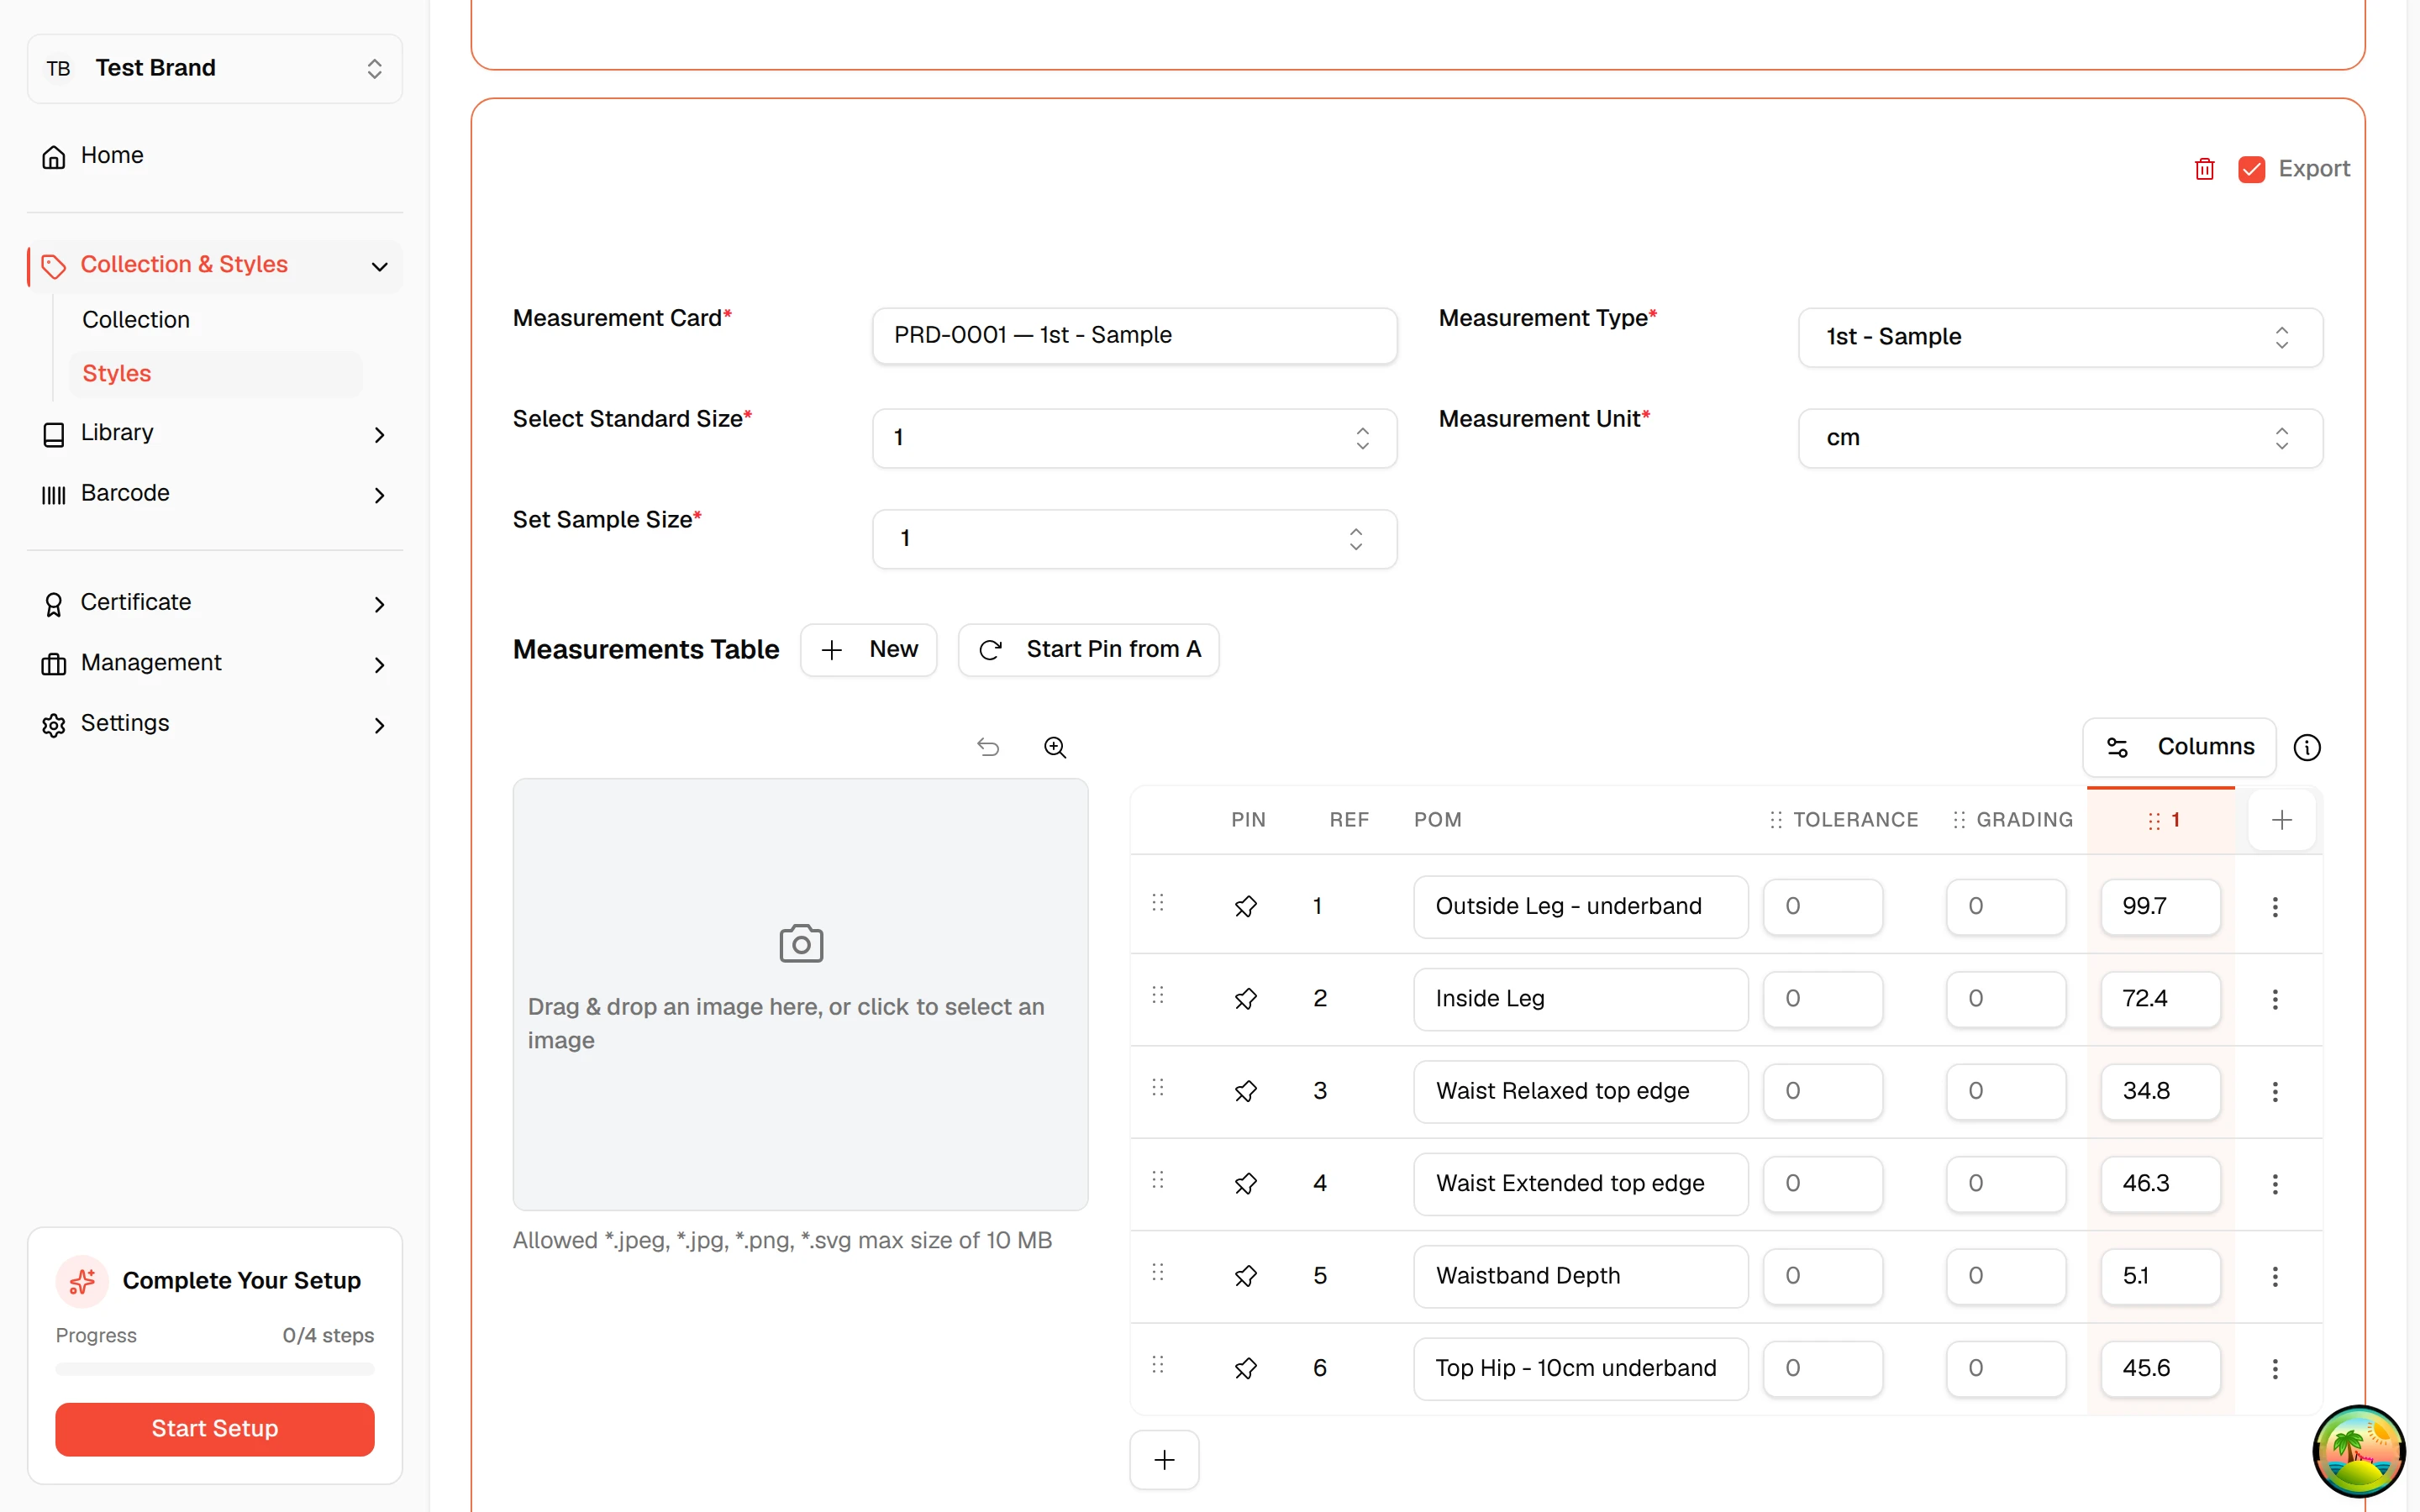
A sample fitting card shows one column instead of a size range: the size the sample was actually cut to (here, size 1), with the point of measure and the value that was actually measured on the garment.
These measurement cards only live on the style's Tech Pack tab. They don't show up in Library → Measurements — that library is for measurement workbooks kept on their own, without a style attached (see Part 2).
Next time
A re-upload of the same file, or the next round's file in the same layout, updates the same cards instead of creating new ones. Anything you've edited by hand on a card — fixing a typo, adding a note the file doesn't have — is kept if the file's re-import doesn't mention it:
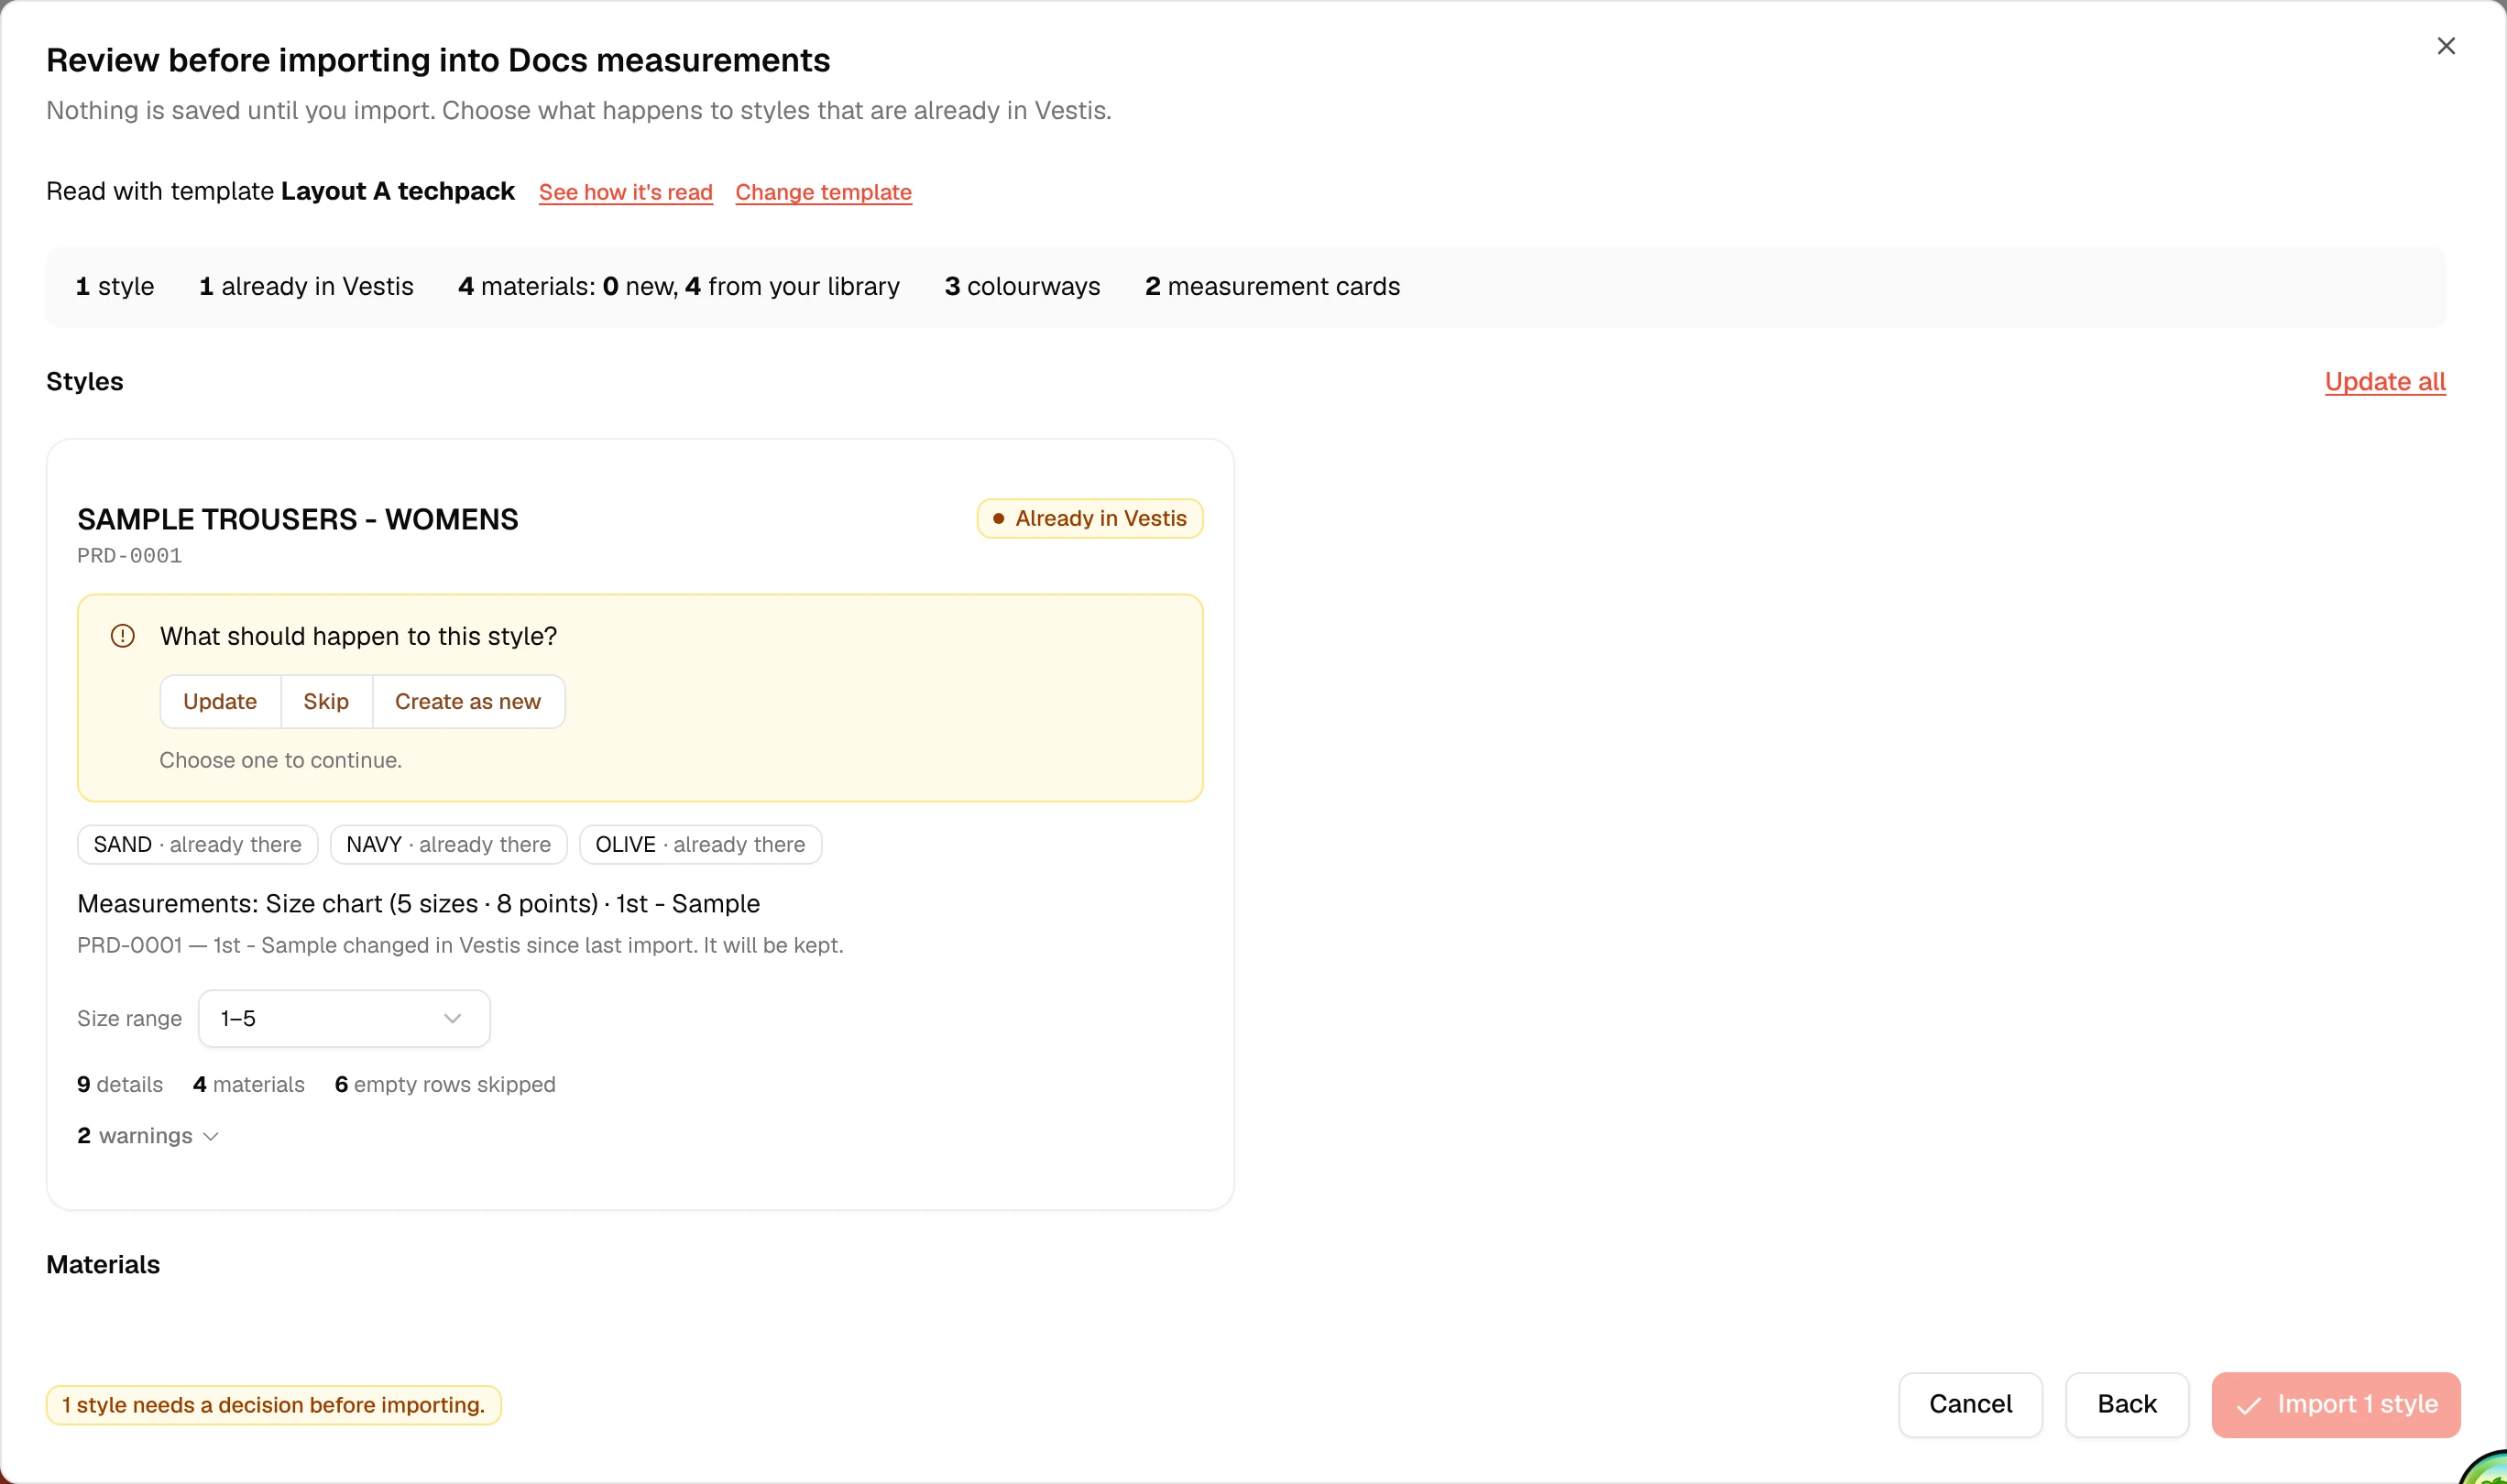
Update brings in the file's numbers for anything it lists in full. If you edit a value the file itself sets (a measured number, say) and then re-import with Update, that value follows the file again — same as any other field. What's kept is anything you've added that the file has no opinion on.
A label : value spreadsheet
Not every techpack uses the Design Sheet layout above. A label : value layout — "Style no:", "Season:" and so on written one pair per line, like Layout B — can carry a sample sheet too. Vestis reads it the same way: it finds a table with a point-of-measure column and a measured-value column, then reads the garment's size off a "Sample size" line on that same sheet, since there's no cell sitting directly above the value column to read it from instead.
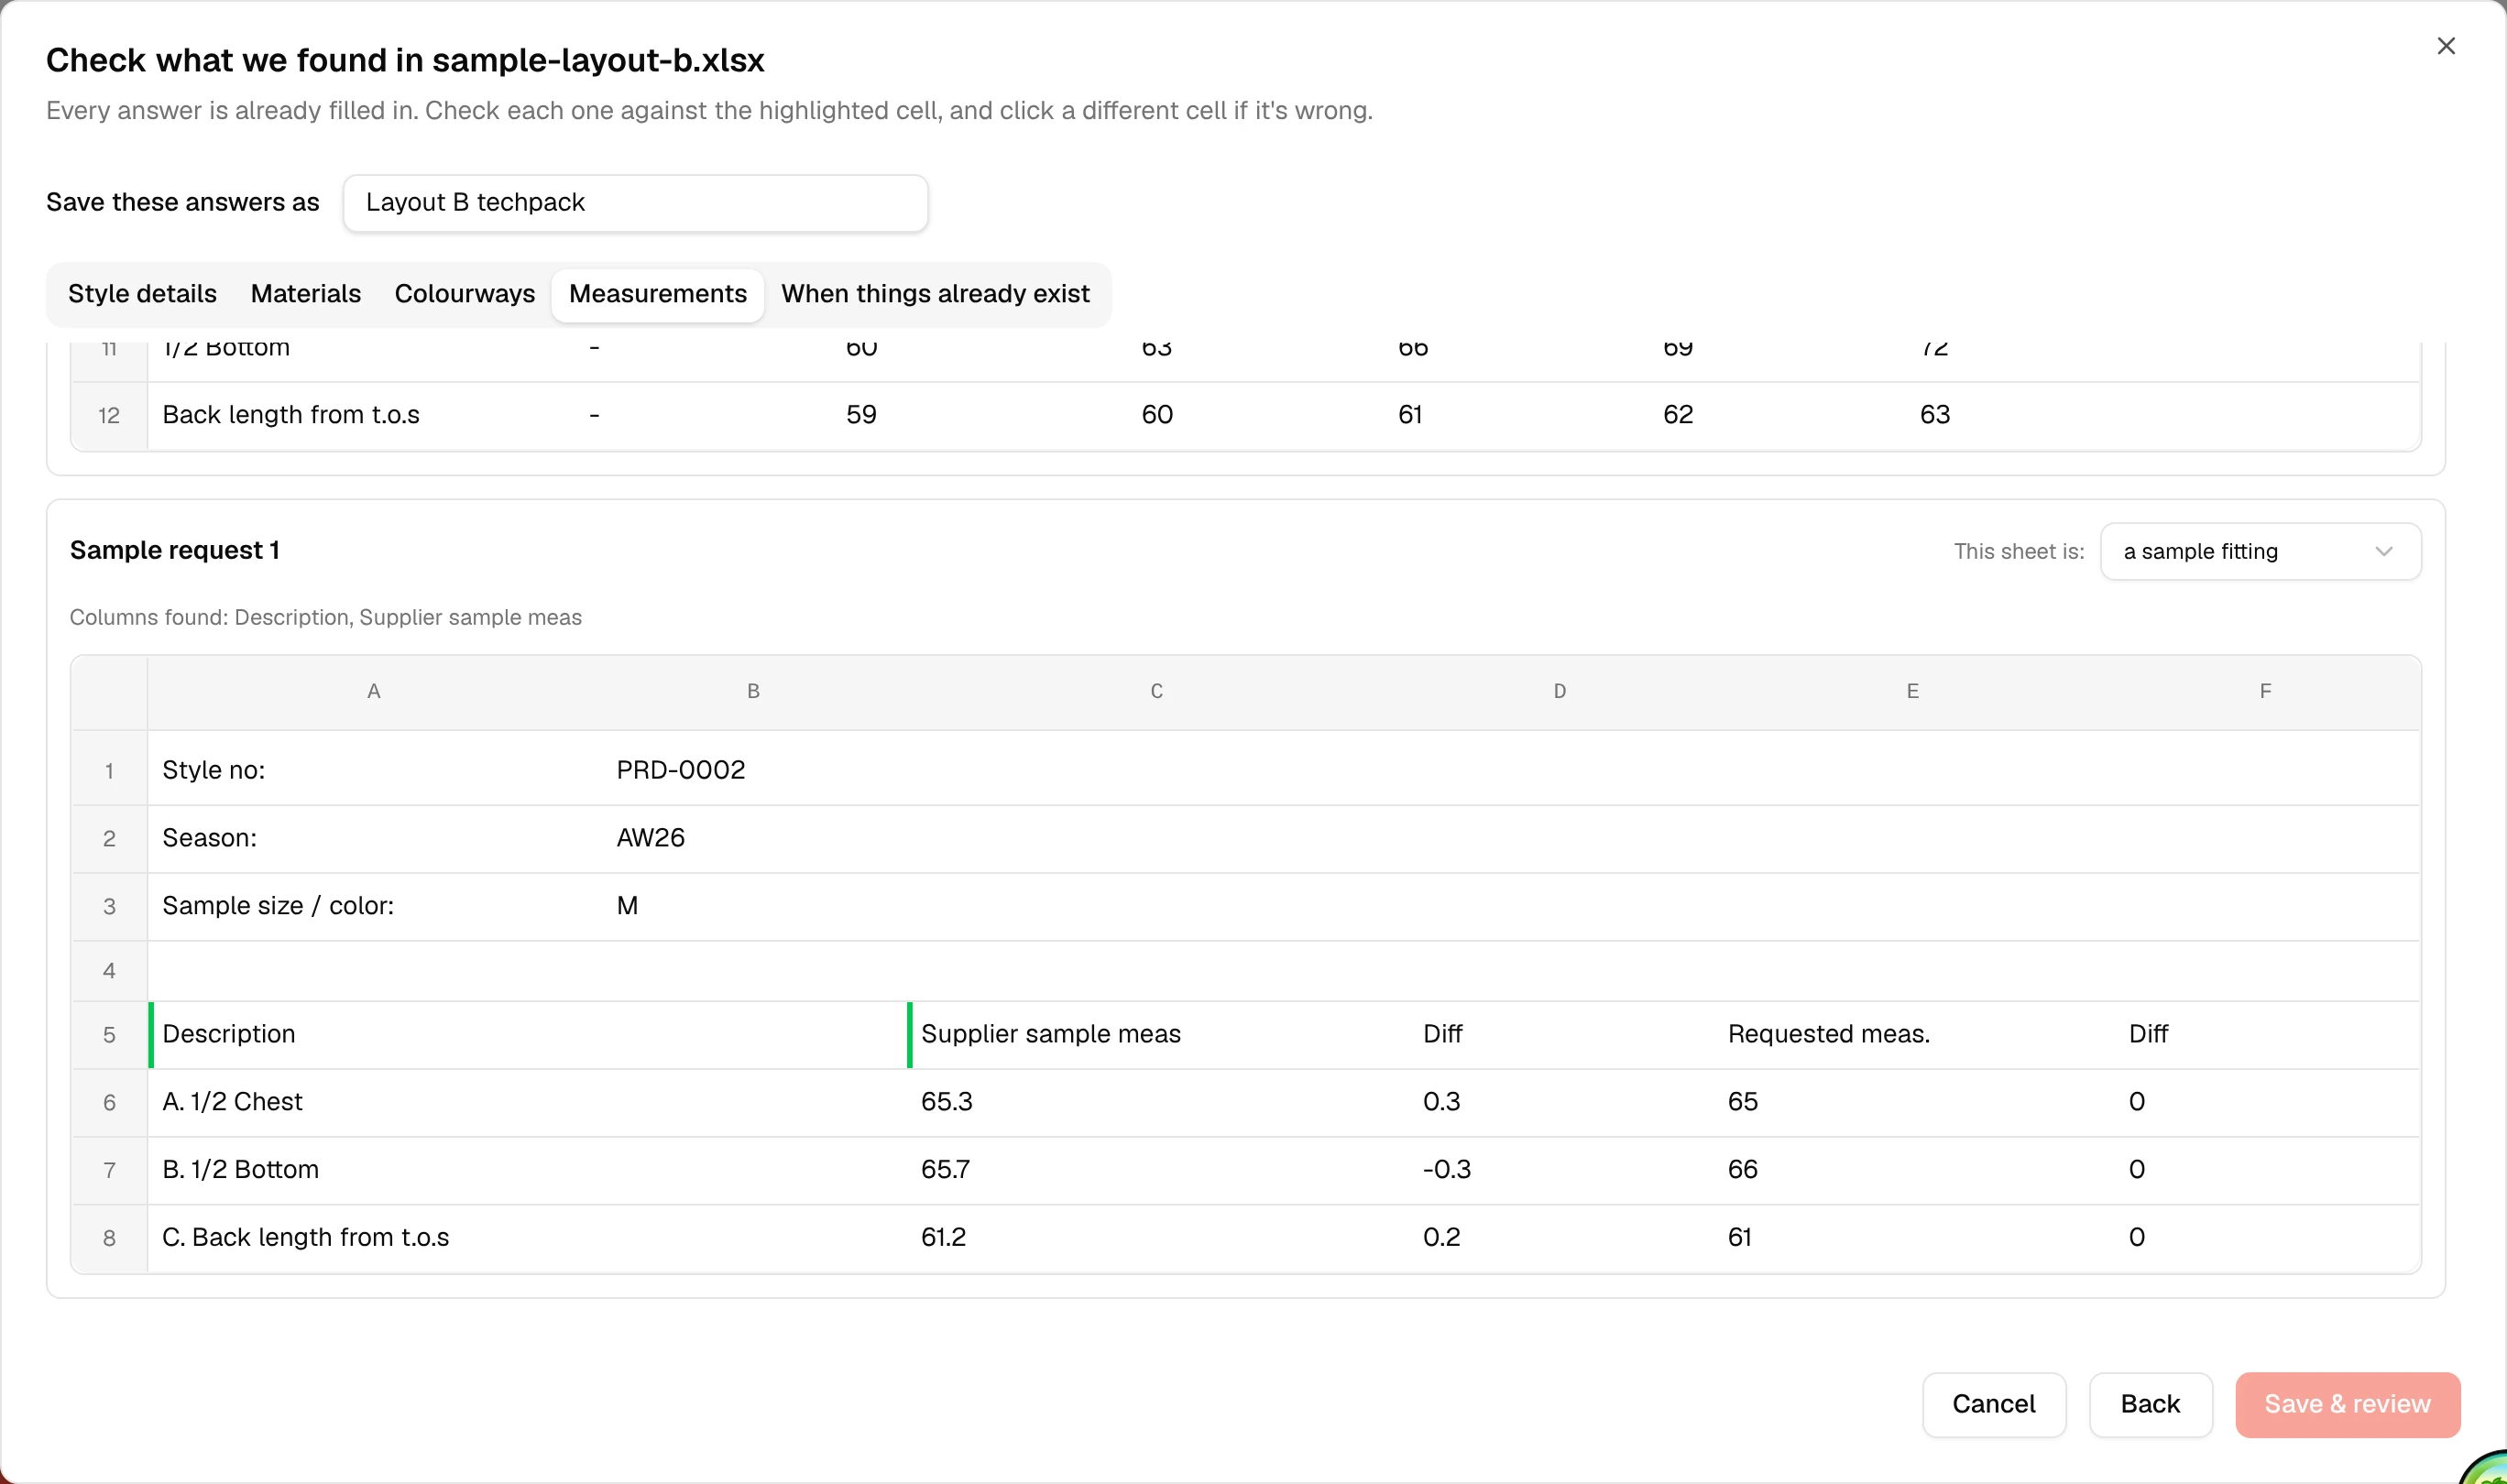
No code column is needed: when a sheet only has point names like "A. 1/2 Chest", Vestis reads the letter as part of the name and still lines every row up correctly.
Already have a template from before?
A template saved before this feature existed only has a Size chart tab, not a Measurements tab — it never learned to read sample sheets. Open Library → Import Templates, click the template's ⋮ menu, then Edit. The Size chart tab offers a one-click upgrade:
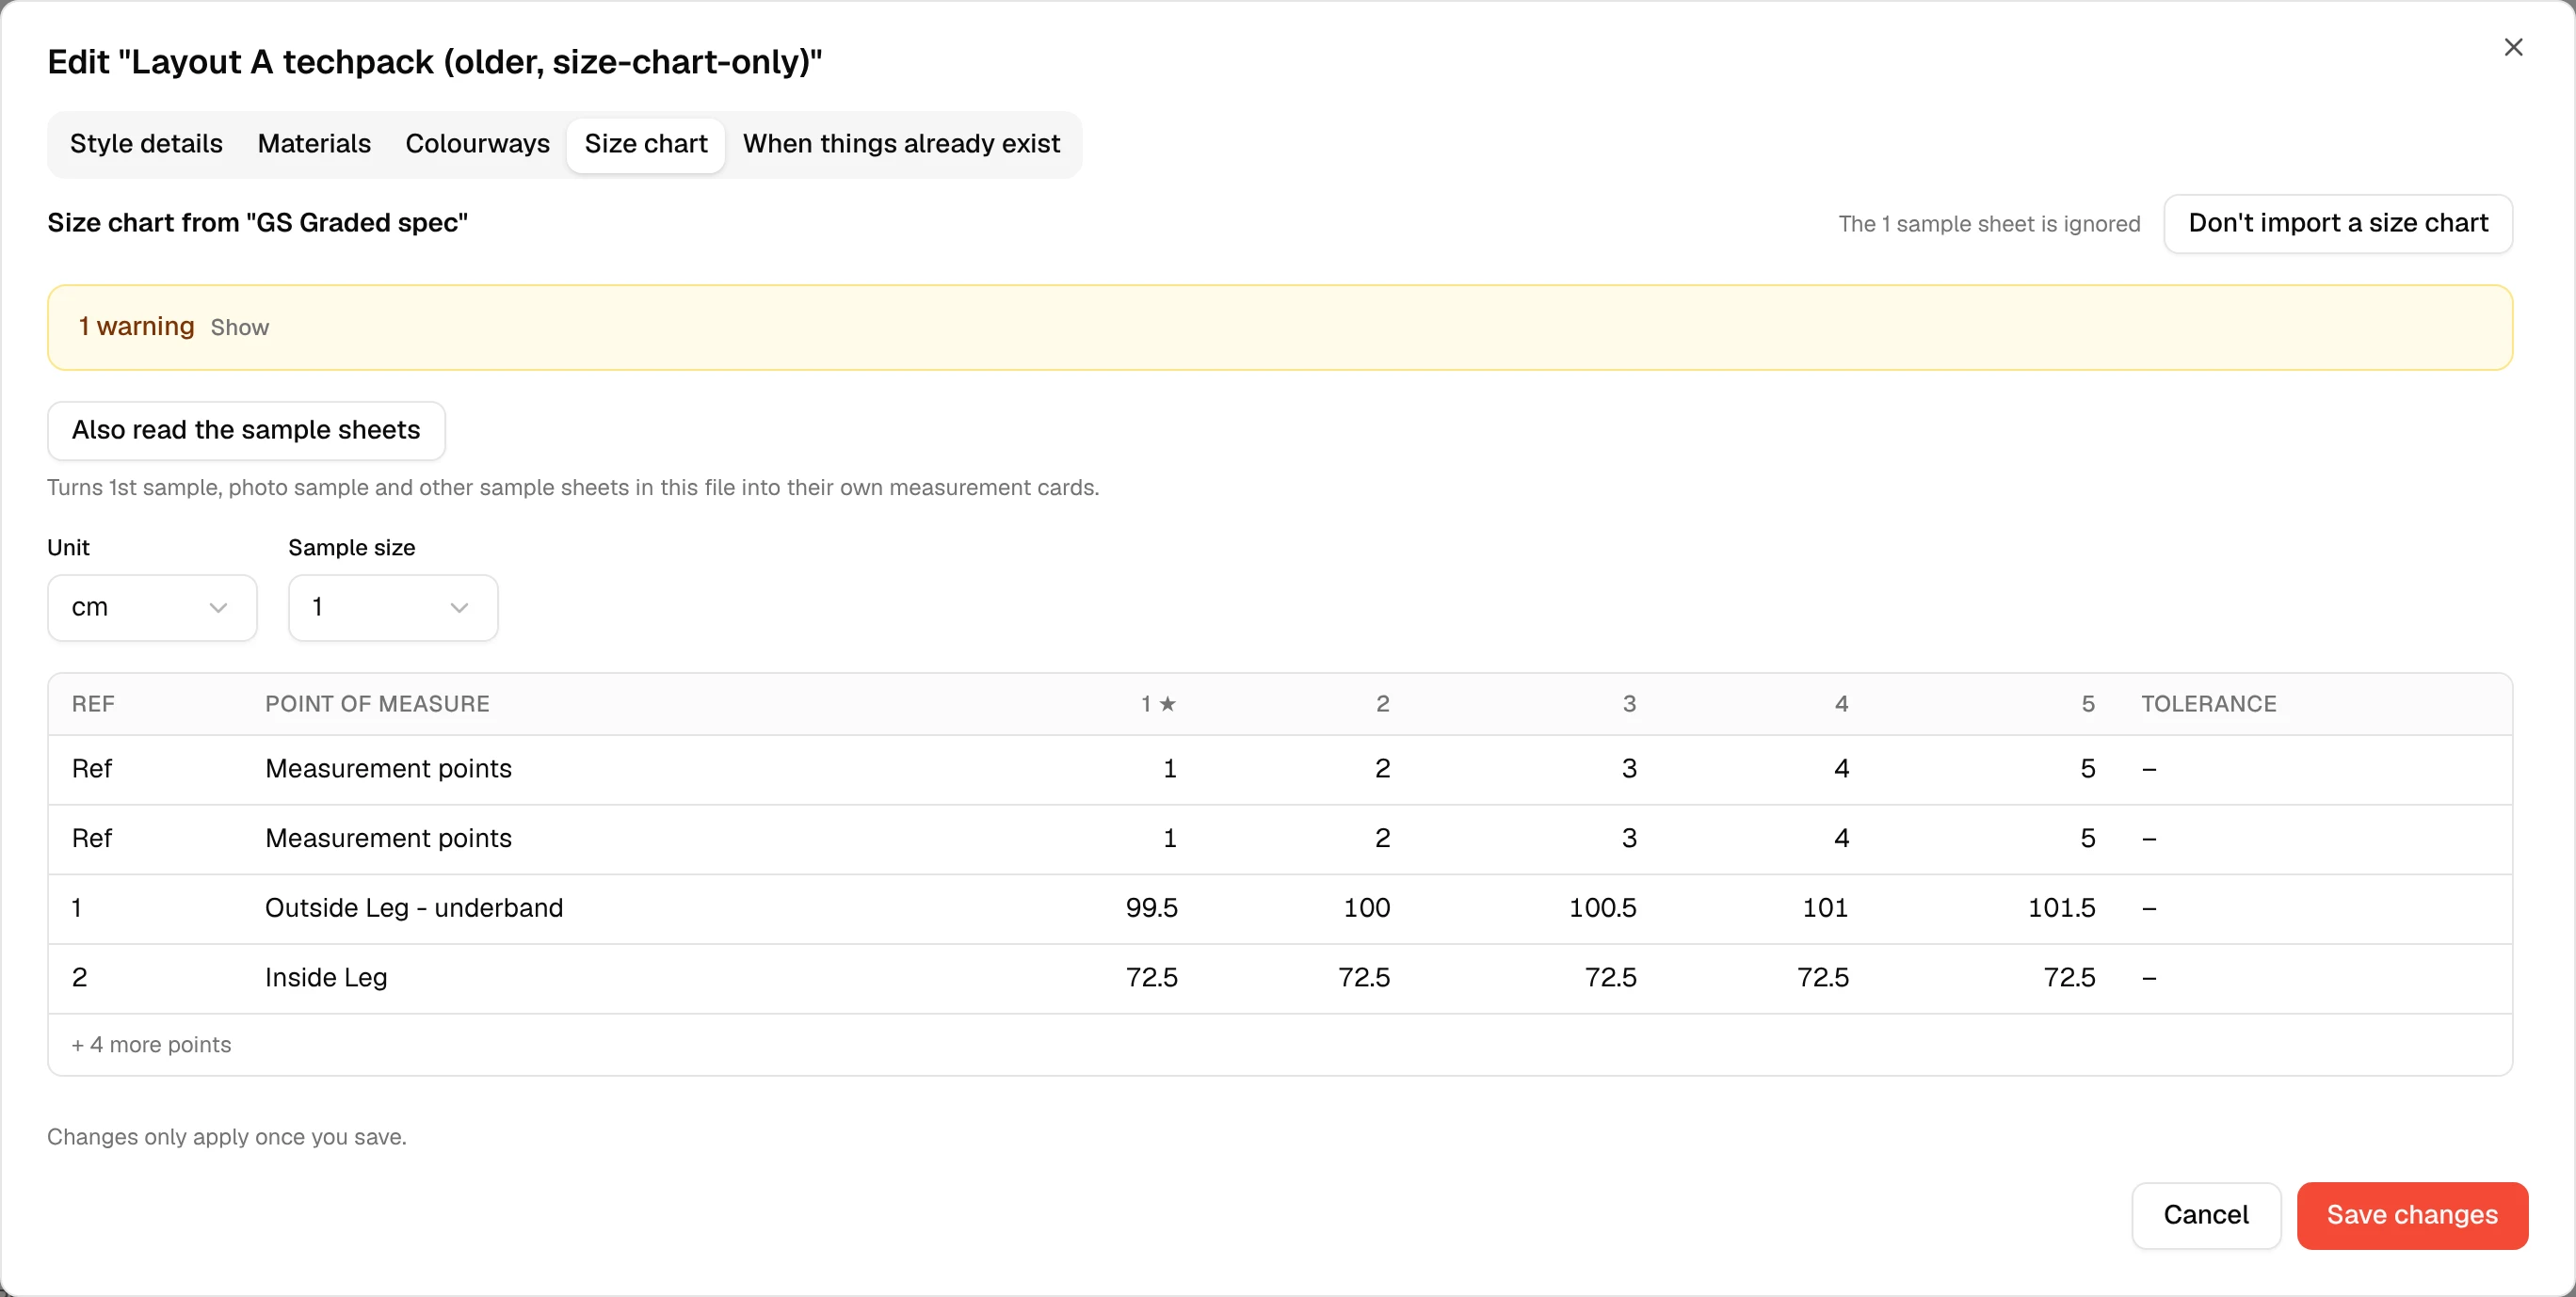
Click Also read the sample sheets. Vestis turns the sheet-by-sheet Size chart tab into a full Measurements tab, picking up every sample sheet in the file the template was built from — nothing else about the template changes. Click Save changes to keep it (or Cancel if you were only checking).
Check before you import
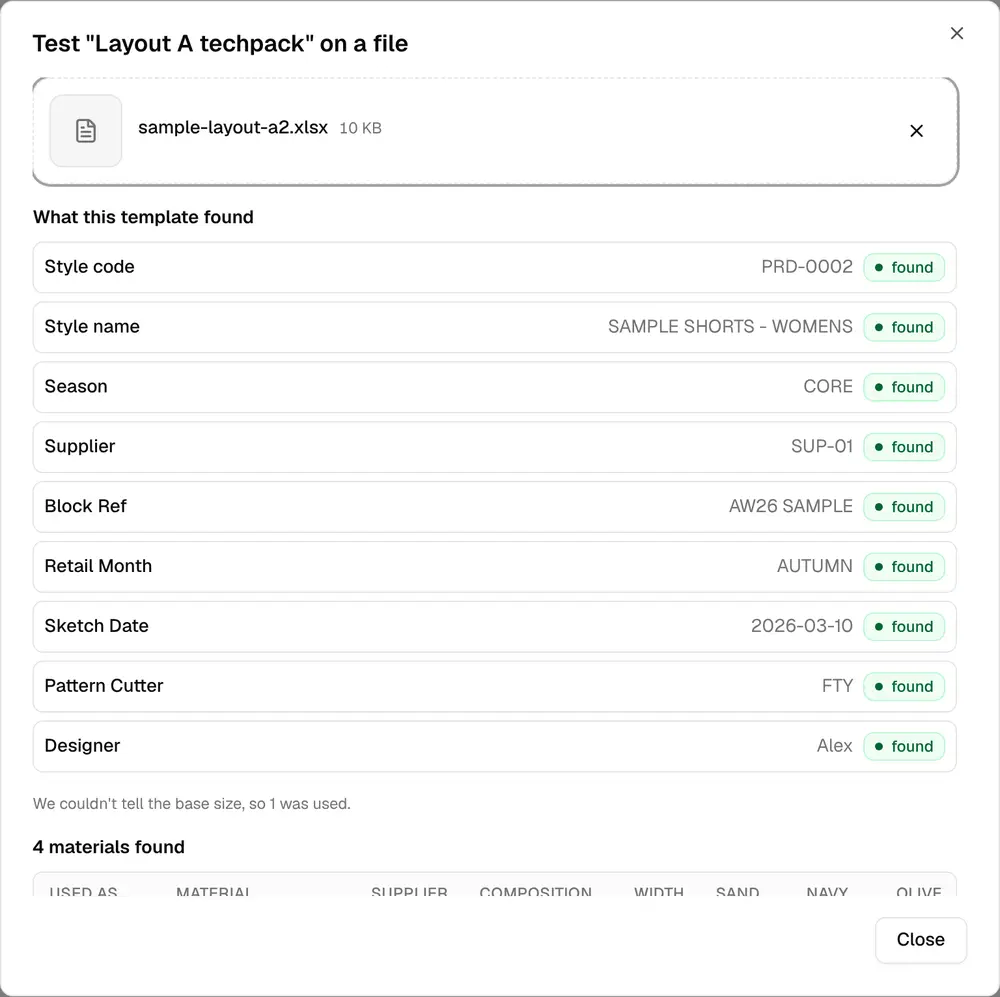
Test on a file, from the template's ⋮ menu, shows every card a file would produce without changing anything. Sample fittings get their own line, with the sheet name, how many points it found, and the size:
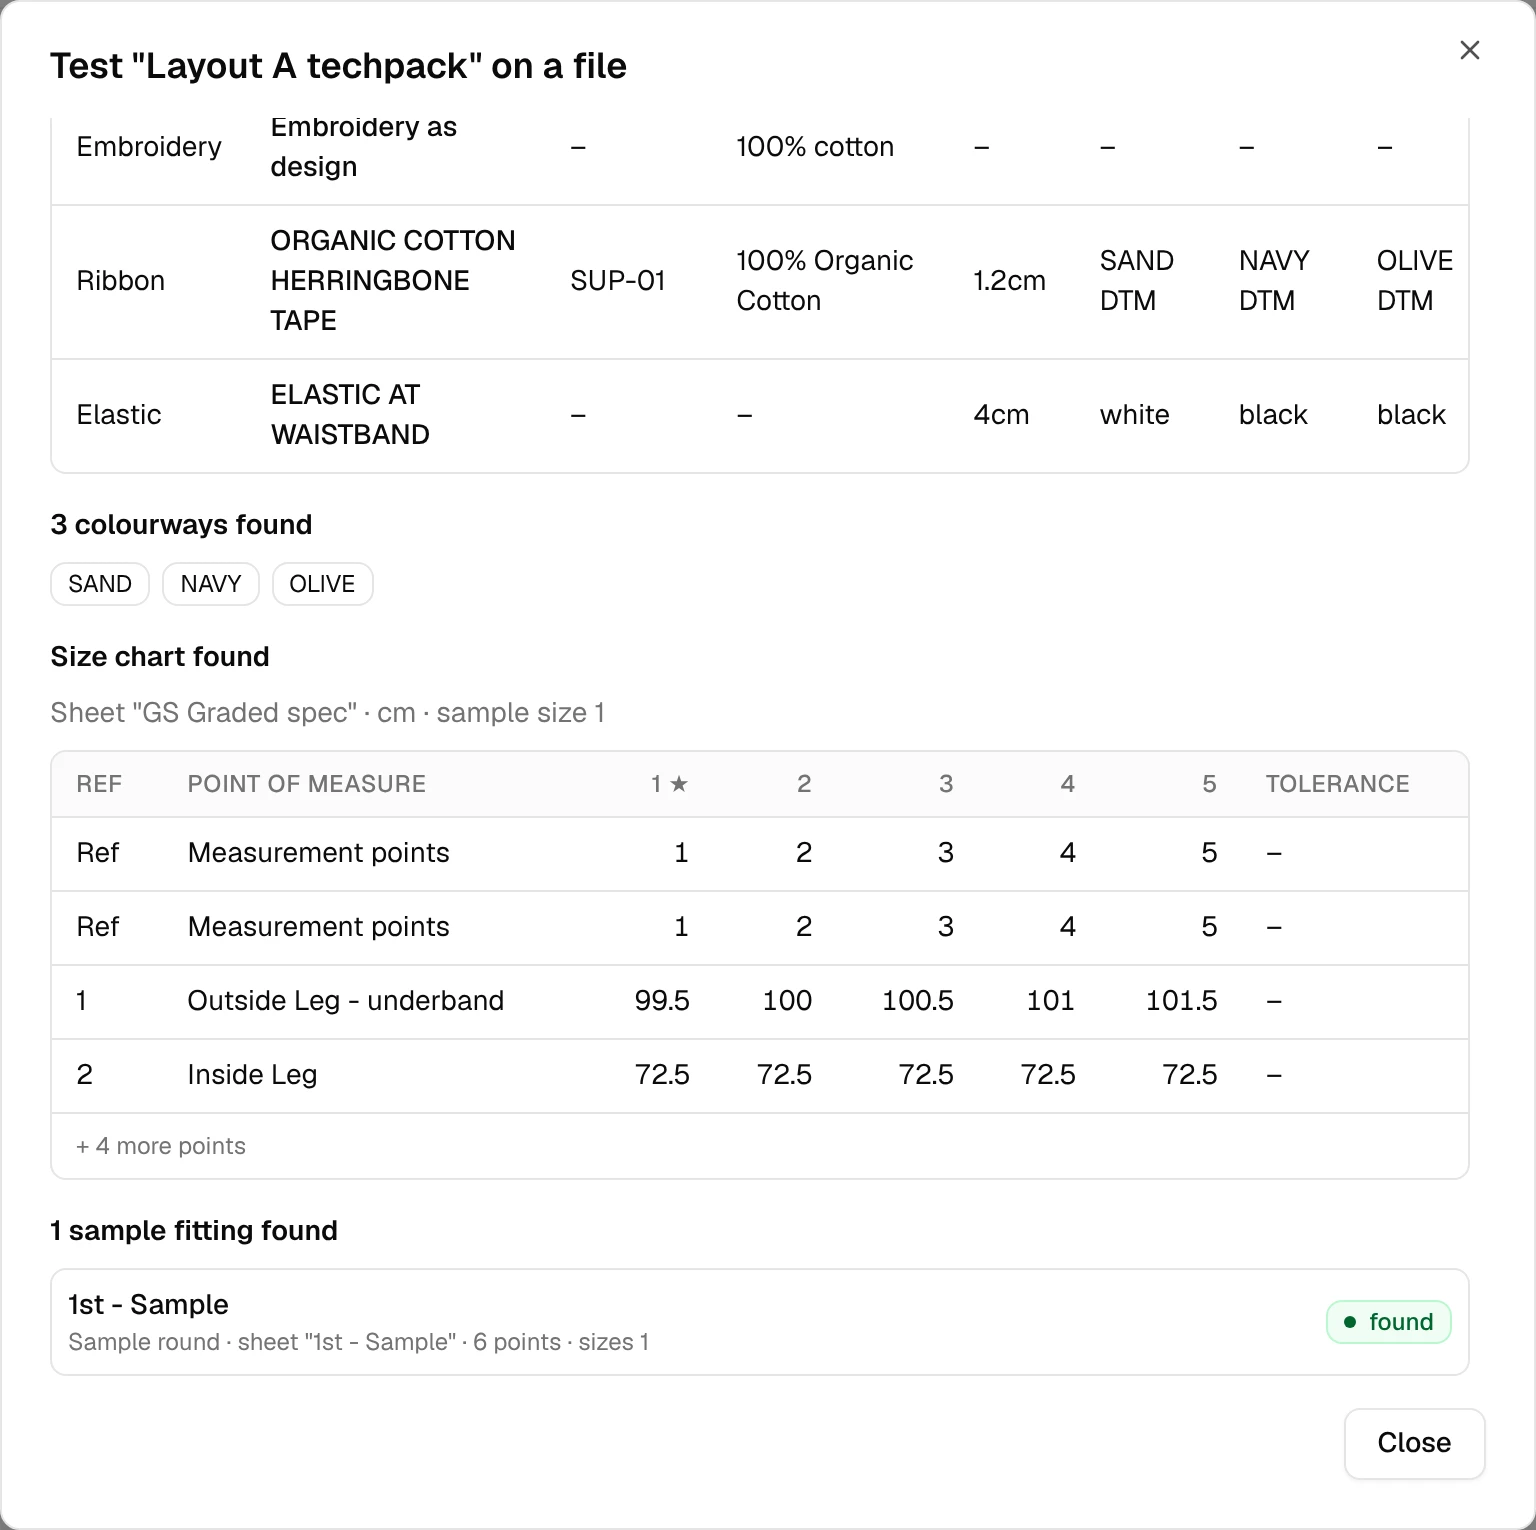
Use this whenever a new round's file looks slightly different and you're not sure the sample sheet will still be picked up.
If a sheet isn't picked up
A sample sheet is missing from the Measurements tab. Vestis only treats a sheet as a sample fitting if its name reads like one: something containing "sample", "proto", "fit", "sms" or "photo" — "1st - Sample", "Photo - Sample" and "SMS - Sample" all match. A sheet named something else, like "Fit round 1", won't be picked up on its own; rename the sheet, or use Fix mapping on the saved template to point at it directly.
Sheet names must match between files. A template remembers a sheet by its name (and, for the graded sheet, by its header row). If next month's file renames "1st - Sample" to "First Sample", Vestis won't recognise it as the same sheet and it comes in as not needed until you fix the mapping.
"We couldn't read the sample sheet '[sheet name]', so no measurement card is made for it." The sheet's name matched, but Vestis couldn't find a usable table on it this time — usually a header row that moved further than expected. The rest of the import still goes ahead; only that one card is skipped.
The measurement unit is wrong. The same Unit control at the top of the Measurements tab covers every card read from that file. If a sample fitting's numbers look like inches when they should be centimetres (or the reverse), change Unit once and every card updates.
Next time with Layout A
Once a layout is saved as a template, using it again is much shorter. Open the import dialog, choose Layout A techpack under Template, then drop in one file, or several at once. Vestis checks each file against the template you chose.
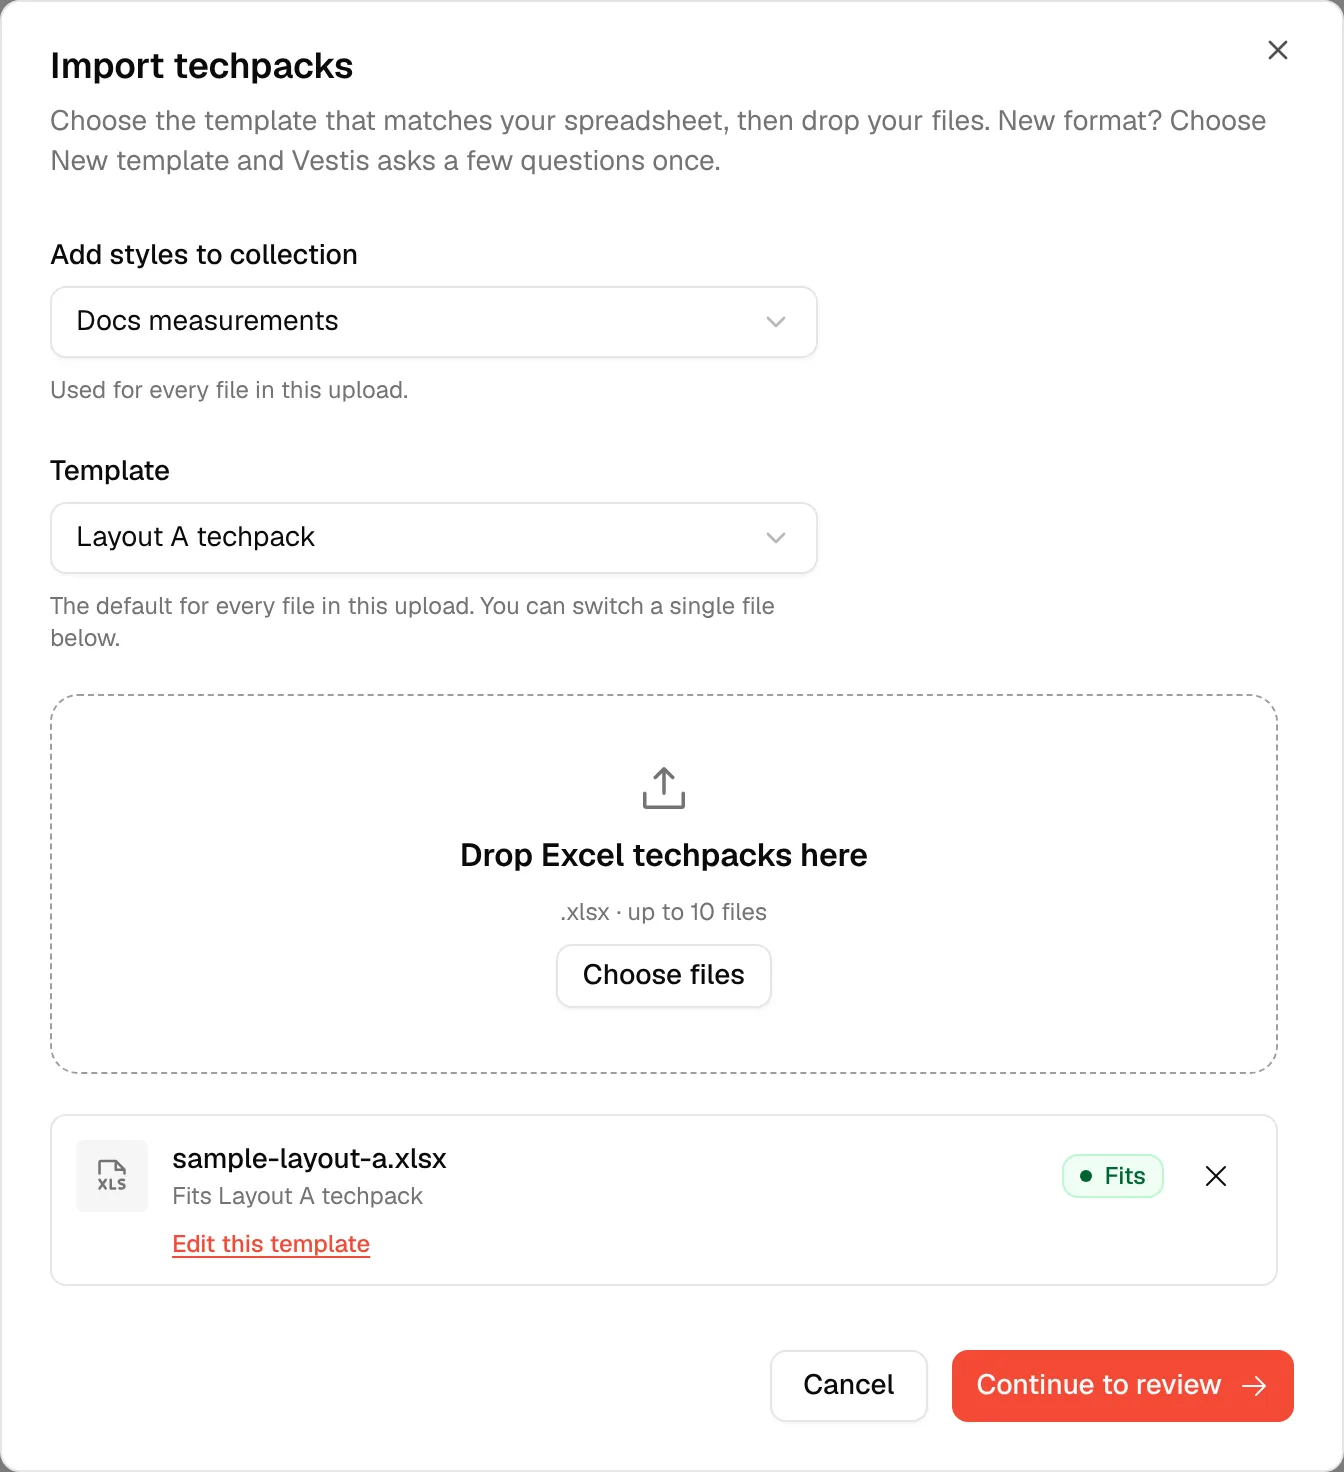
The file shows a green Fits with Fits Layout A techpack underneath. No questions this time. Click Continue to review and you land straight on the Review screen from before. Continue to review turns on once every file fits (or has been switched to a template it fits, fixed, or removed).
Each file is checked as soon as you drop it, and gets one of four answers:
| Status | What it means | What you can do |
|---|---|---|
| Fits (green) | The file reads cleanly with the template you chose. | Continue, or click Edit this template. |
| Almost fits (amber) | Nearly the same format, with a label missing, like "1 label not found: Supplier". | Fix mapping (see "When a file almost fits" below). |
| Doesn't match (red) | This isn't the format the template reads. | Switch to another template, or Set up a new template. |
| New format (blue) | You chose + New template. | Set up this format. |
When a file doesn't match
Say you chose Layout A techpack but dropped in a Layout B file. Vestis tells you plainly, and nothing switches on its own.
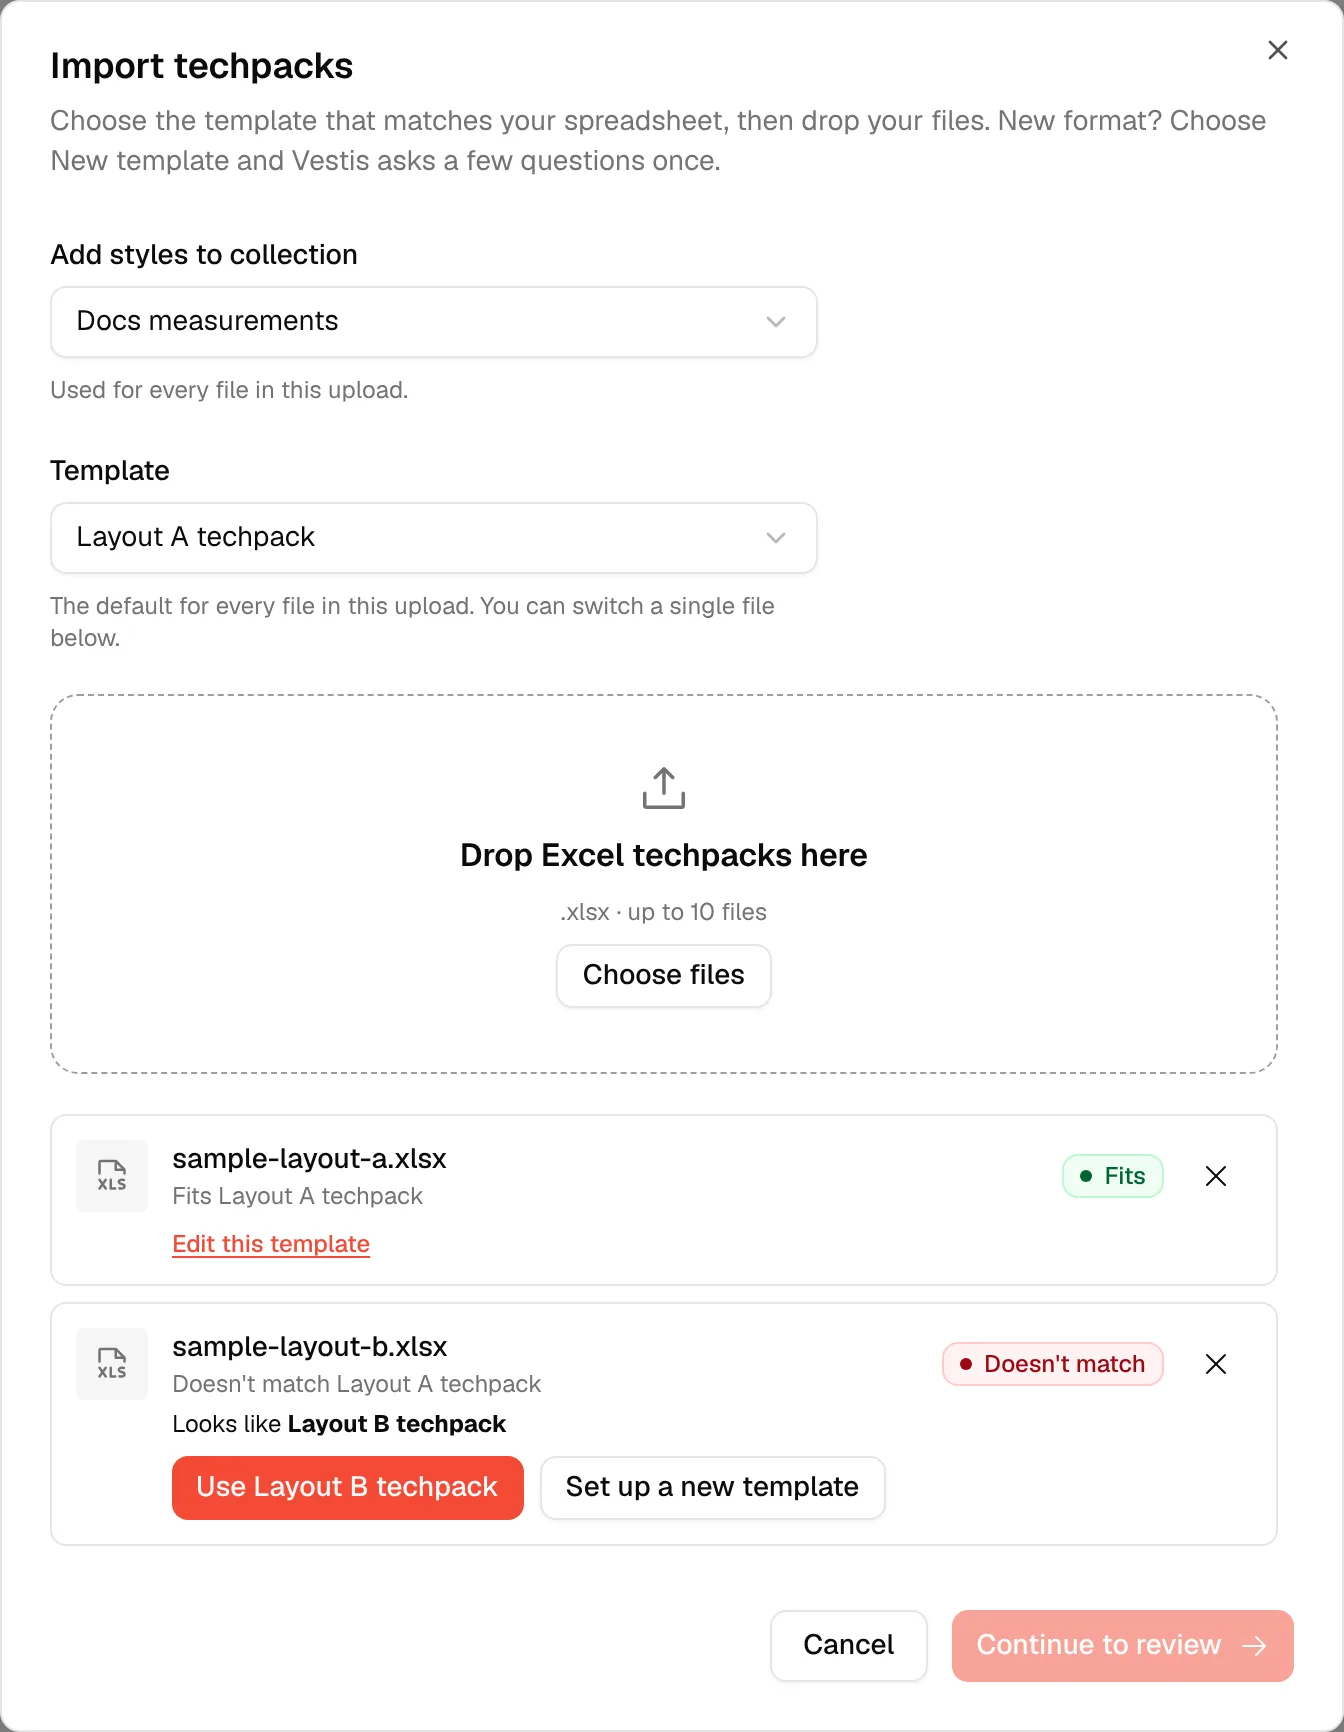
The second file says Doesn't match Layout A techpack. If you have another saved template that does fit it, Vestis points it out: Looks like Layout B techpack.
- Use Layout B techpack switches only this file to that template. The row then says "Switched from Layout A techpack for this file only." and shows Fits. Your other files keep Layout A techpack.
- Set up a new template takes you through Check what we found to teach Vestis this format.
When a batch uses more than one template, the Review screen says Read with templates Layout A techpack and Layout B techpack, and each style card shows Template: … so you can see which one read it.
Editing a template
On any Fits file, click Edit this template to change how the template reads. You see the same screen as Check what we found, with the template's answers already applied to your file.
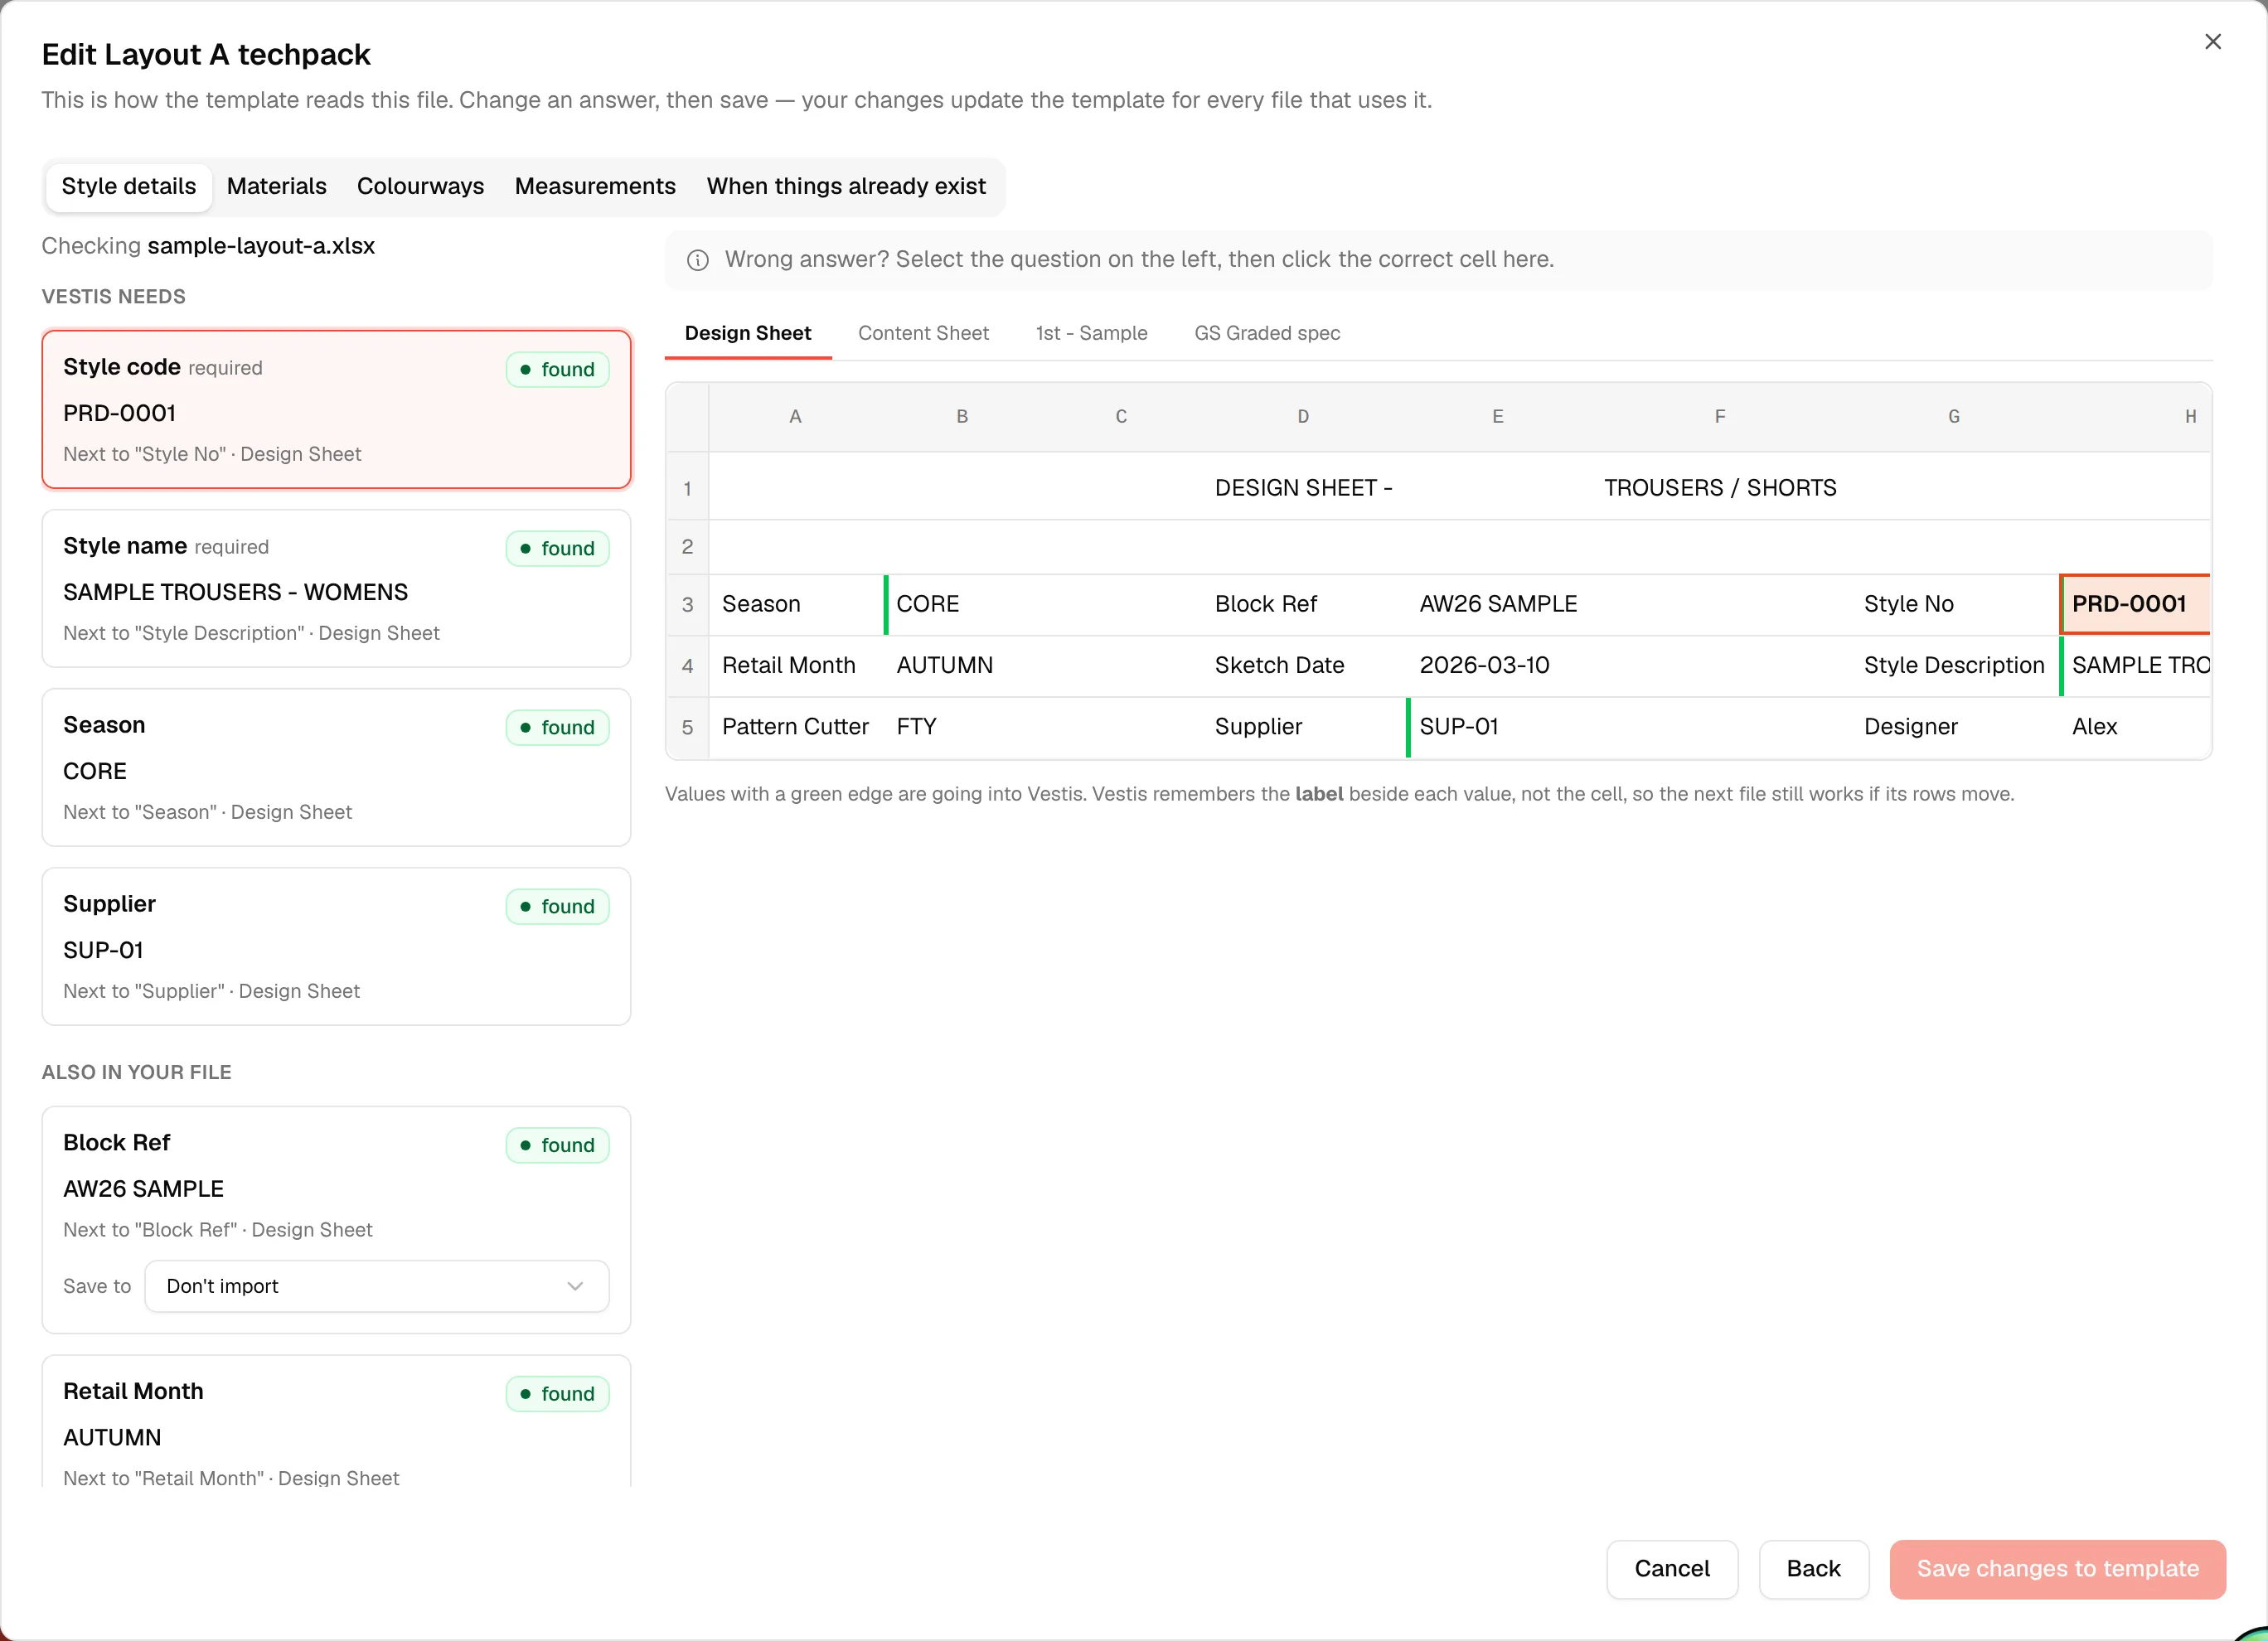
Change an answer the usual way: click the question on the left, then click the right cell on the right. Save changes to template stays off until you change something. When you click it, the saved template is updated for every future file that uses it. Vestis then checks your file again and brings you back to the upload step. Back just goes back without saving.
Example 2: Layout B, a different spreadsheet format
Not every file you get looks like Layout A. Layout B is a different shape entirely: every sheet starts with a label block ("Brand:", "Style name:", "Style no:", "Season:", "Supplier:"), materials come from a sheet called "Item list", and colourways come from the column headers rather than a fabric row. Vestis treats it as a completely separate layout, with its own template.
Upload and check what we found
Open the import dialog again, choose + New template, and drop sample-layout-b.xlsx in the same way. Vestis has never seen this shape of file before, so it's a New format again. Click Set up this format.
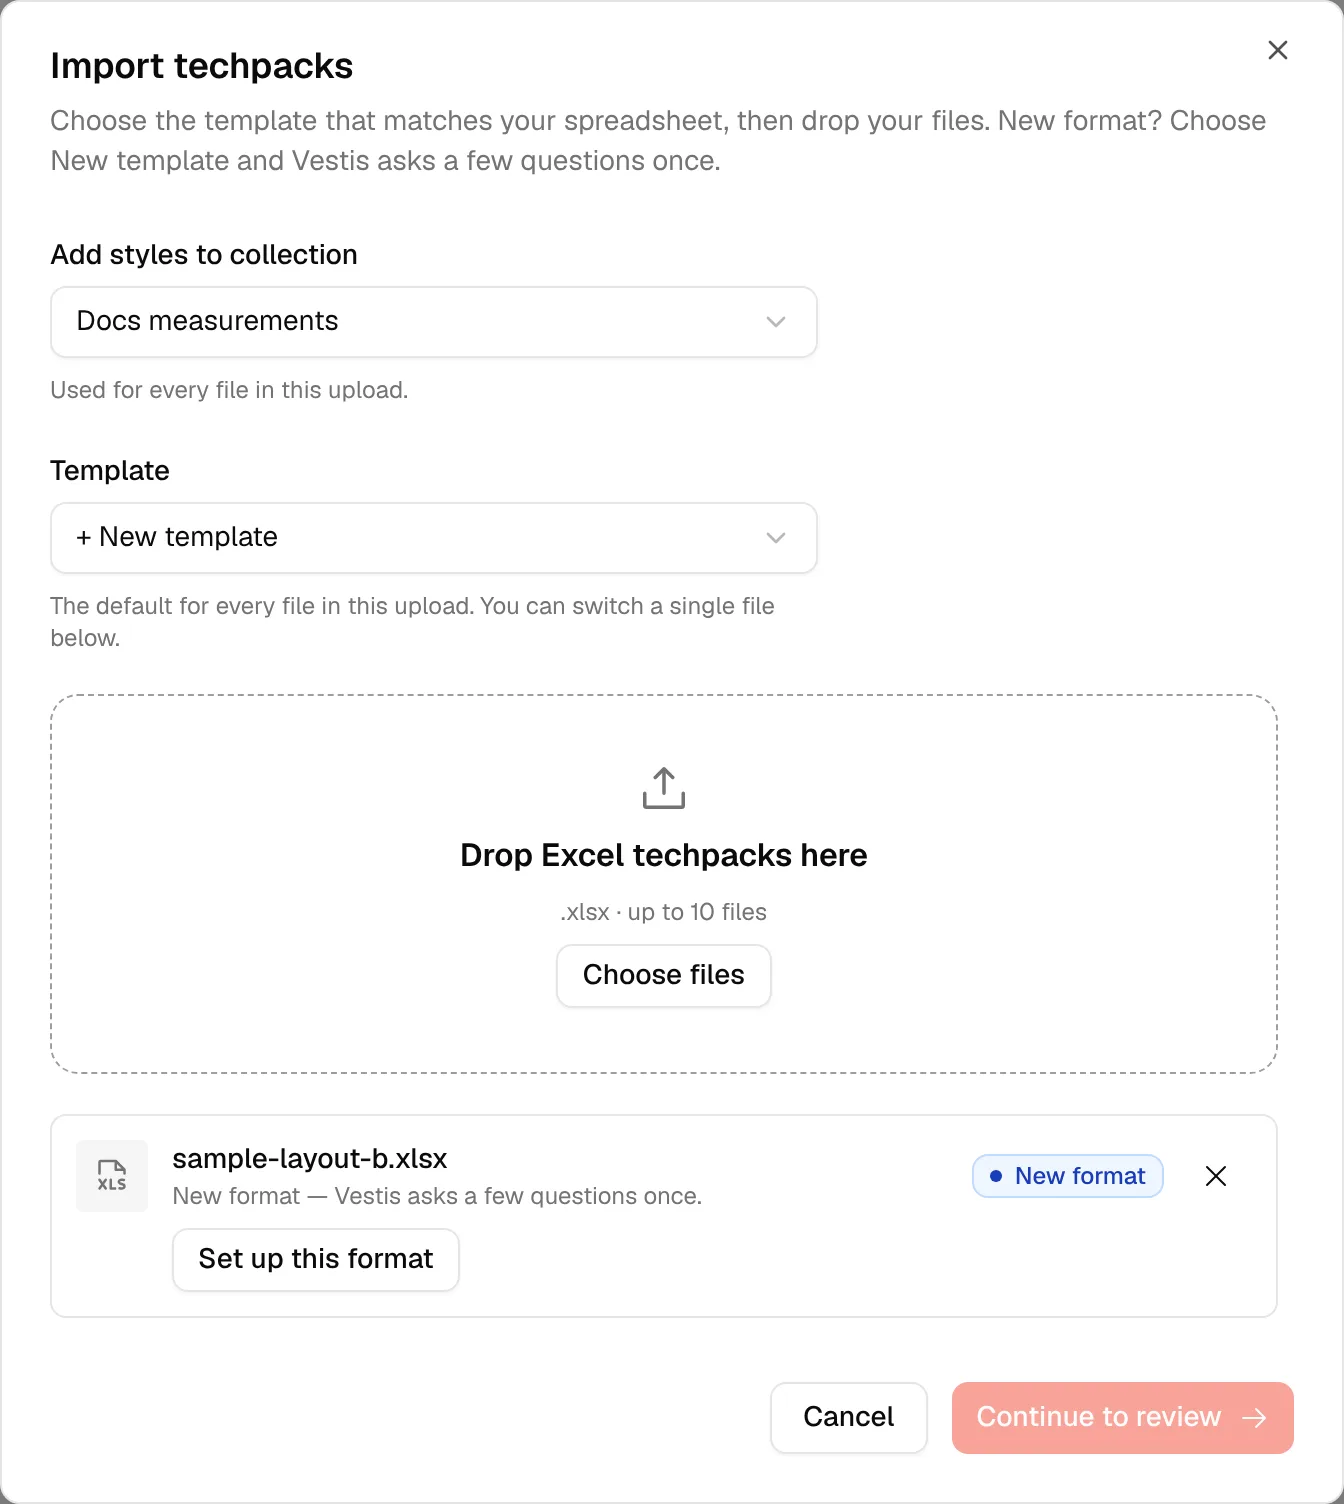
(If you had chosen Layout A techpack here instead, Vestis would say the file Doesn't match. See "When a file doesn't match" above.)
This time, Style code comes back not found. In this file, "Style no:" was left blank, but the code was written elsewhere on the sheet, next to a label called "Article no:".
To fix it: with Style code selected on the left, click the cell that actually holds it in the sheet on the right, next to "Article no:". As soon as you click it, the answer turns green and shows found.
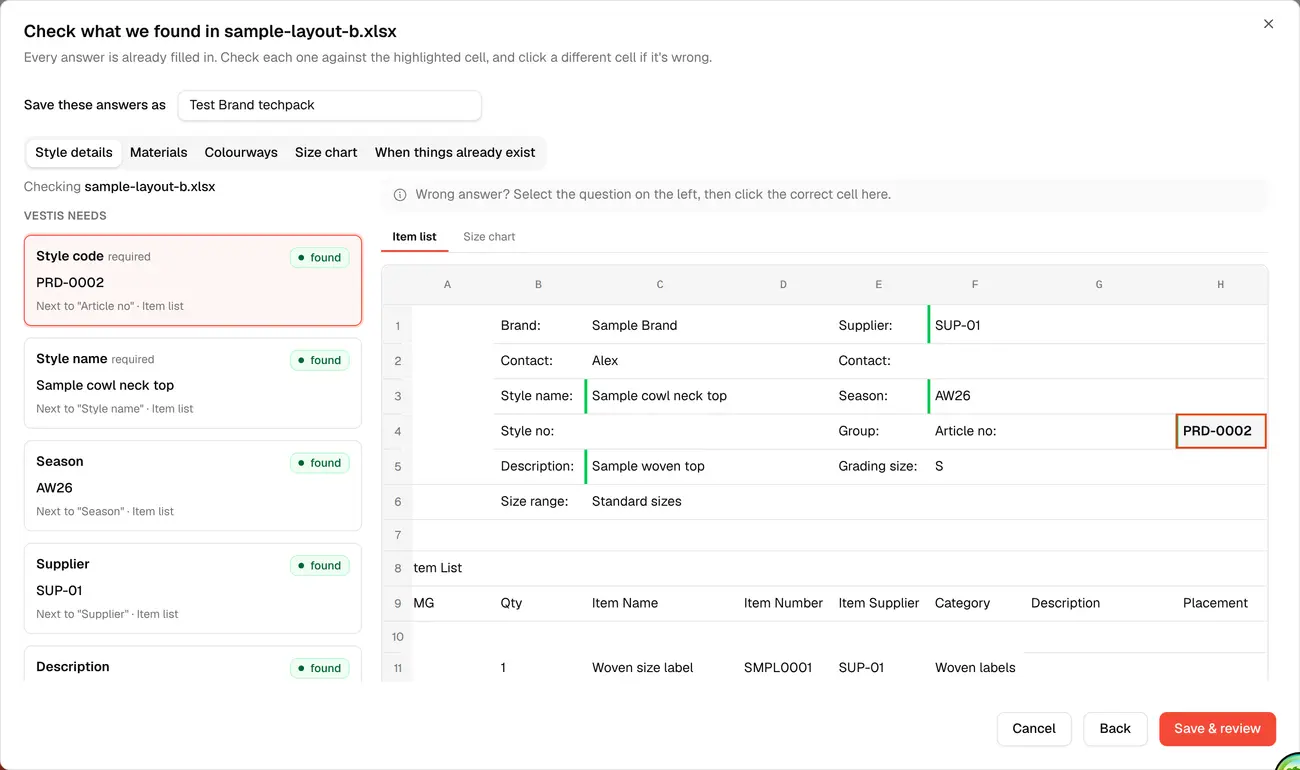
Name this template Layout B techpack, then go through the other tabs.
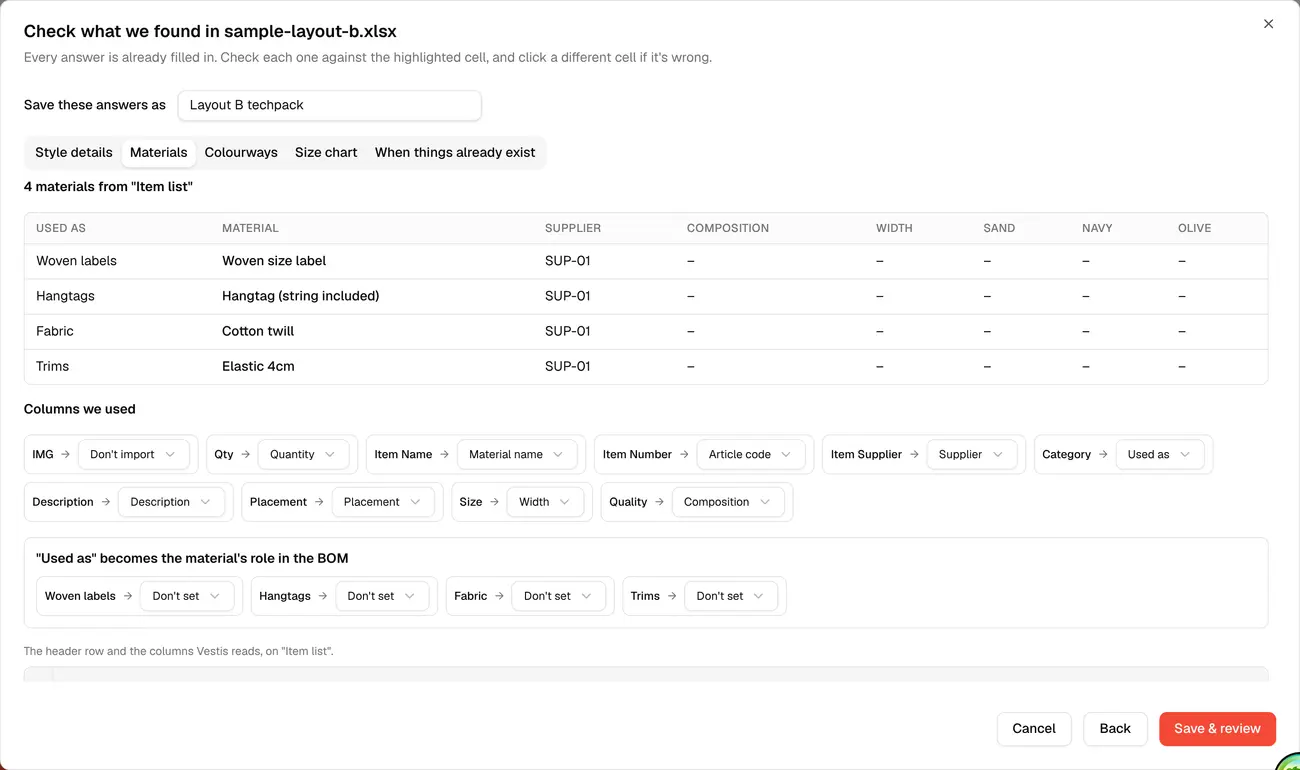
Materials come from the "Item list" sheet this time, with the columns matched up the same way:
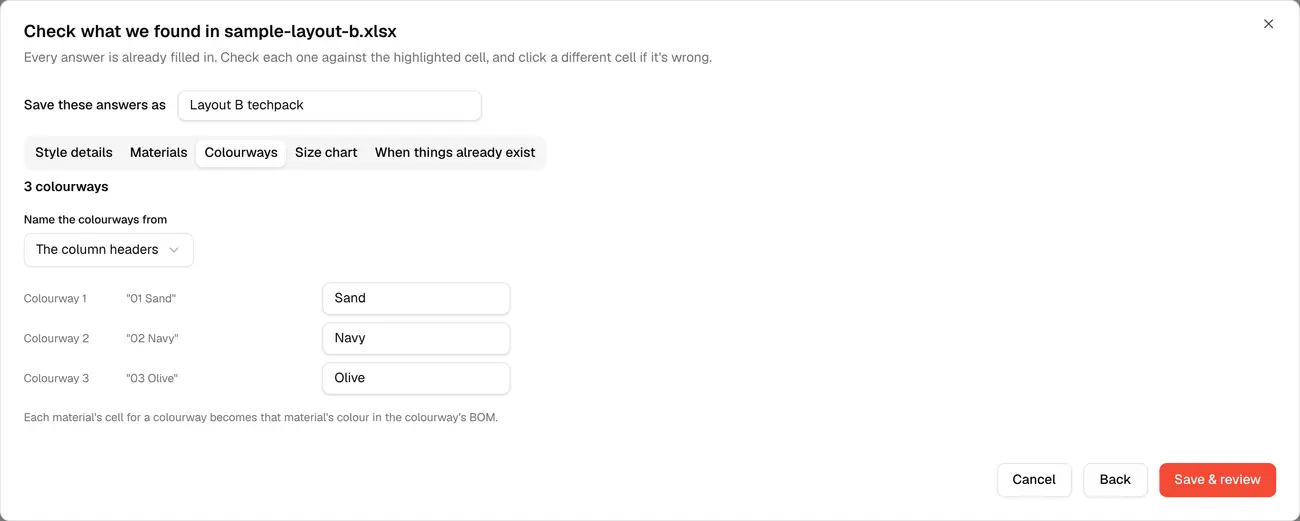
Colourways are read from the column headers, since Layout B doesn't have a single fabric row to read them from:
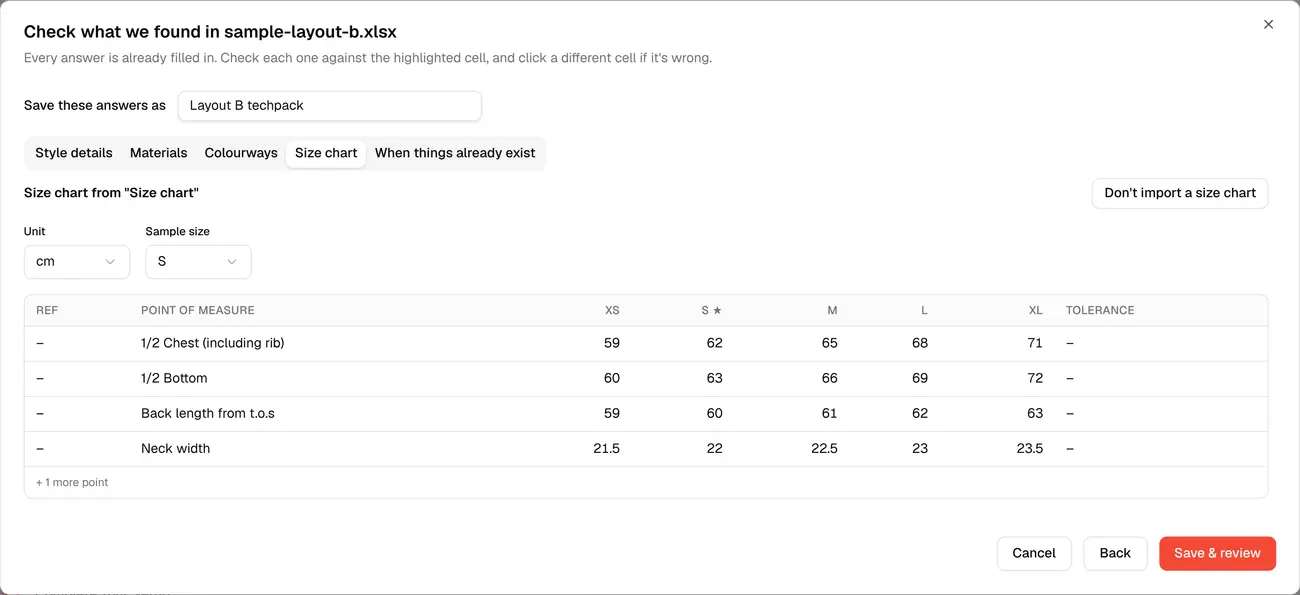
Size chart comes from the "Size chart" sheet, in the same way as before:
Save & review, then import, exactly as with Layout A.
Good to know. One brand can keep as many templates as it has spreadsheet formats, one per layout. You pick the one that matches your spreadsheet, and if you pick the wrong one, Vestis tells you and suggests the template that fits.
Uploading a style that's already in Vestis
If a file's style code matches a style you already have, Vestis flags it instead of silently creating a duplicate or silently overwriting it.
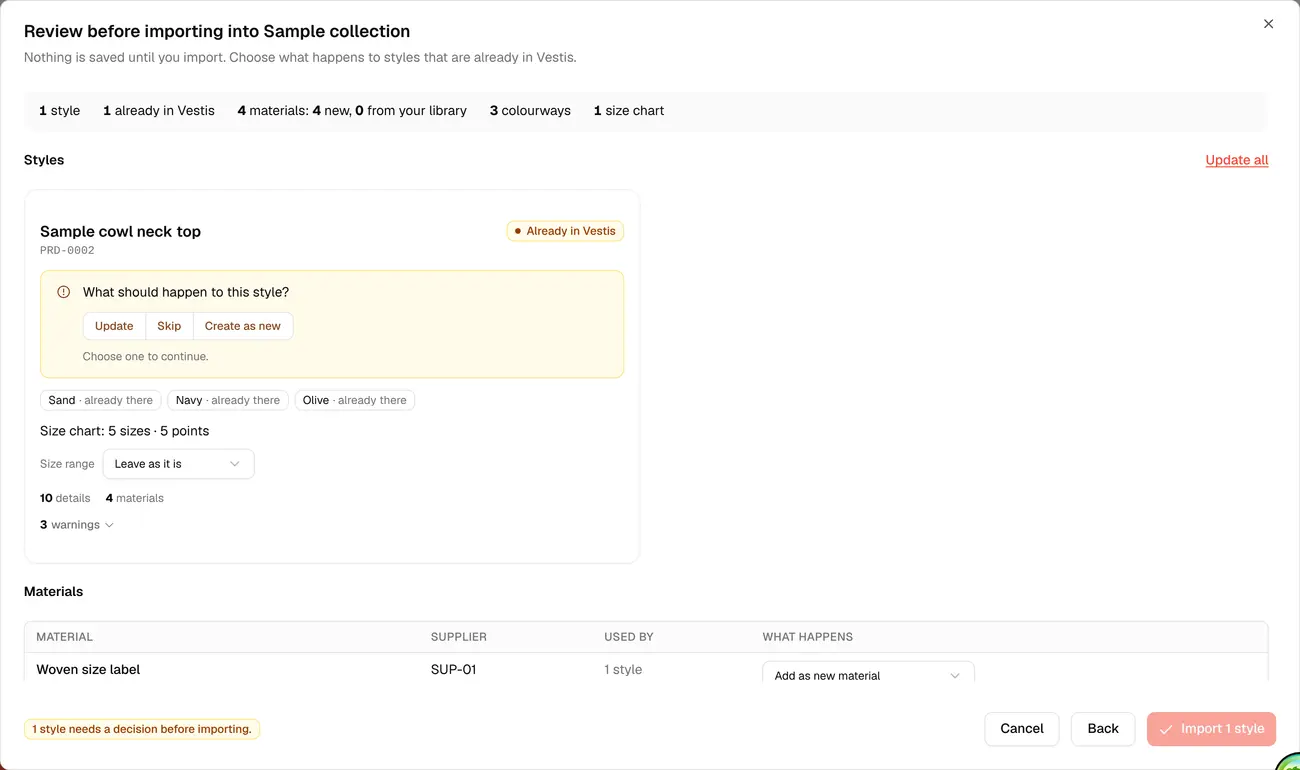
You get three choices for that style:
- Update: brings in whatever changed in the file. Anything you've added or edited by hand in Vestis, that the file doesn't mention, is left alone.
- Skip: leaves the style exactly as it is in Vestis. Nothing from this file is applied.
- Create as new: makes a second style with a new style code you type in, in case the matching code was a coincidence and this is really a different style.
Click What will change to see exactly which colourways, size chart, and materials will be touched before you commit to Update.
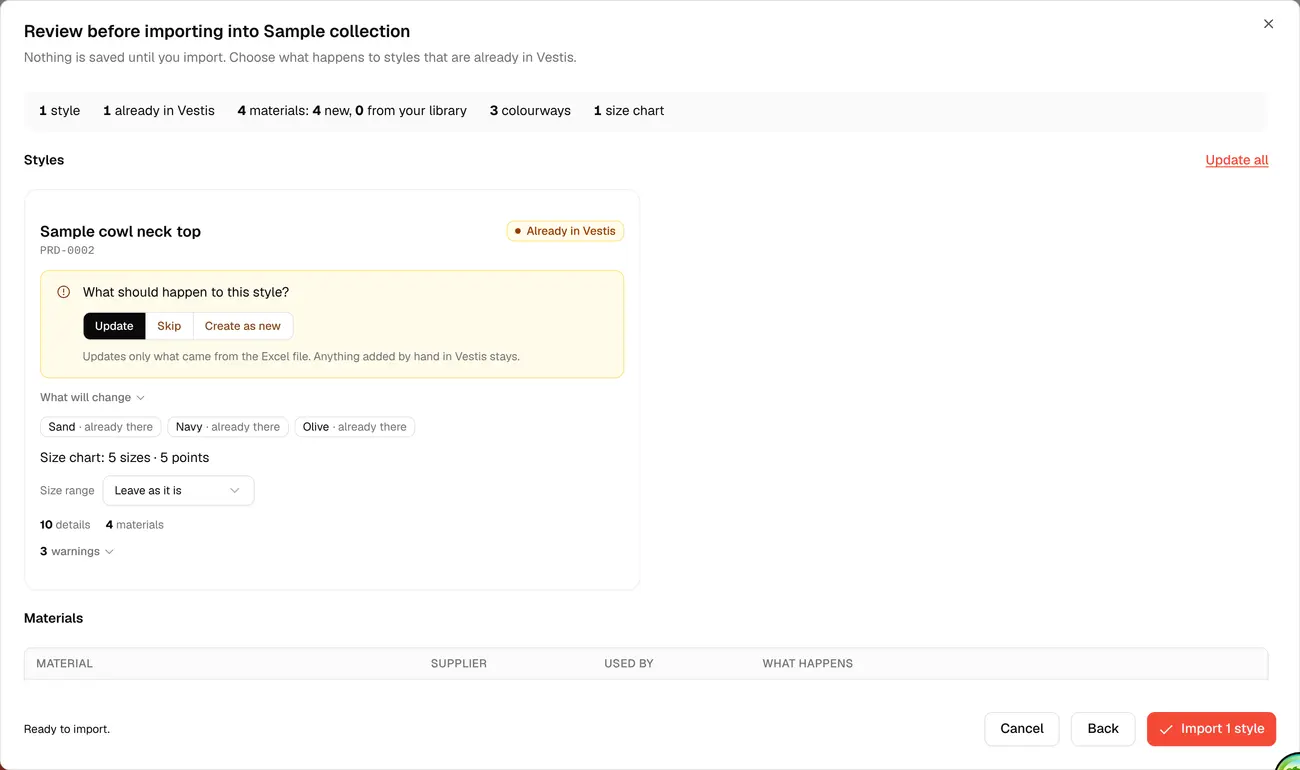
Update is the recommended default for most re-uploads. It's how a spreadsheet that gets revised every week stays in sync with Vestis, without losing anything a designer has added directly in the app.
When a file almost fits
Sometimes a file is nearly the same format as the template you chose, but missing something. A column got deleted, or a field wasn't filled in. The file shows an amber Almost fits and says what's missing, for example Almost fits Layout A techpack — 1 label not found: Supplier.
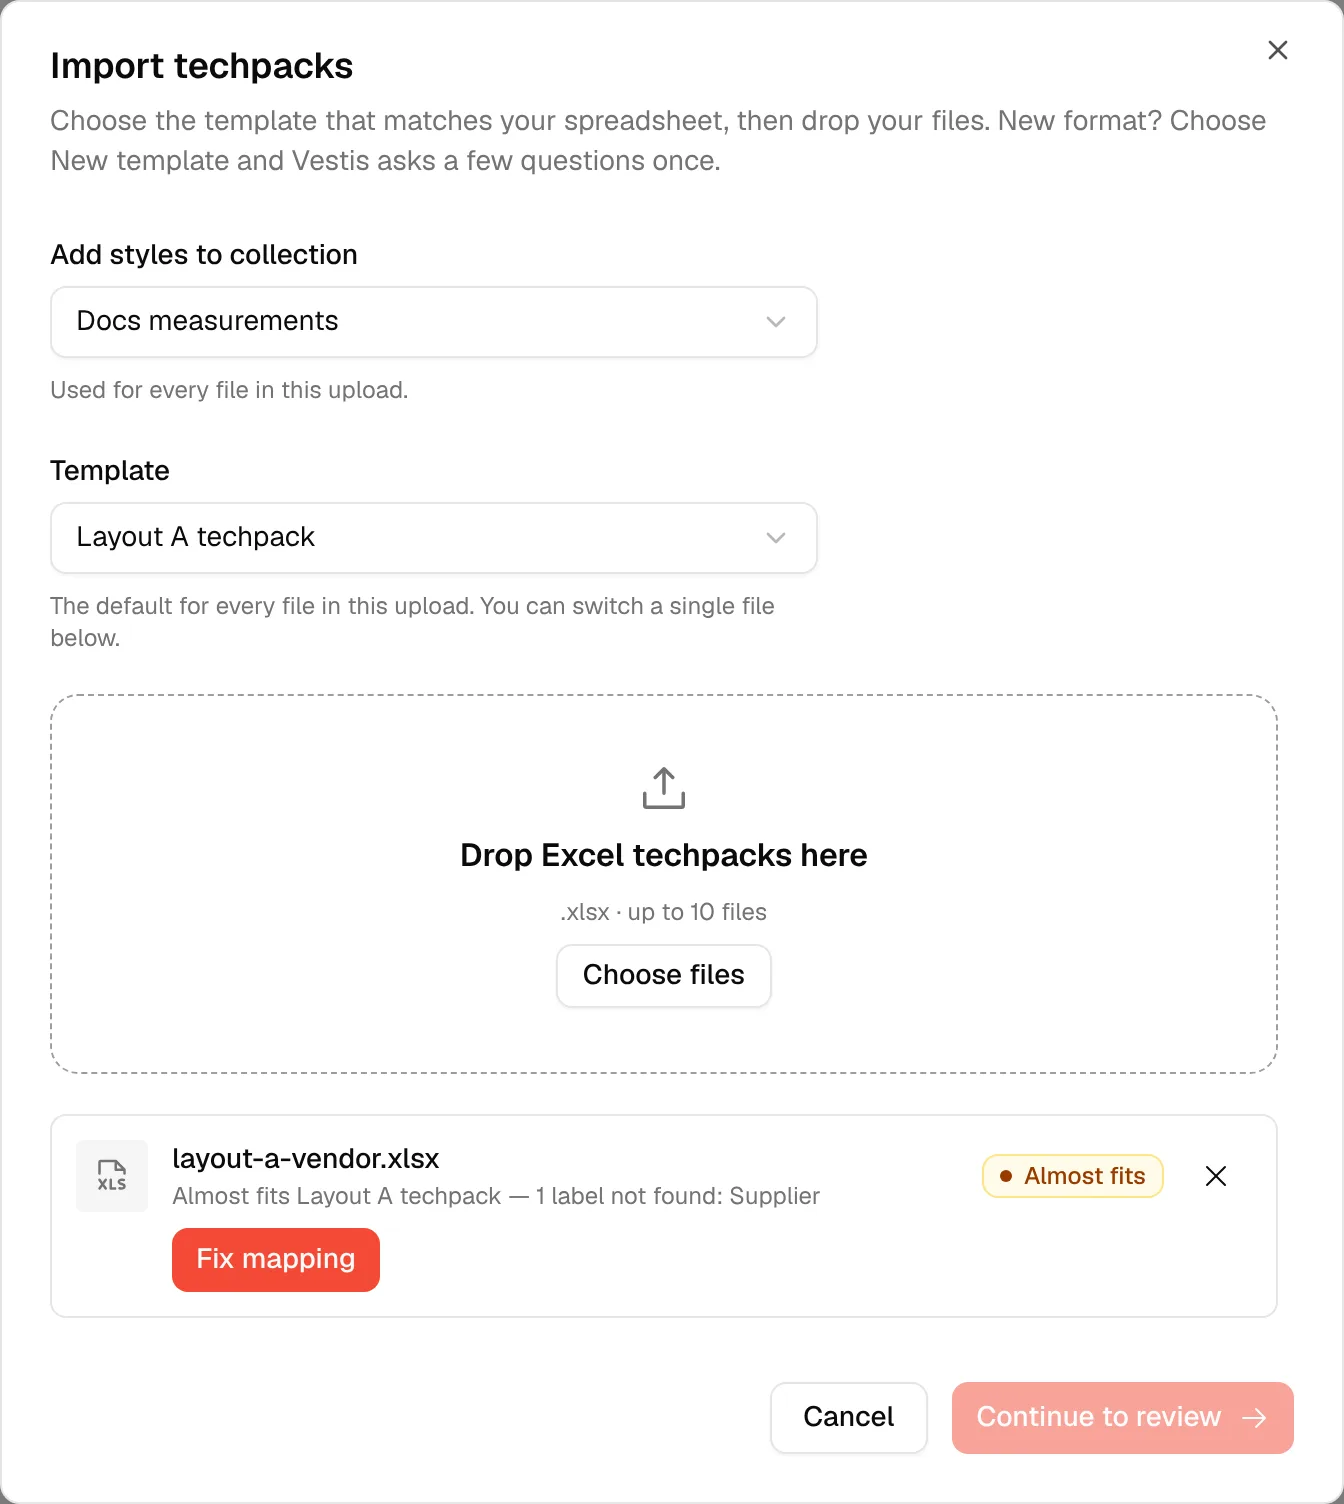
Click Fix mapping to see just the missing answers.
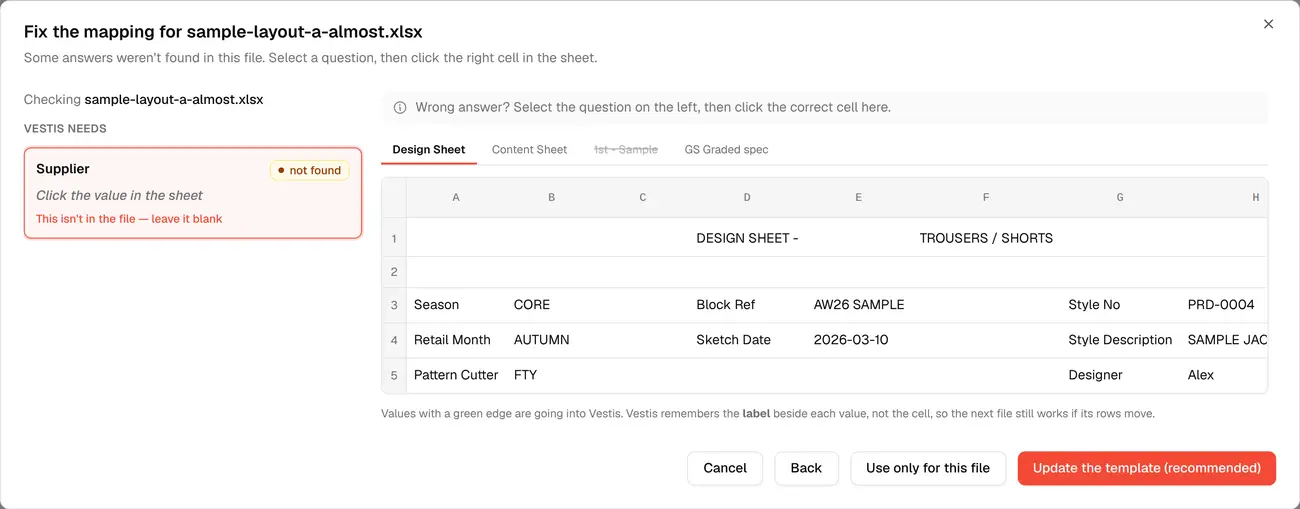
Click the question, then click the right cell, same as during setup. At the bottom you get two choices:
- Use only for this file: fixes this one file without touching the saved template. Use this if the file in front of you is a one-off.
- Update the template (recommended): saves the fix into the template, so every future file with the same gap is fixed automatically.
Part 2 — Measurements (size charts)
Vestis can read a spec workbook and turn its size chart straight into a measurement card in your library, ready to attach to any style. The steps are the same as a techpack: choose a template, upload, check what we found the first time, review, import.
We'll use sample-layout-a.xlsx again. It has a size chart on a sheet called "GS Graded spec", plus three other sheets that don't hold any measurements.
The first time
1. Choose a template, then upload
Go to Library → Measurements, then click Import from Excel.
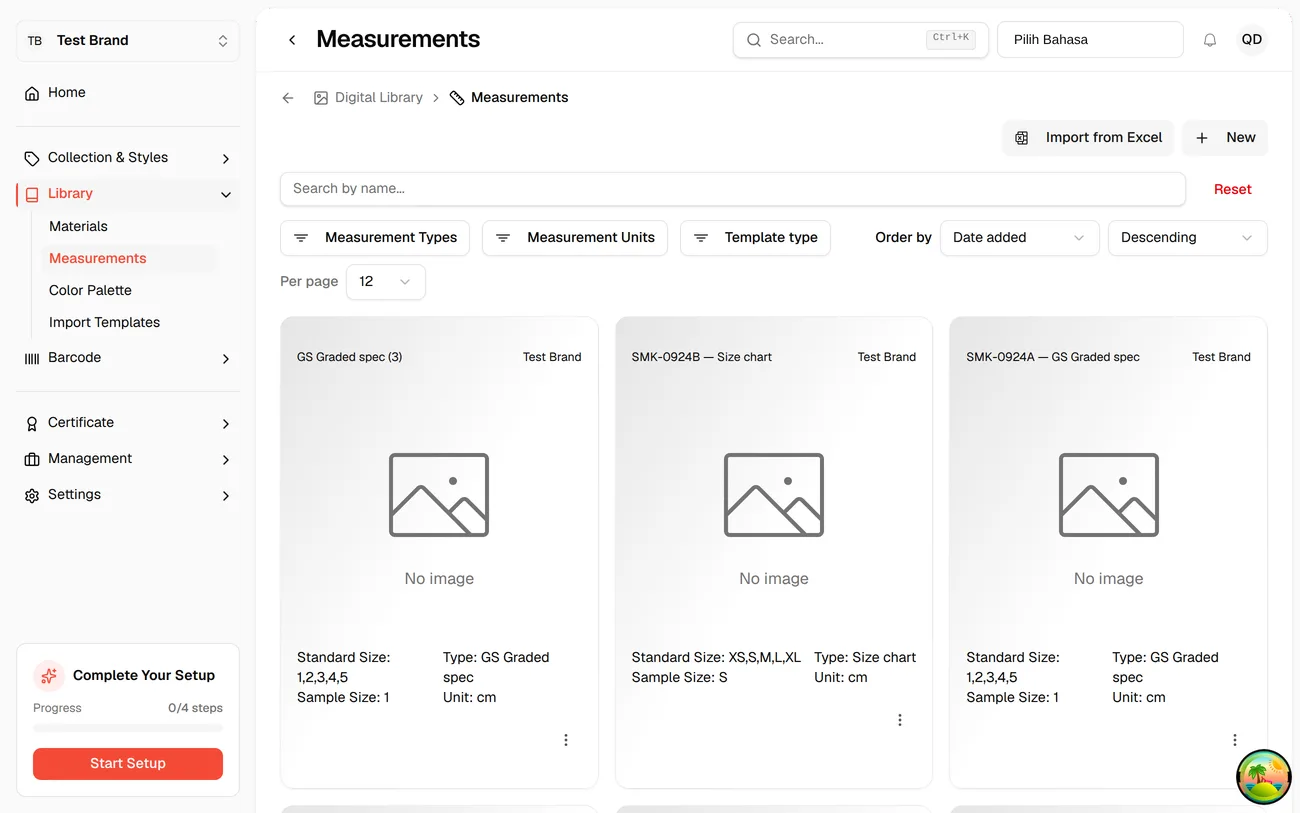
The dialog looks just like the techpack one. The Template field is empty ("Choose a template…"), and the drop zone says Choose a template first until you pick one. It takes one file at a time.
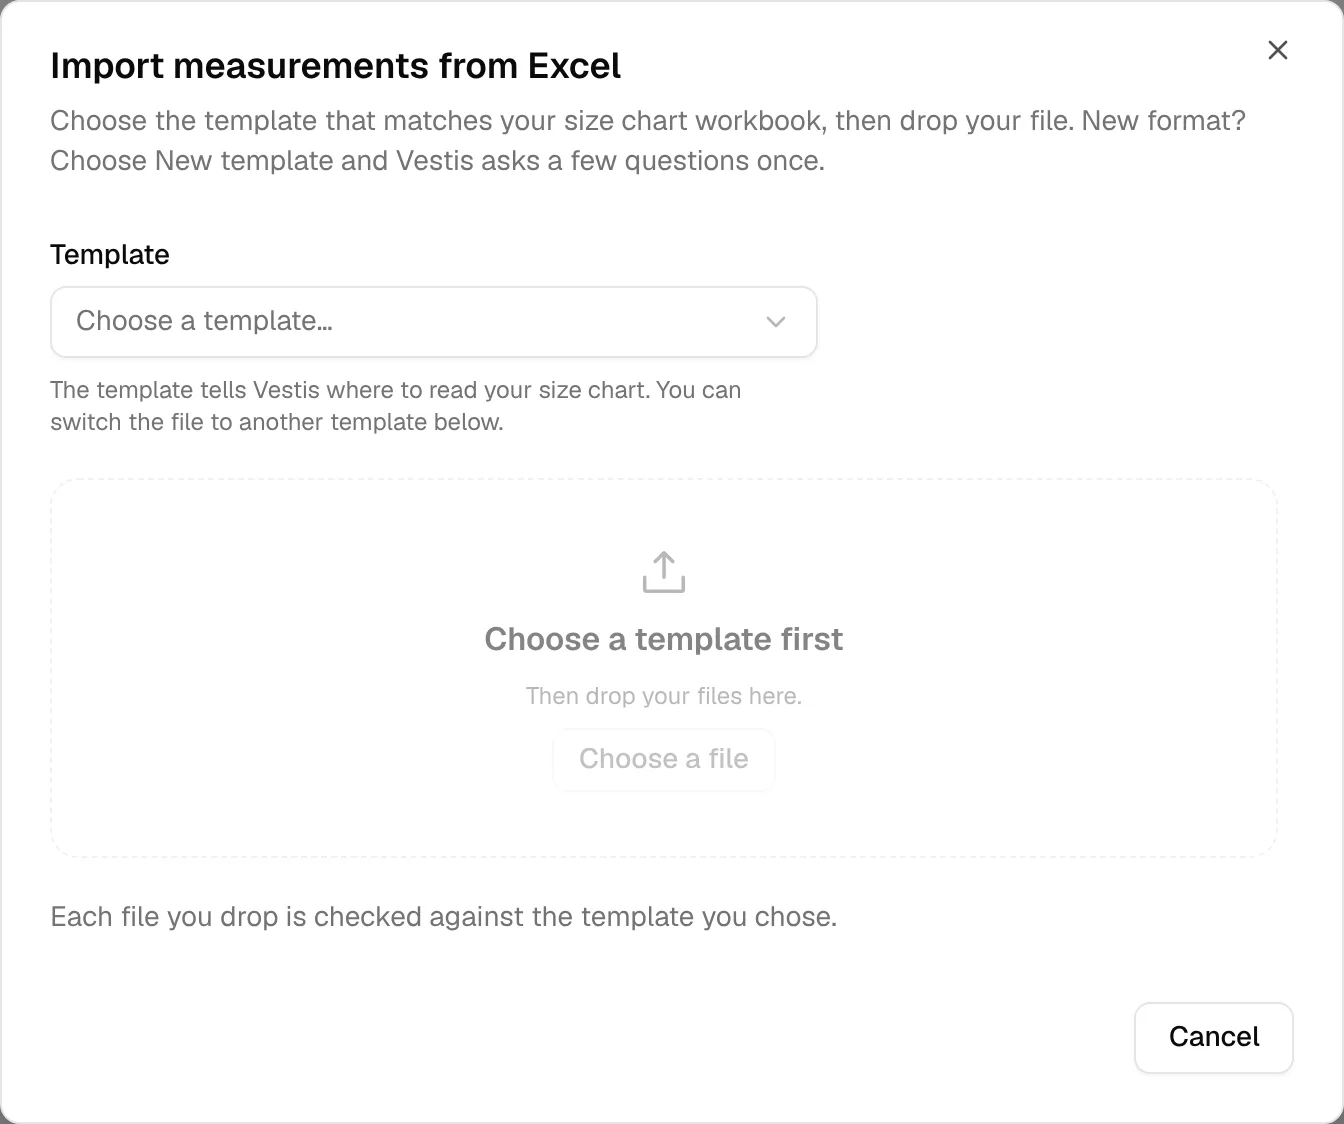
Since Vestis has never seen this format, choose + New template. Then drop sample-layout-a.xlsx in, or click Choose a file.
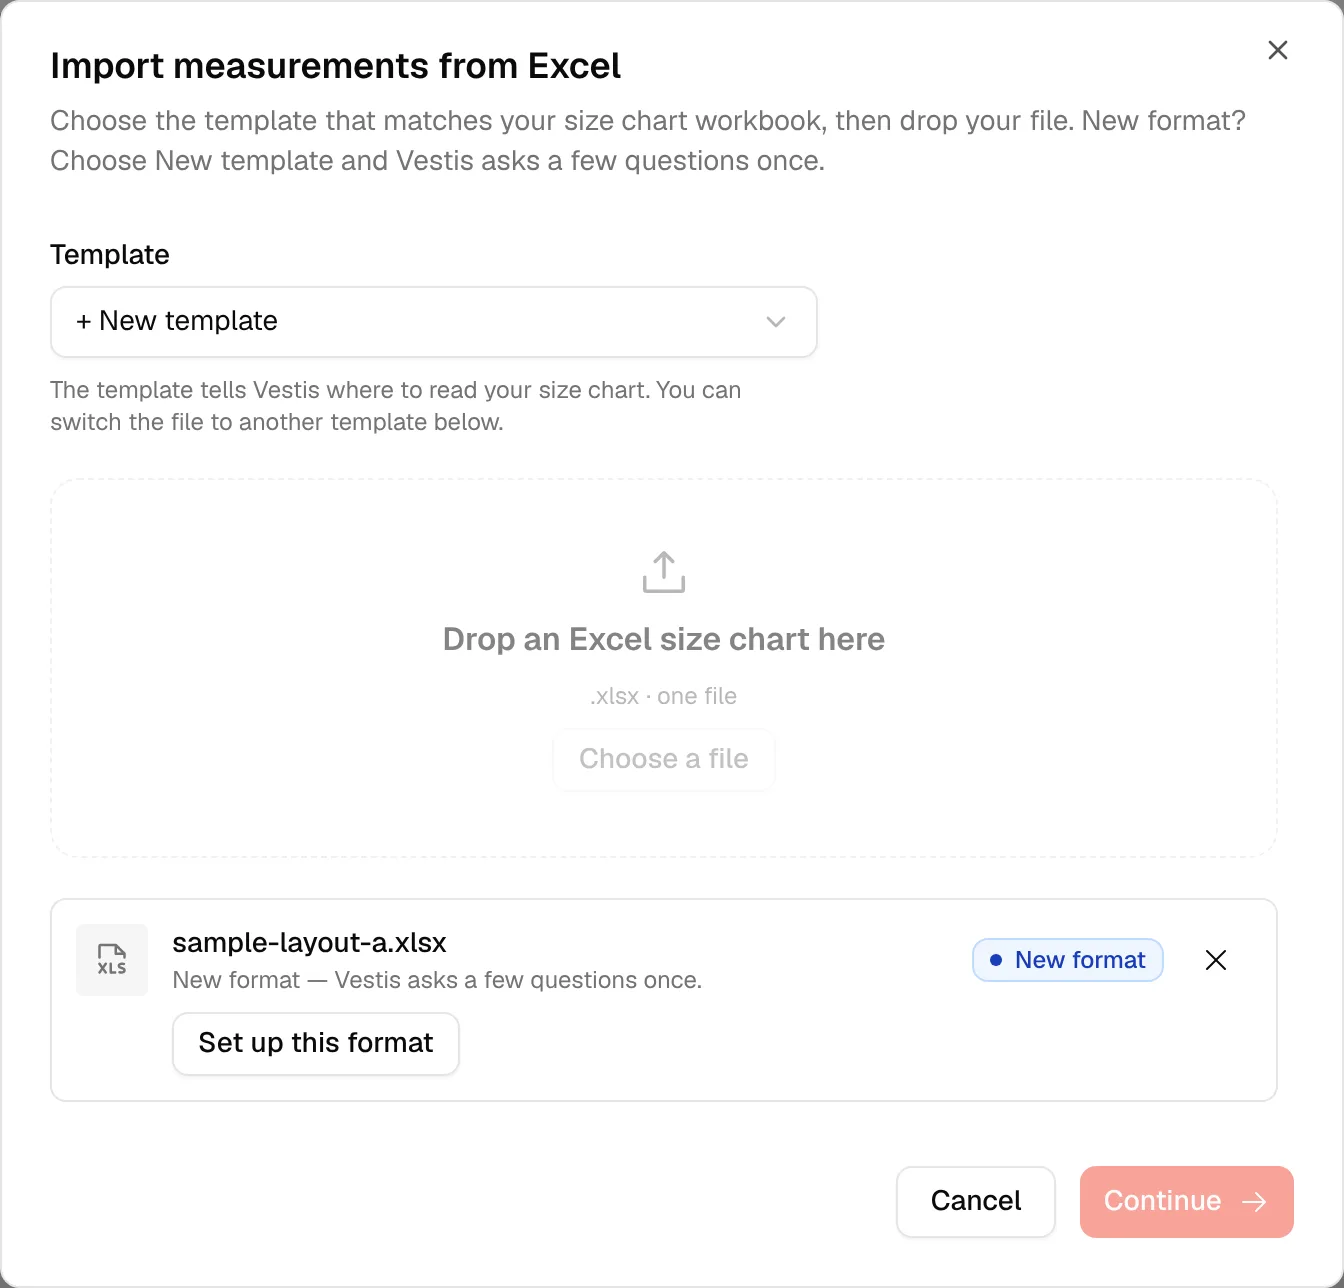
The file gets one status row: New format. Click Set up this format.
Good to know. Nothing is saved yet. Vestis only reads the file so the next screen can show you the real spreadsheet.
2. Check what we found
This screen is laid out like the techpack one. On the left are your answers. On the right is the live Excel sheet, with a tab for each sheet in the file.
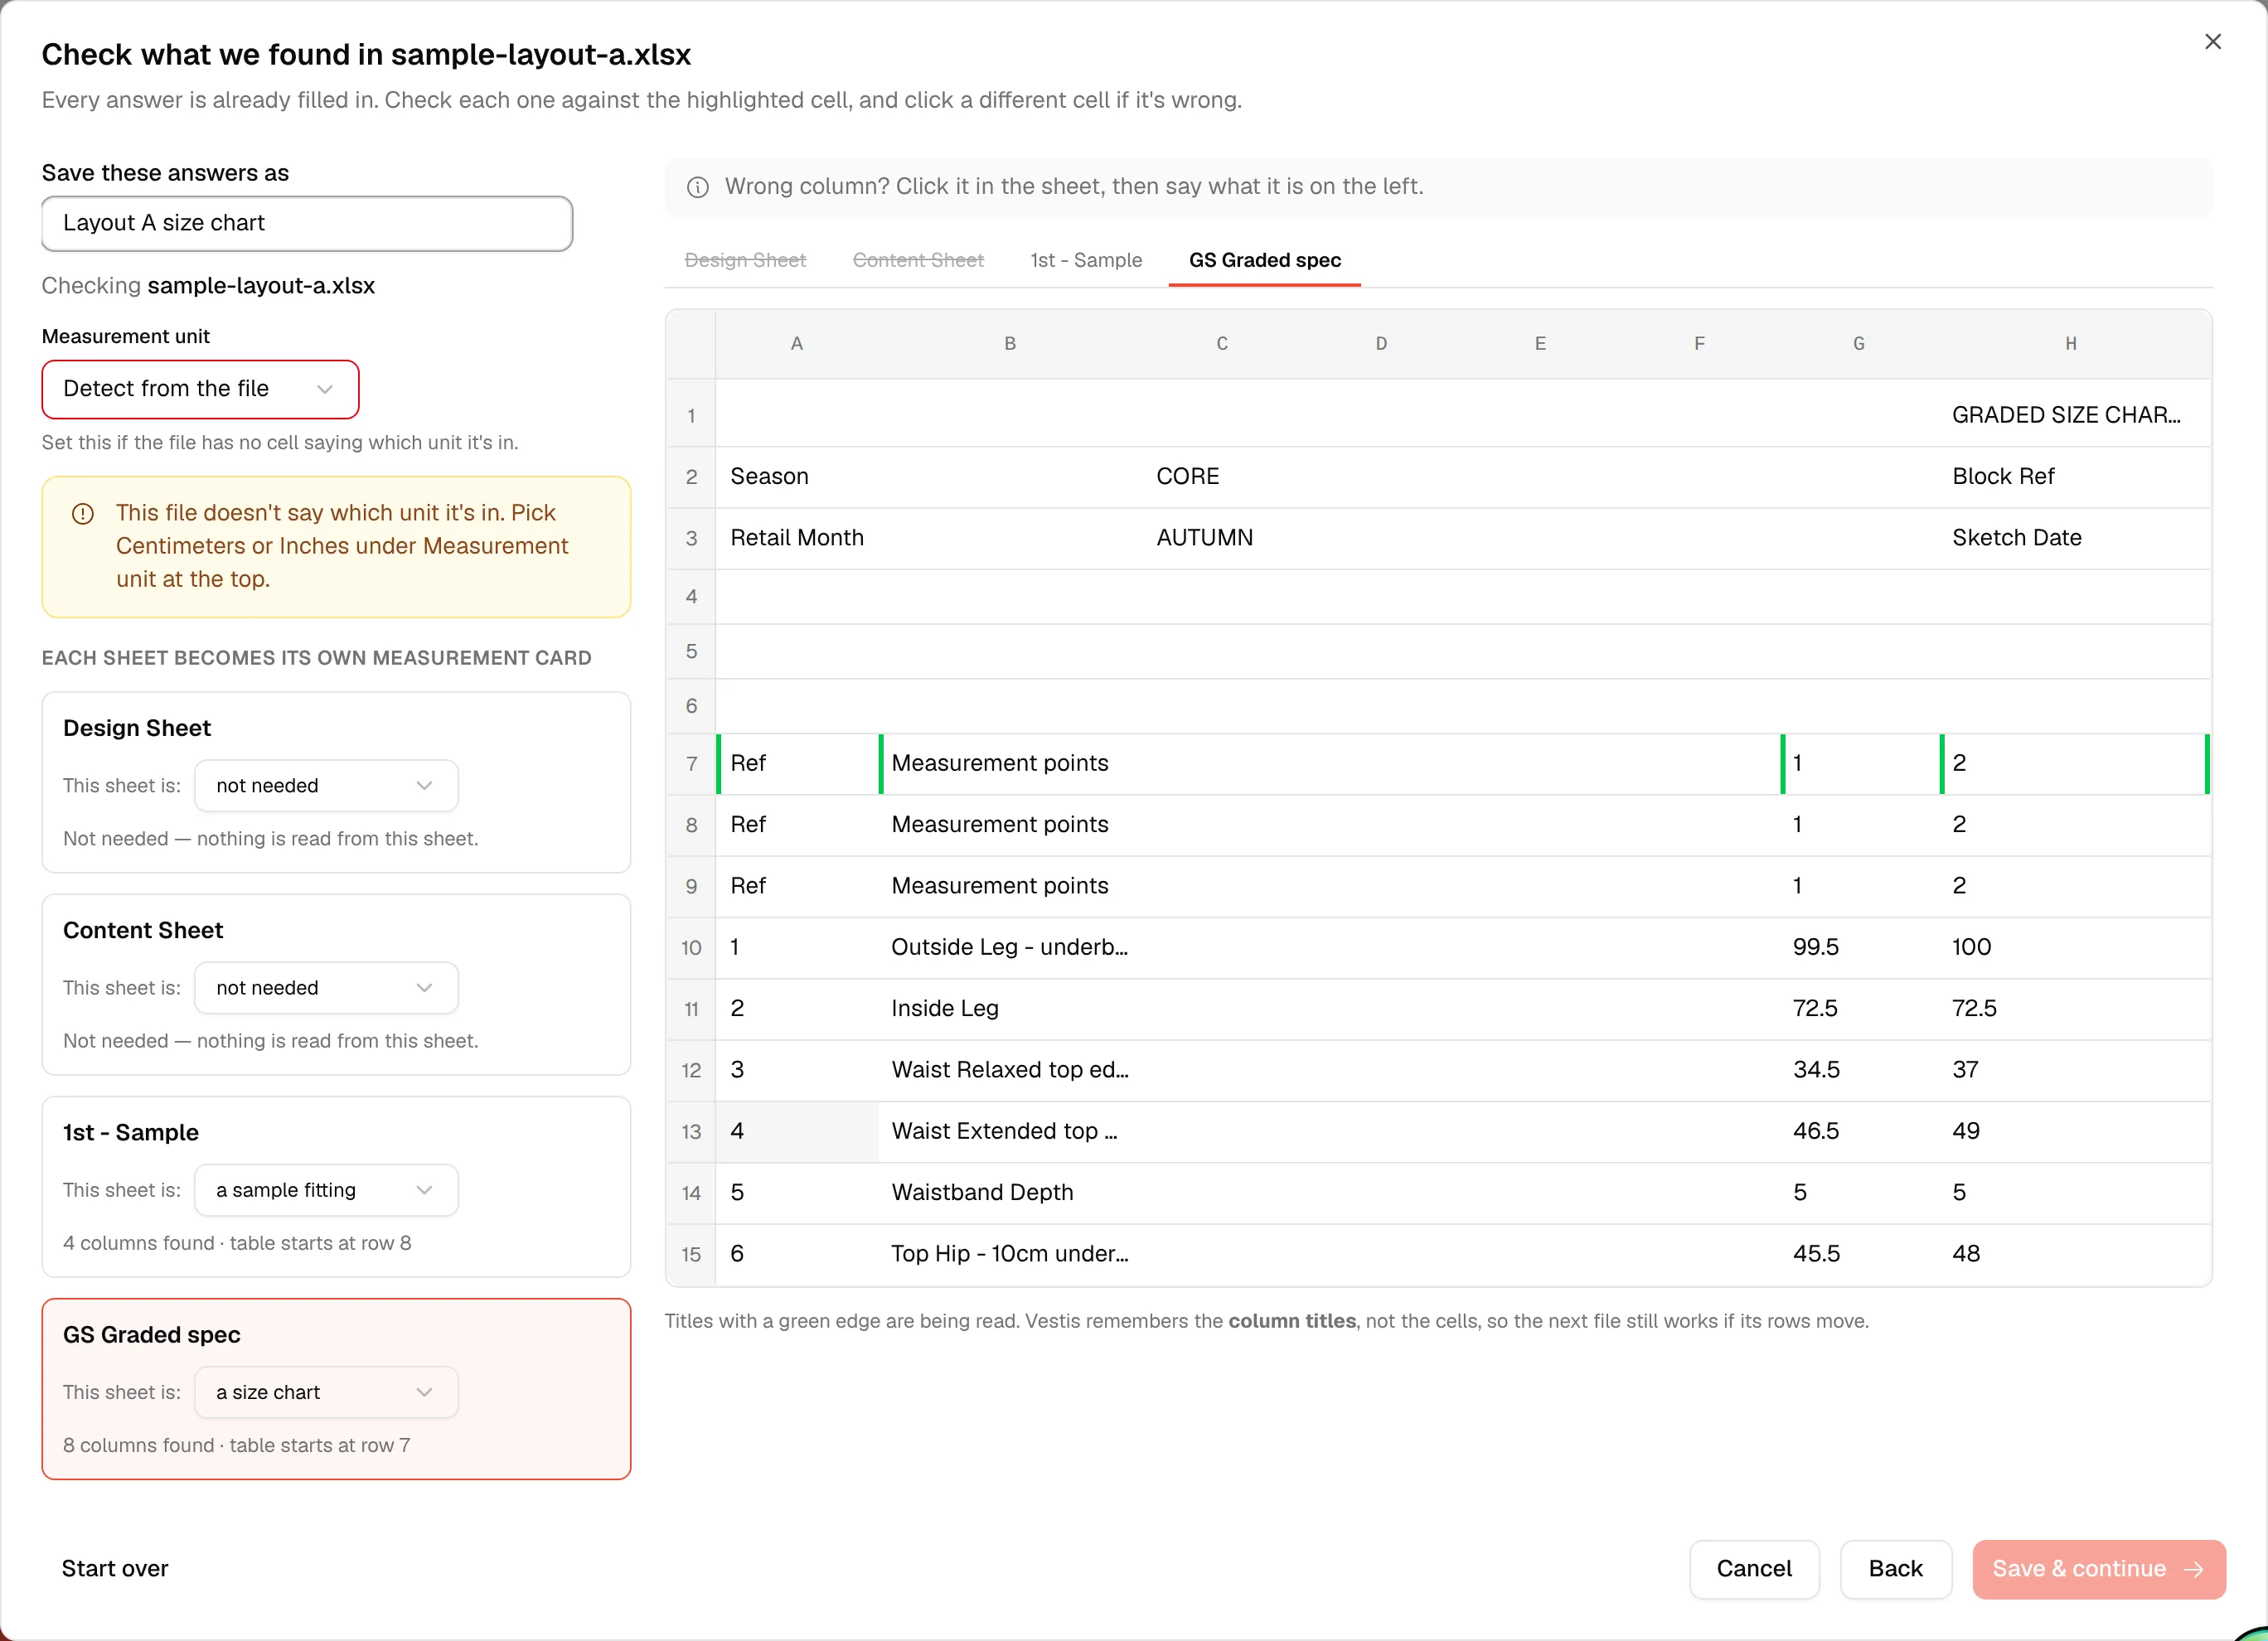
From top to bottom on the left:
- Save these answers as: name the template after the file format, like "Layout A size chart", not the file's own name. You only see this when you're setting up a new template.
- Checking the file's name.
- Measurement unit, once for the whole file. Pick Centimeters or Inches. This file doesn't say which unit its numbers are in, so a message tells you to pick one, and the Save & continue button stays off until you do.
- A card for each sheet. This sheet is: says what Vestis thinks it holds:
- a size chart: the full size range with target measurements
- grading rules: how each measurement changes from one size to the next. If you pick this, Vestis asks whether the numbers are steps between sizes (each cell is the change from the size next to it) or offsets from the sample size (each cell is the difference from the sample size, with the sample size itself at zero)
- a sample fitting: one fitting round, like a first or second sample
- a guide: instructions or a diagram for another sheet
- not needed: nothing to bring in, like a cover page or a colour list
Sheets with no measurements on them start as not needed. In this file, Design Sheet and Content Sheet are set already and need nothing from you.
Click a sheet's card to work on it. For GS Graded spec, set to a size chart:
- The table starts at "Ref" (row 7) shows where Vestis found the header row. If that's wrong, click a different row in the sheet.
- Columns found lists every column Vestis matched: reference code, measurement name, one column per size, and any extra number column. In the sheet, the column titles Vestis reads have a green edge. To change one, click that column in the sheet, then pick This column is: and what it should be.
- For grading rules, a question asks how the numbers work. If the sheet has a text block of notes you want to keep, there's an Extra text block question too.
Underneath, Also in your file lists anything else Vestis spotted that you can bring in: style code, style name, brand, sample size, measurement unit and status. Each has Pick the cell if you'd rather point at a different one.
Pick Centimeters (or Inches, whichever the file is really in) from Measurement unit. The warning clears and the button turns on.
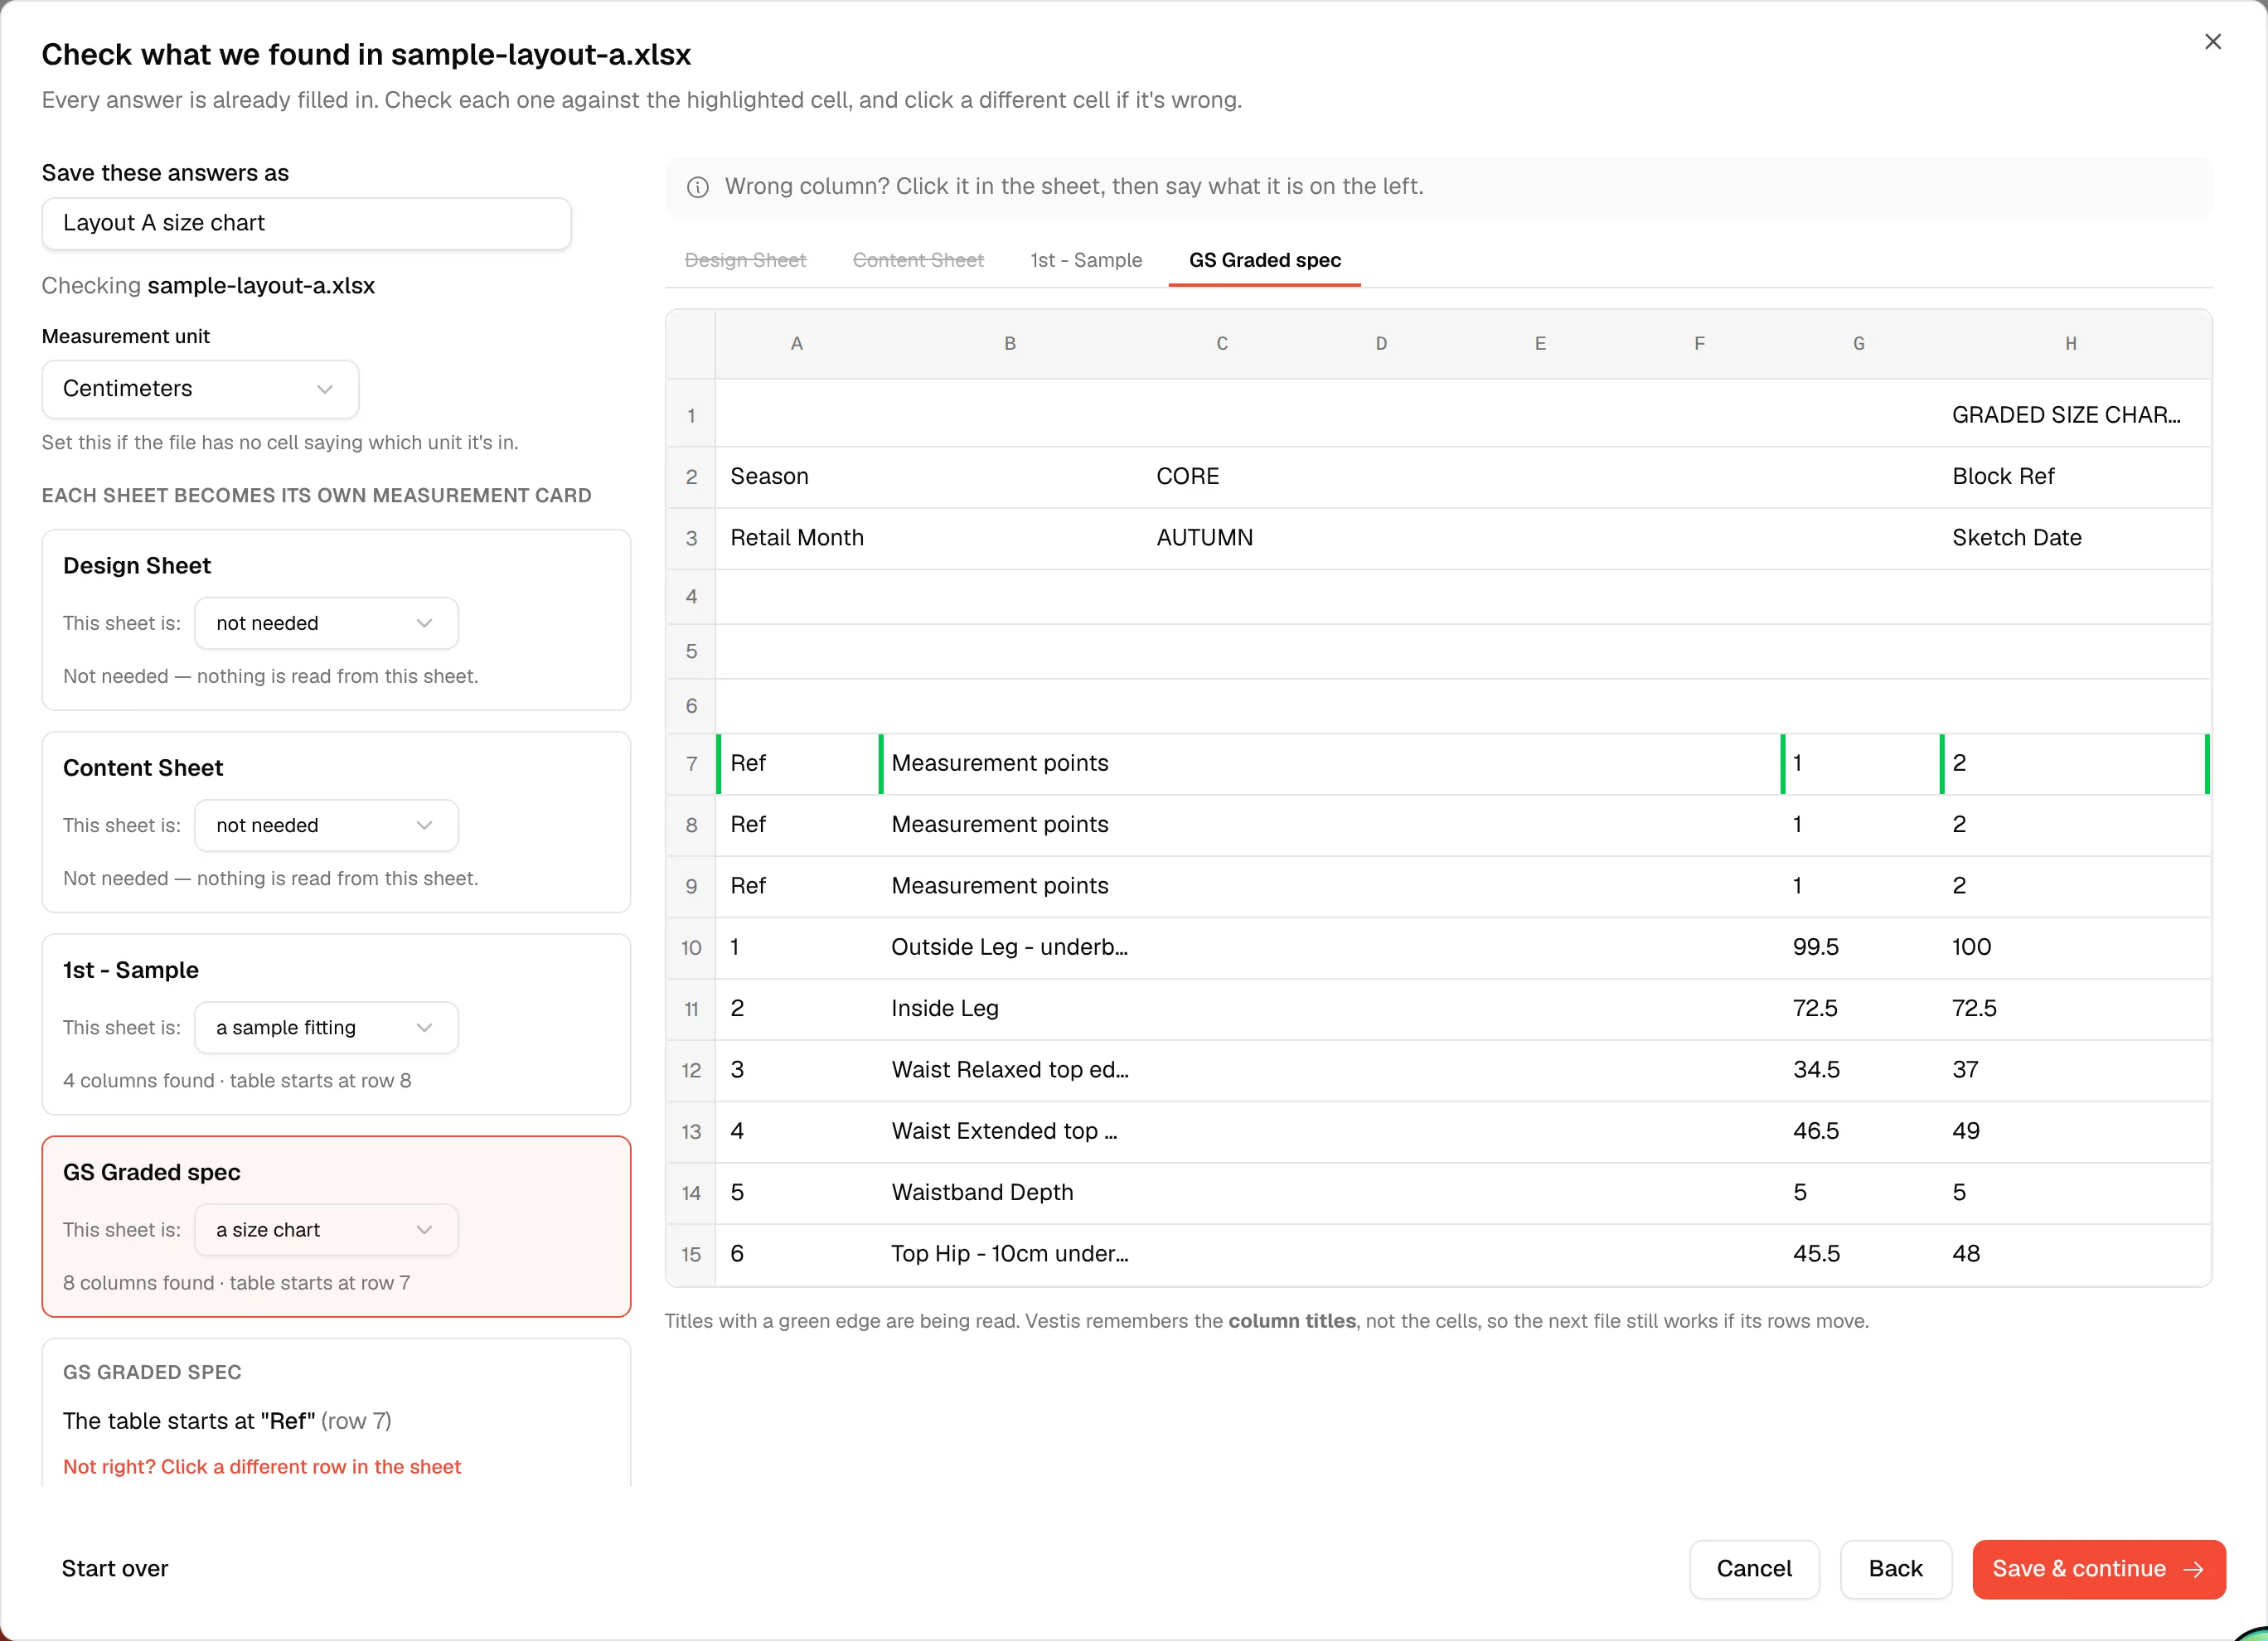
Click Save & continue. This goes straight to Review.
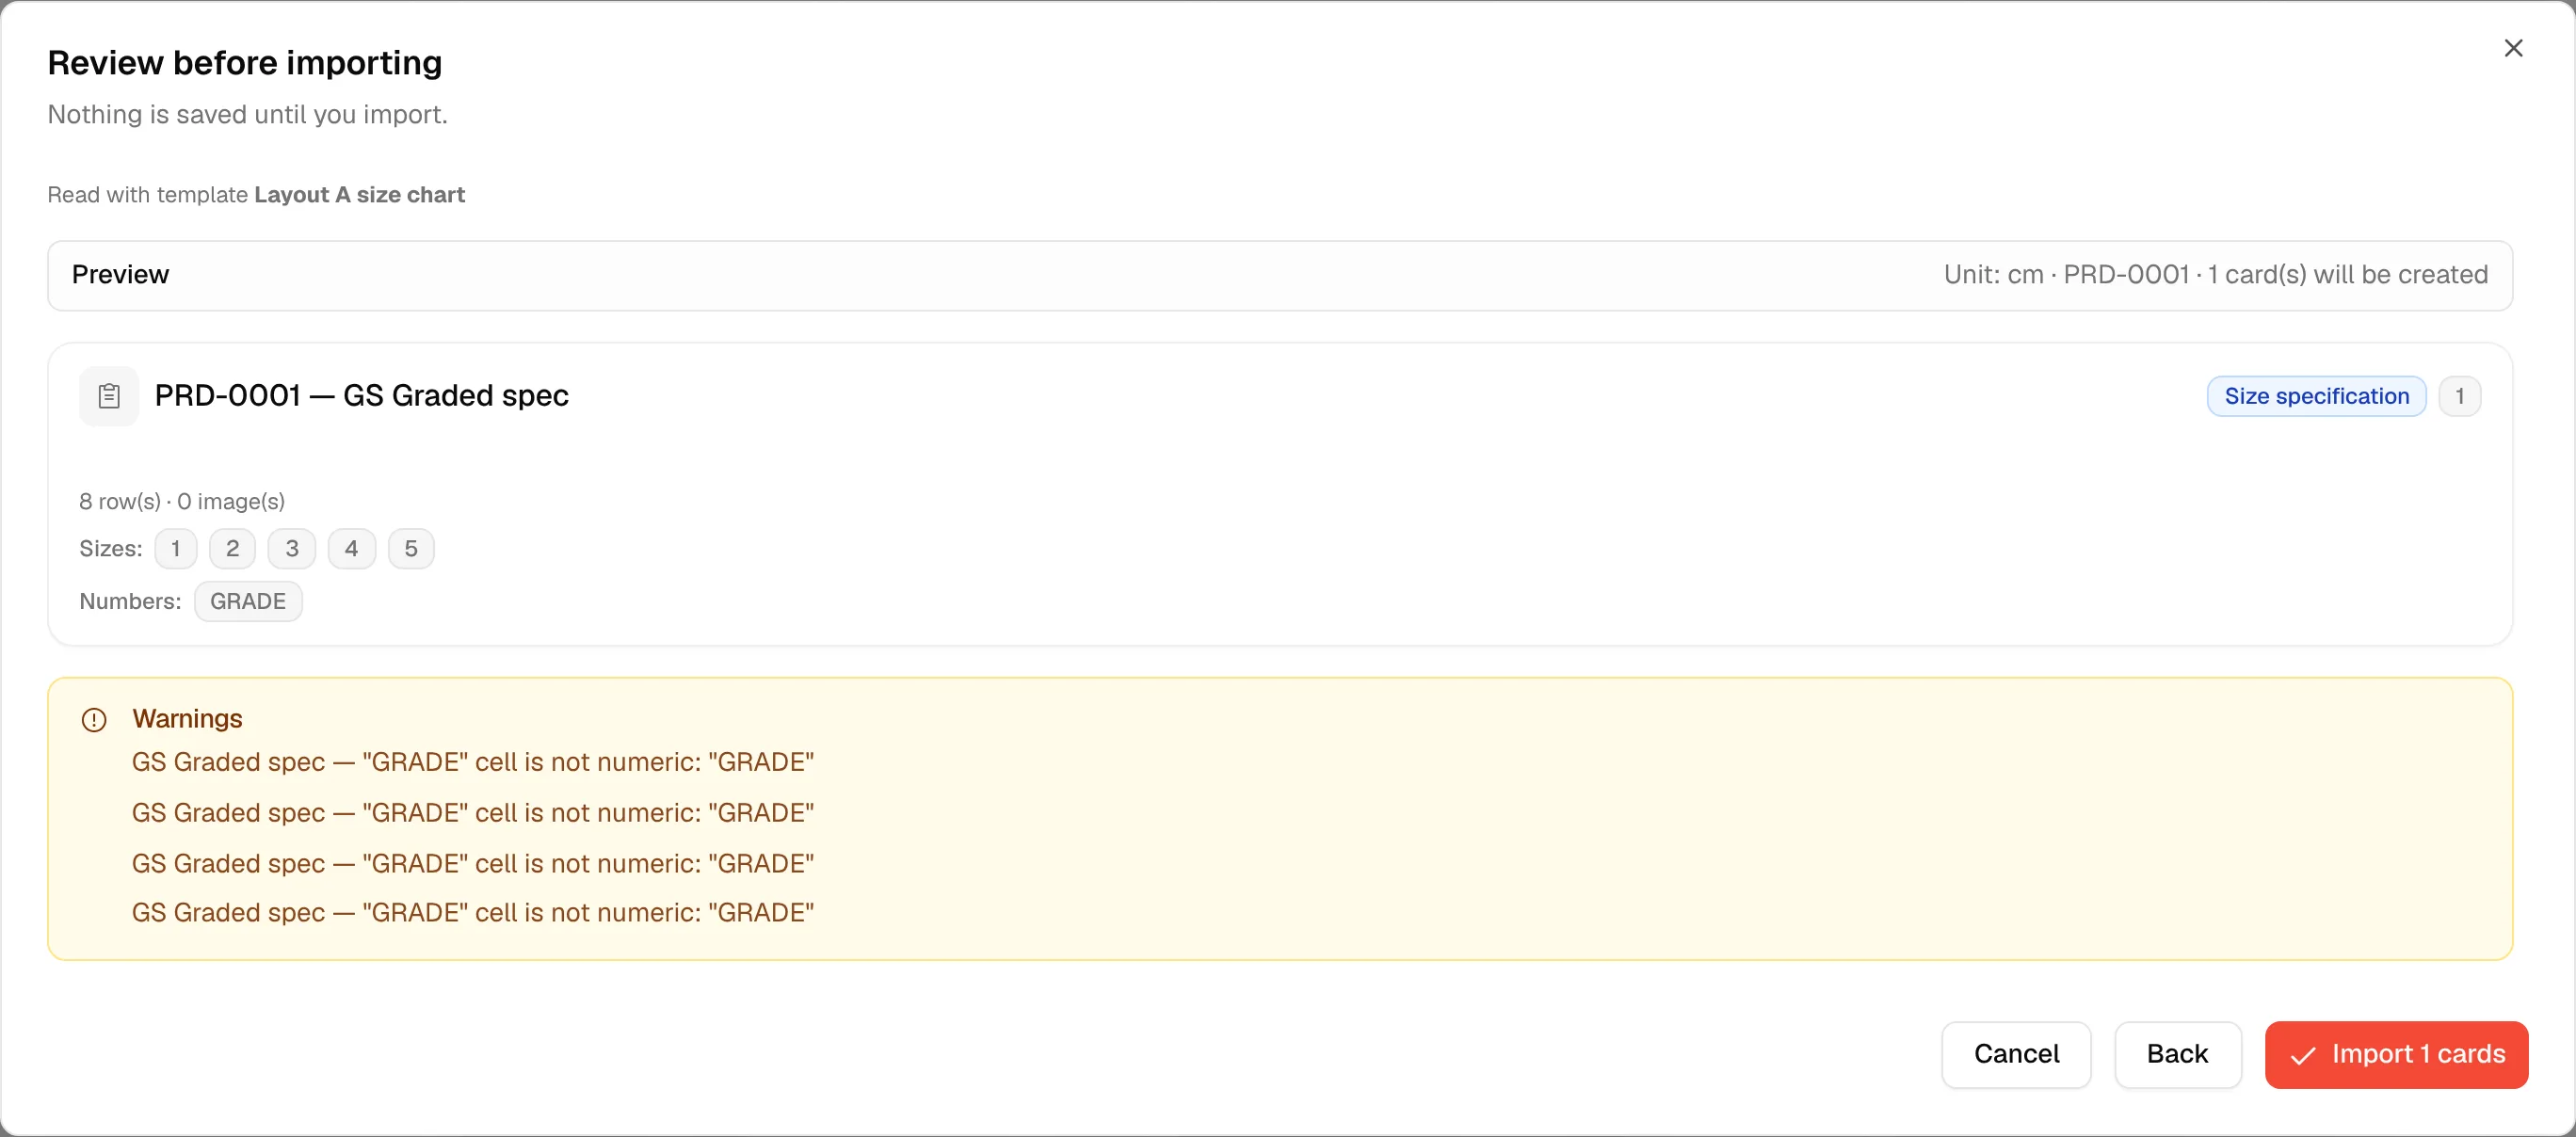
3. Review
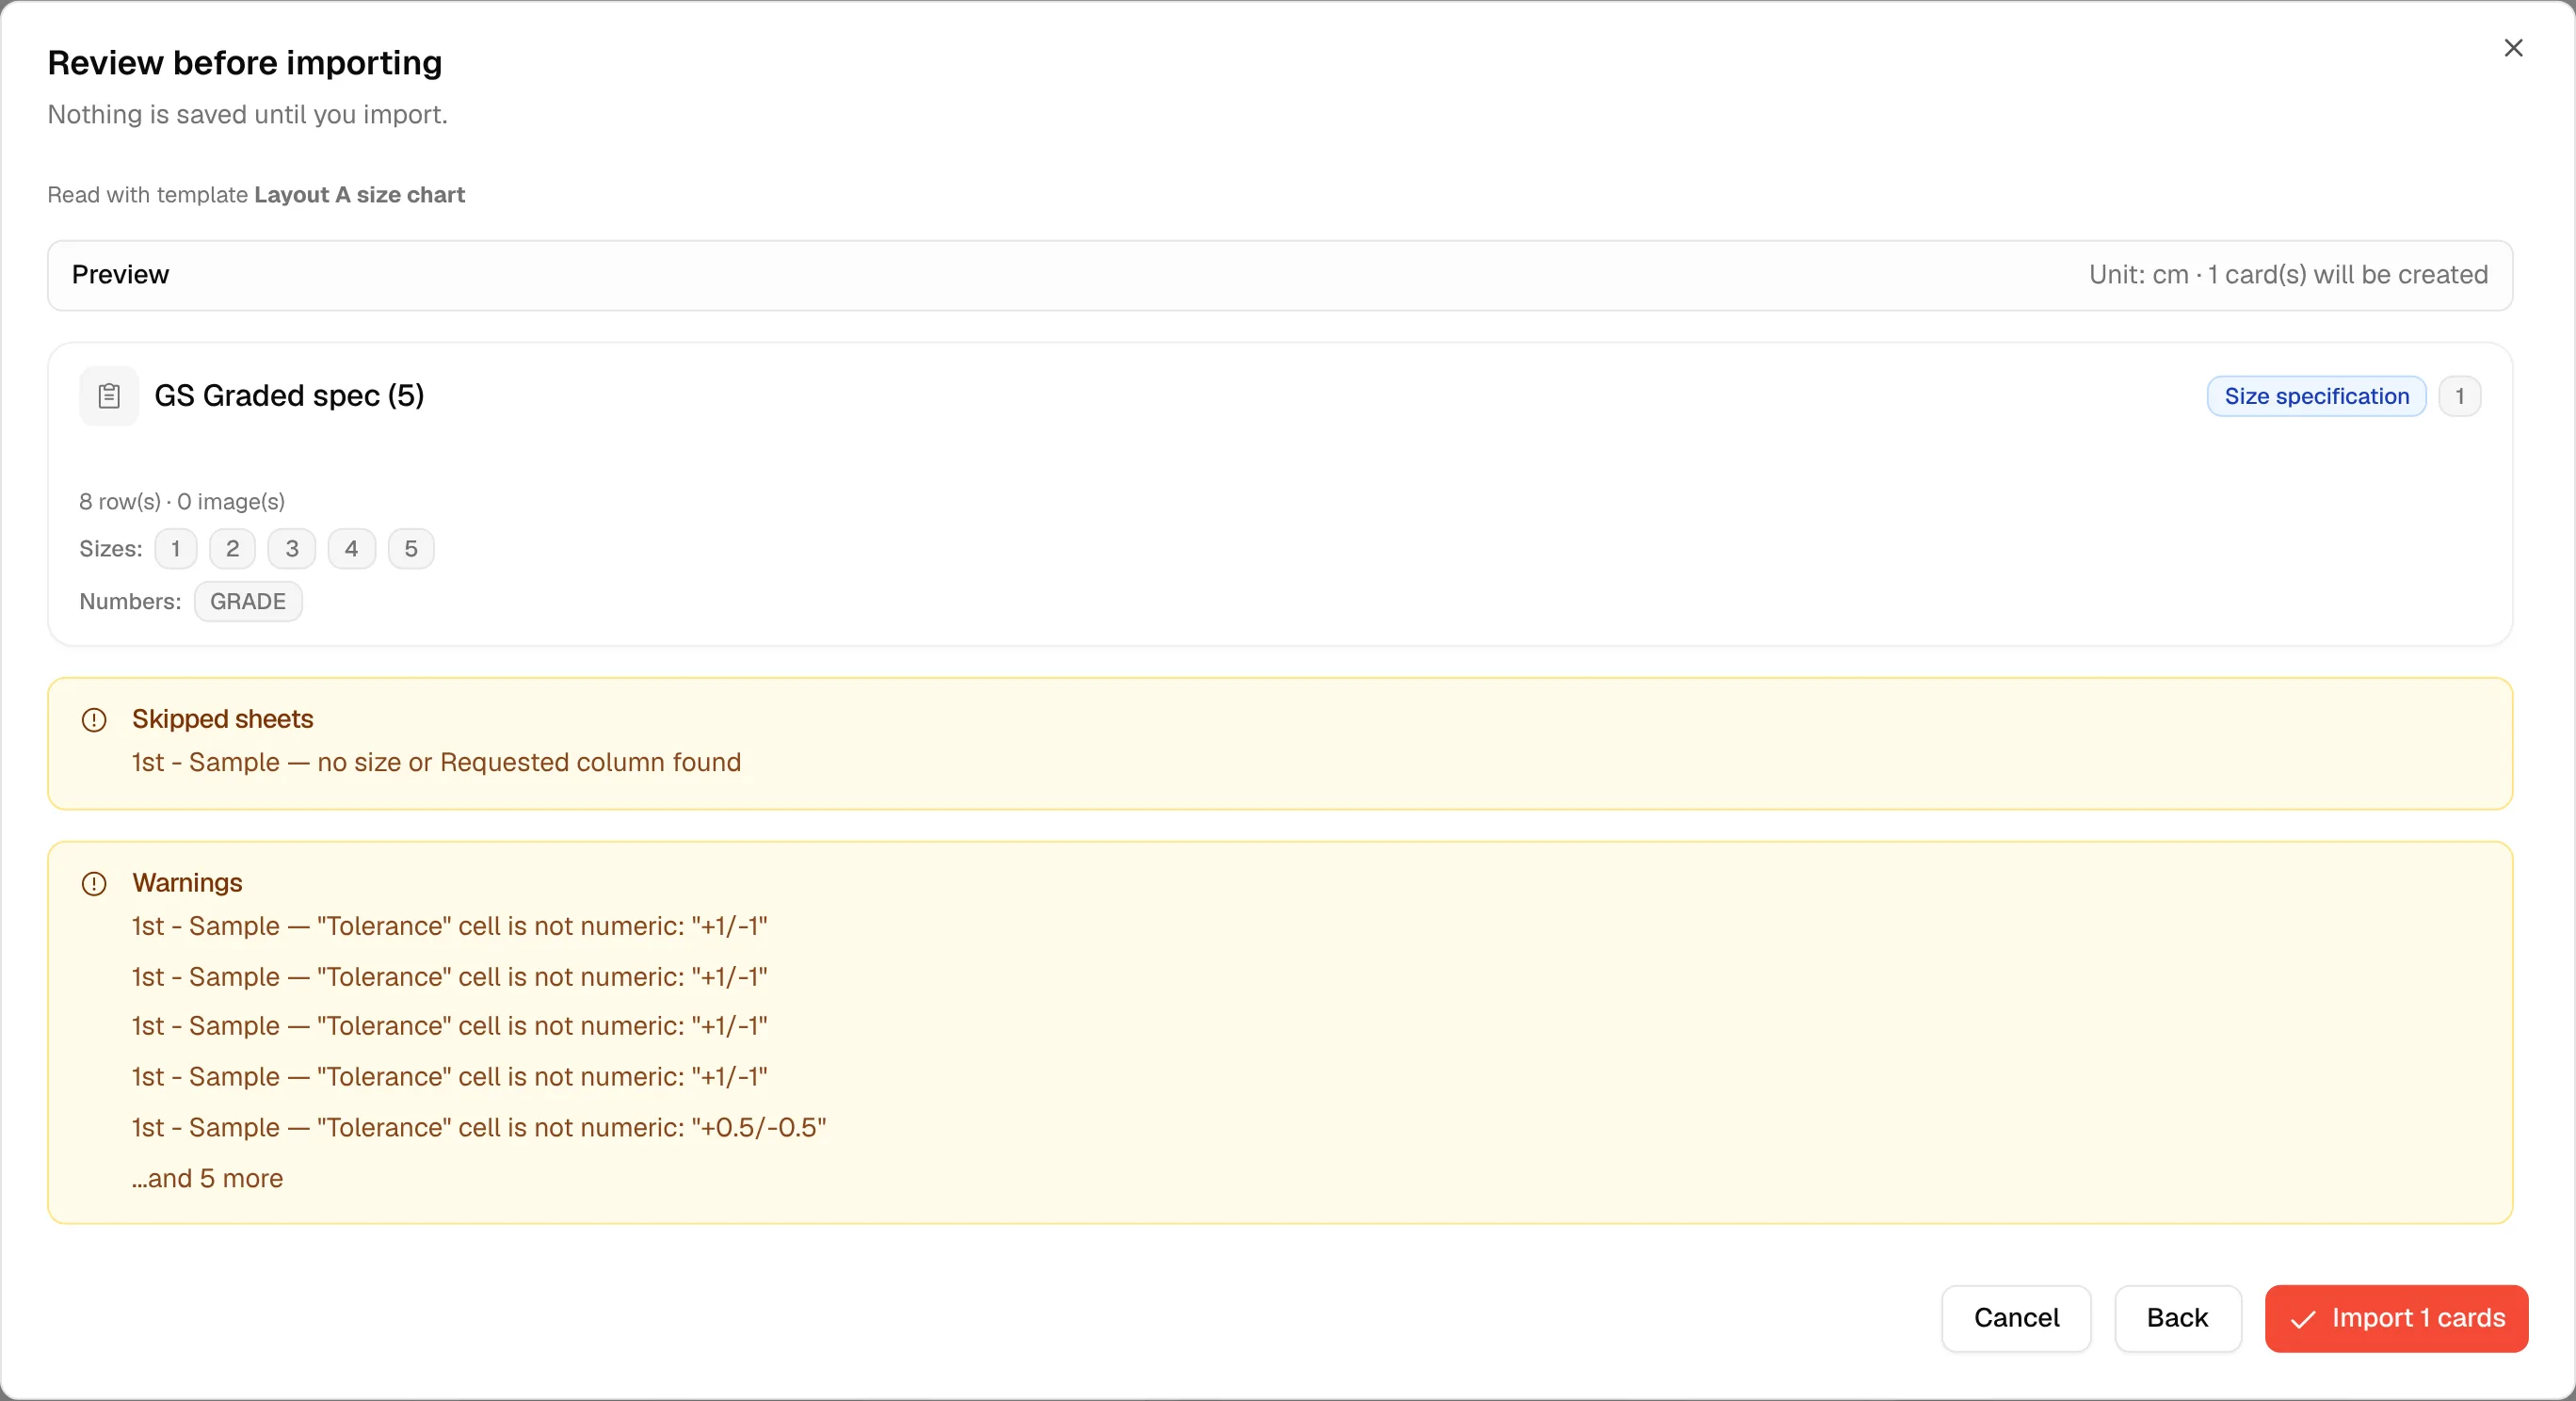
The title is Review before importing, and a line under it says which template read the file. The template's name was chosen on the previous screen, so there's nothing to name here.
The card that will be created is named after the sheet, and shows its type (Size specification), the sample size, how many rows and pictures it found, and the sizes it covers. Any picture columns in the file are read for reference only: pictures themselves aren't imported.
Warnings point out something worth a second look, like a column with text in it where Vestis expected a number. They don't stop you importing.
Click Import N cards.
4. Import
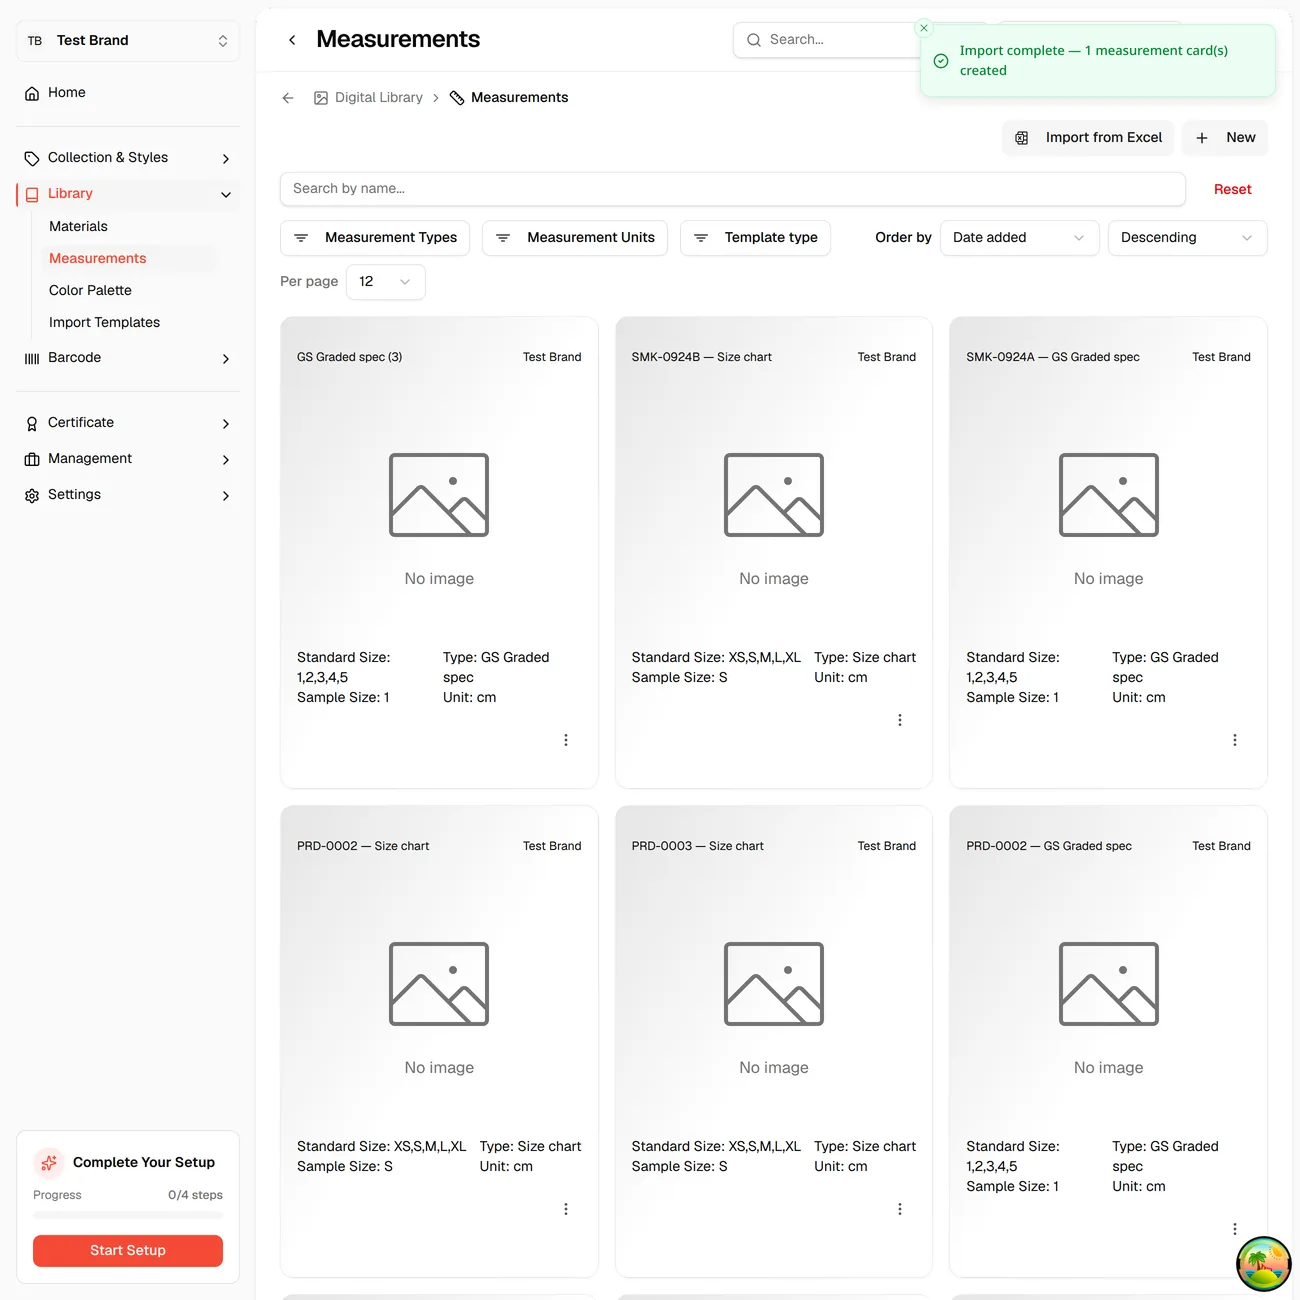
The new card appears in your measurement library, with its type, sizes and unit shown on the card itself.
Next time
Once a format is saved as a template, open the dialog, choose it under Template (here, Layout A size chart) and drop the file in.
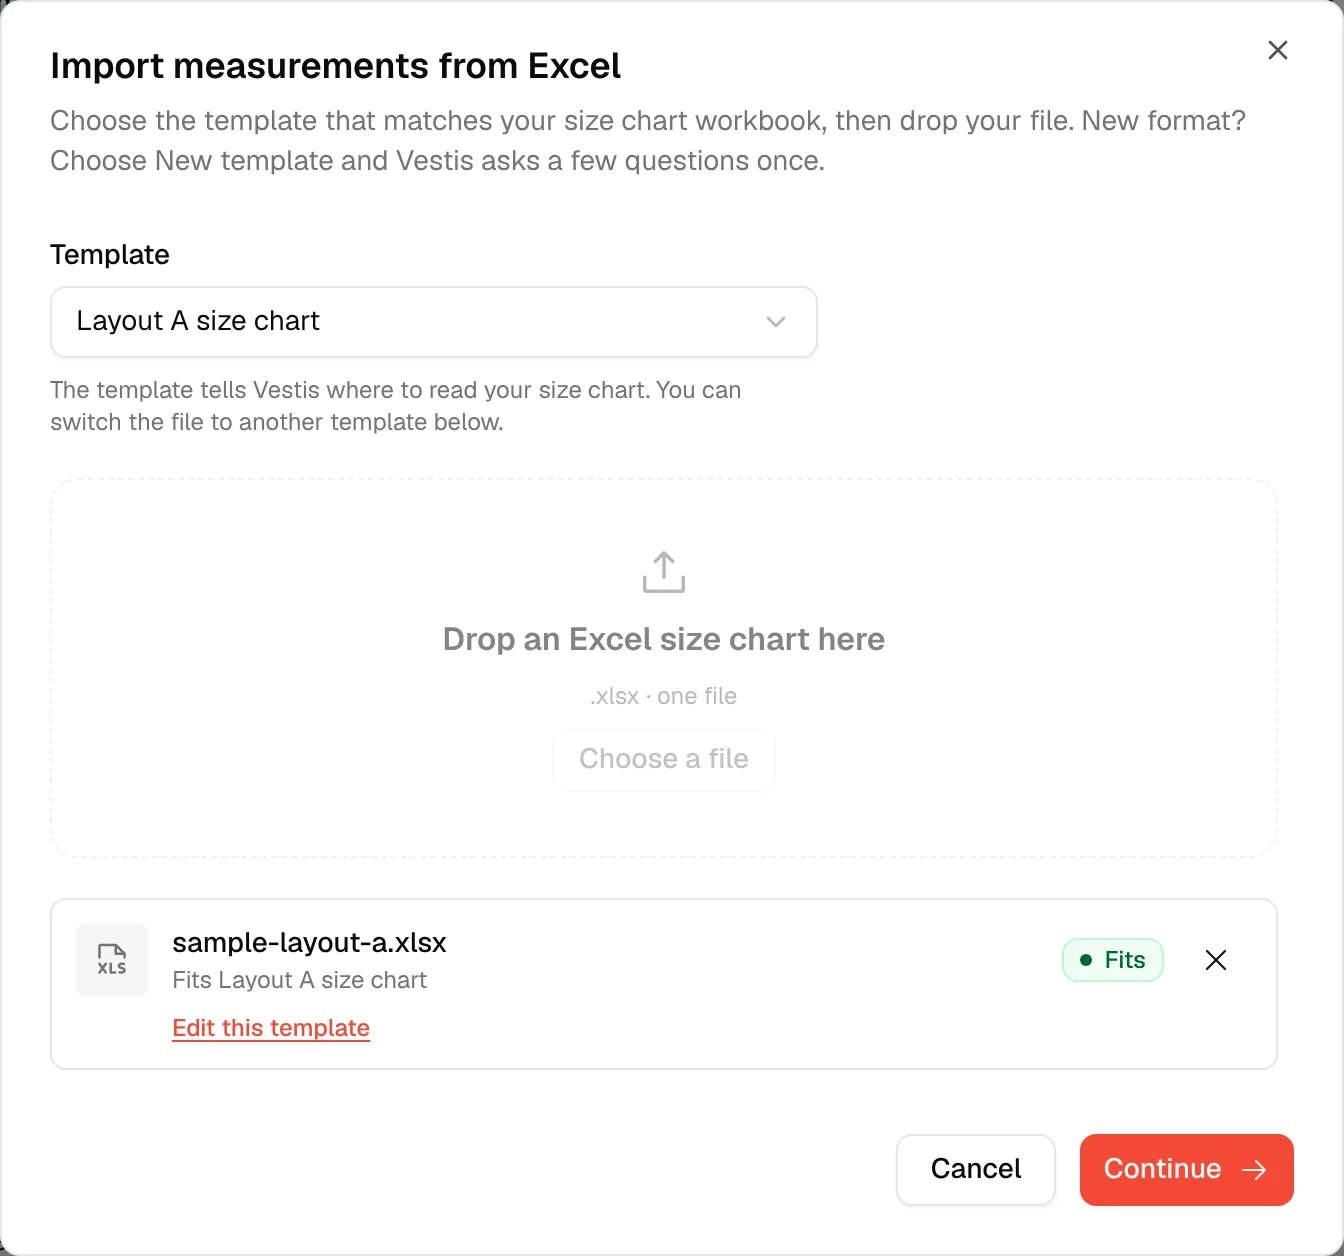
The file shows a green Fits with Fits Layout A size chart. Click Continue and you land straight on Review, with no sheet-by-sheet questions.
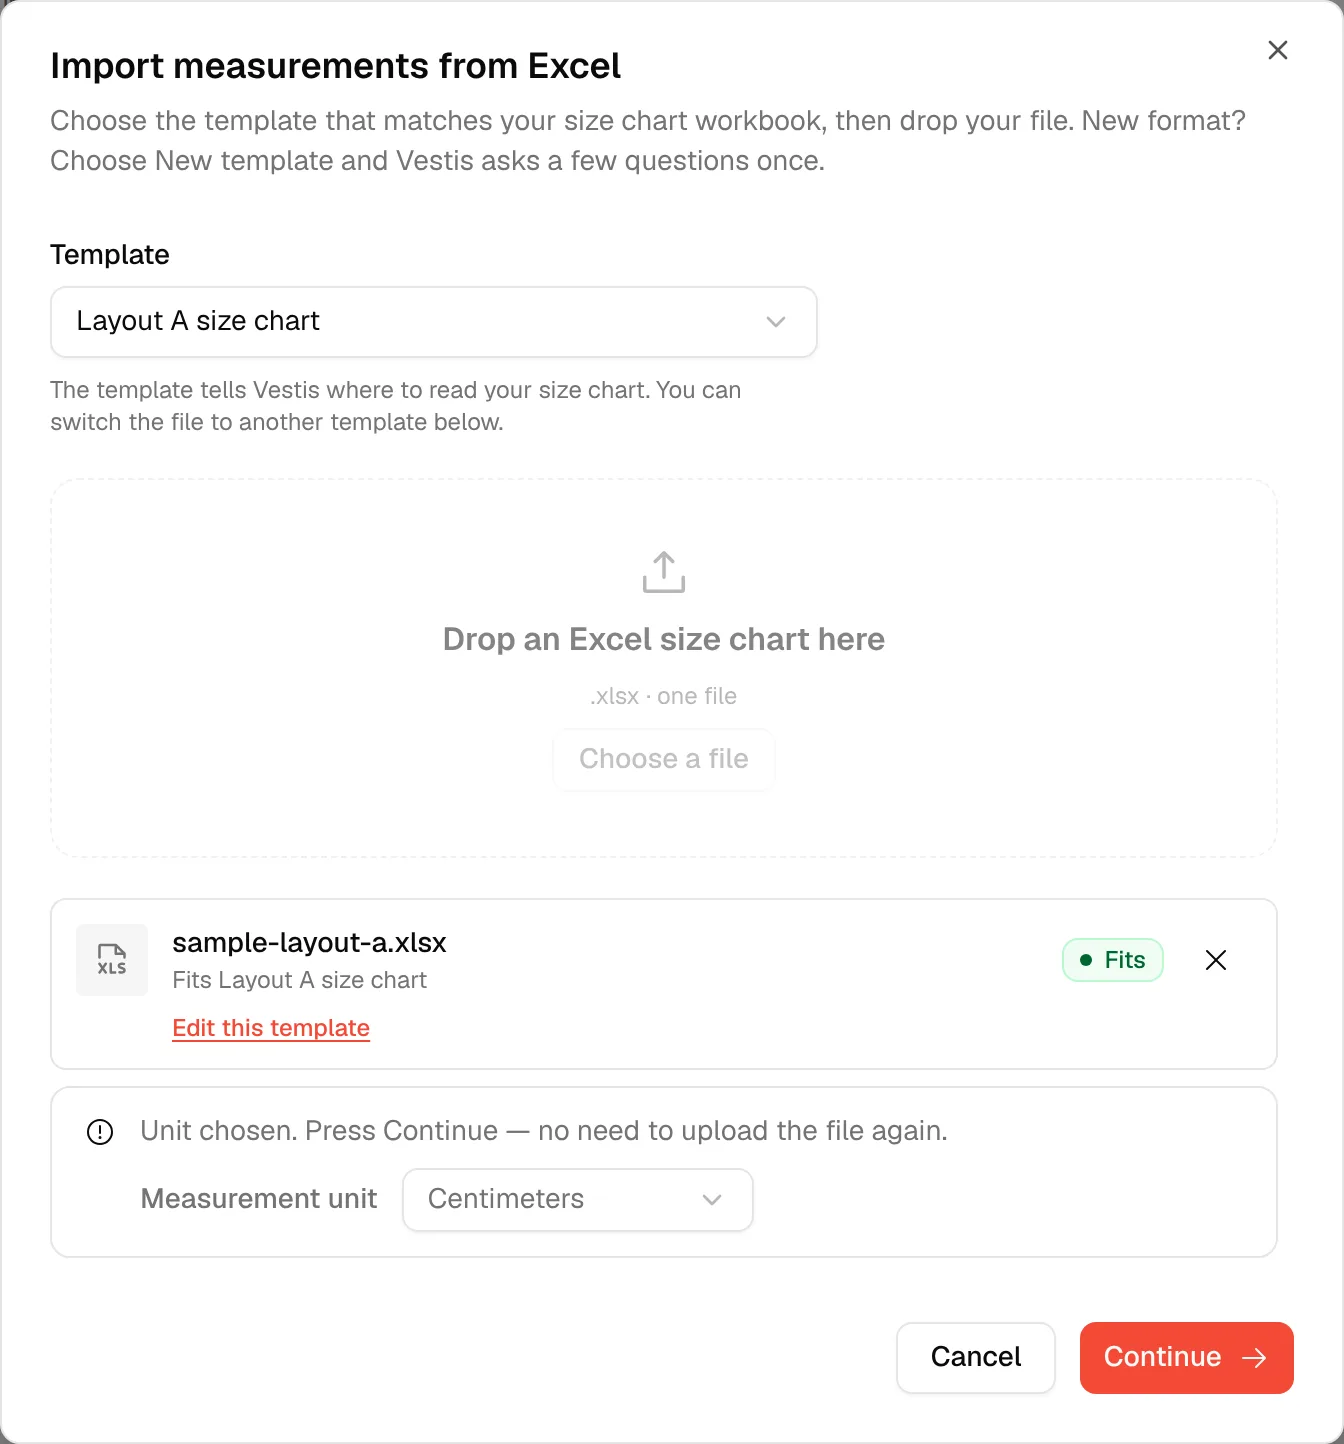
Under the status row, Edit this template opens the Check screen with the template's answers applied to your file. Change an answer, then click Save changes to template (it stays off until you change something). Vestis updates the template, checks the file again, and brings you back to the upload step.
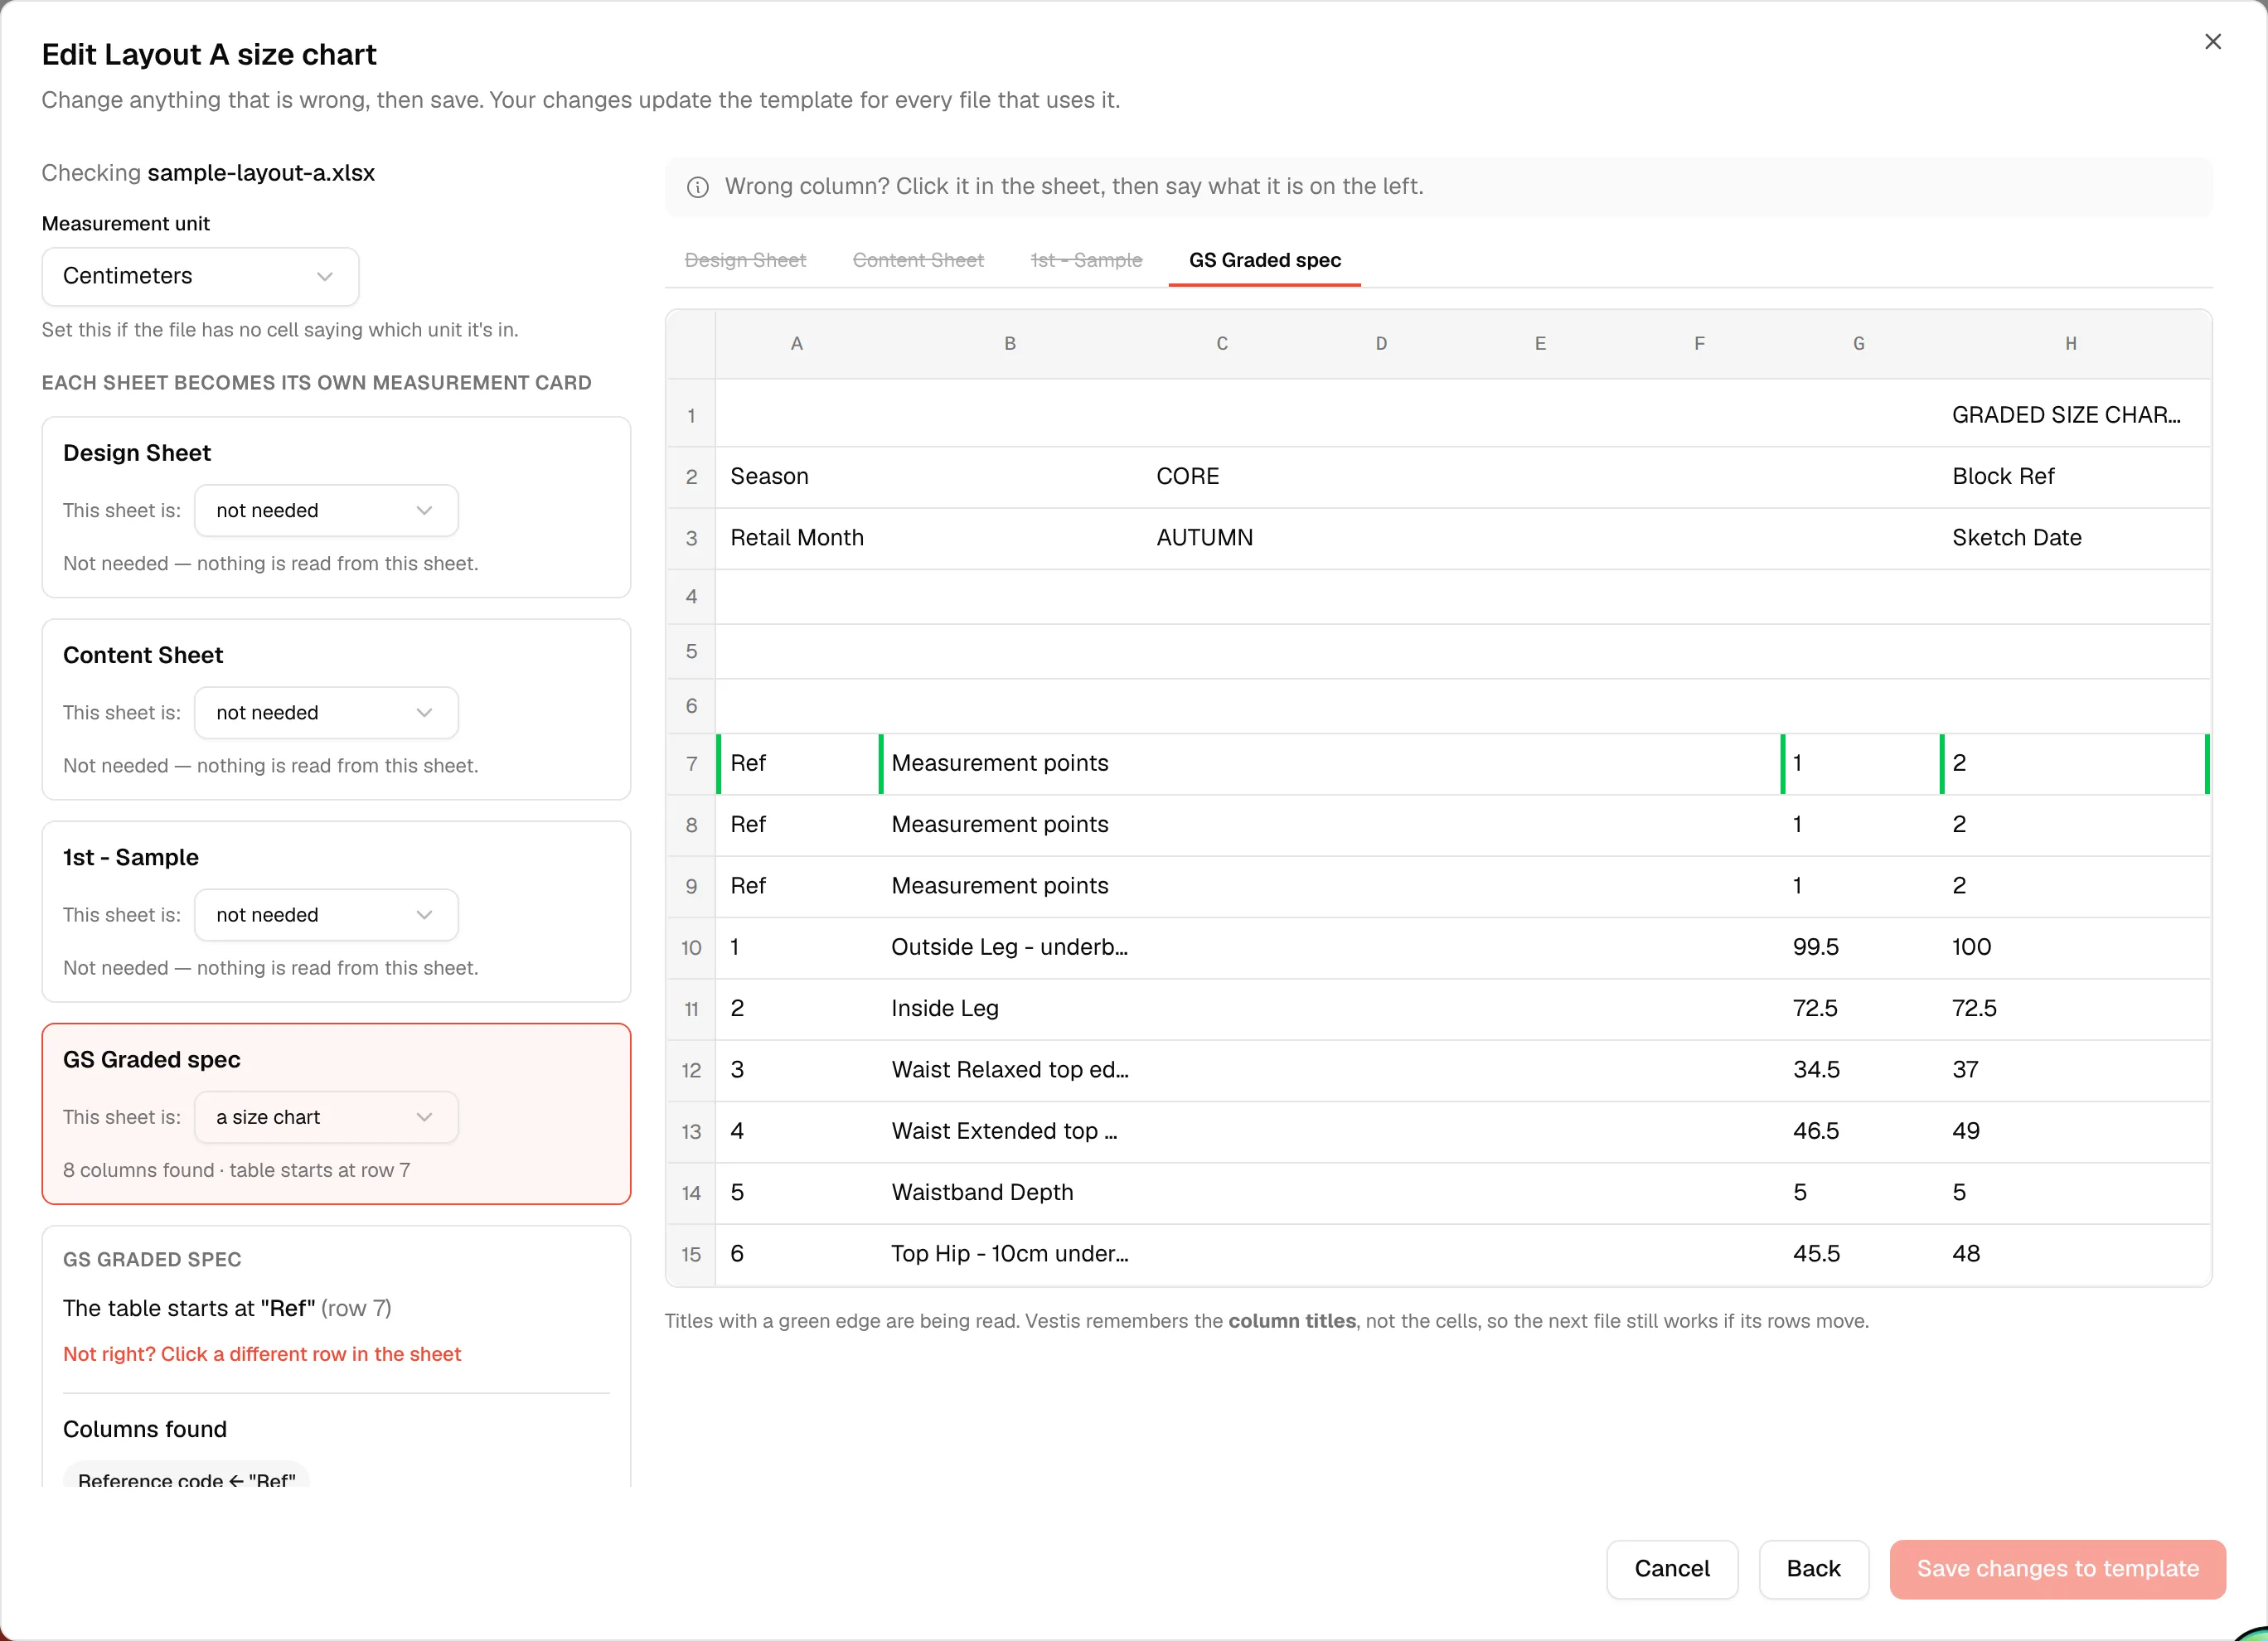
If the file doesn't say its unit. When you press Continue, Vestis shows a message right there: "This file doesn't say which unit it's in. Pick Centimeters or Inches, then press Continue again — no need to upload the file again." A Measurement unit picker sits under it.
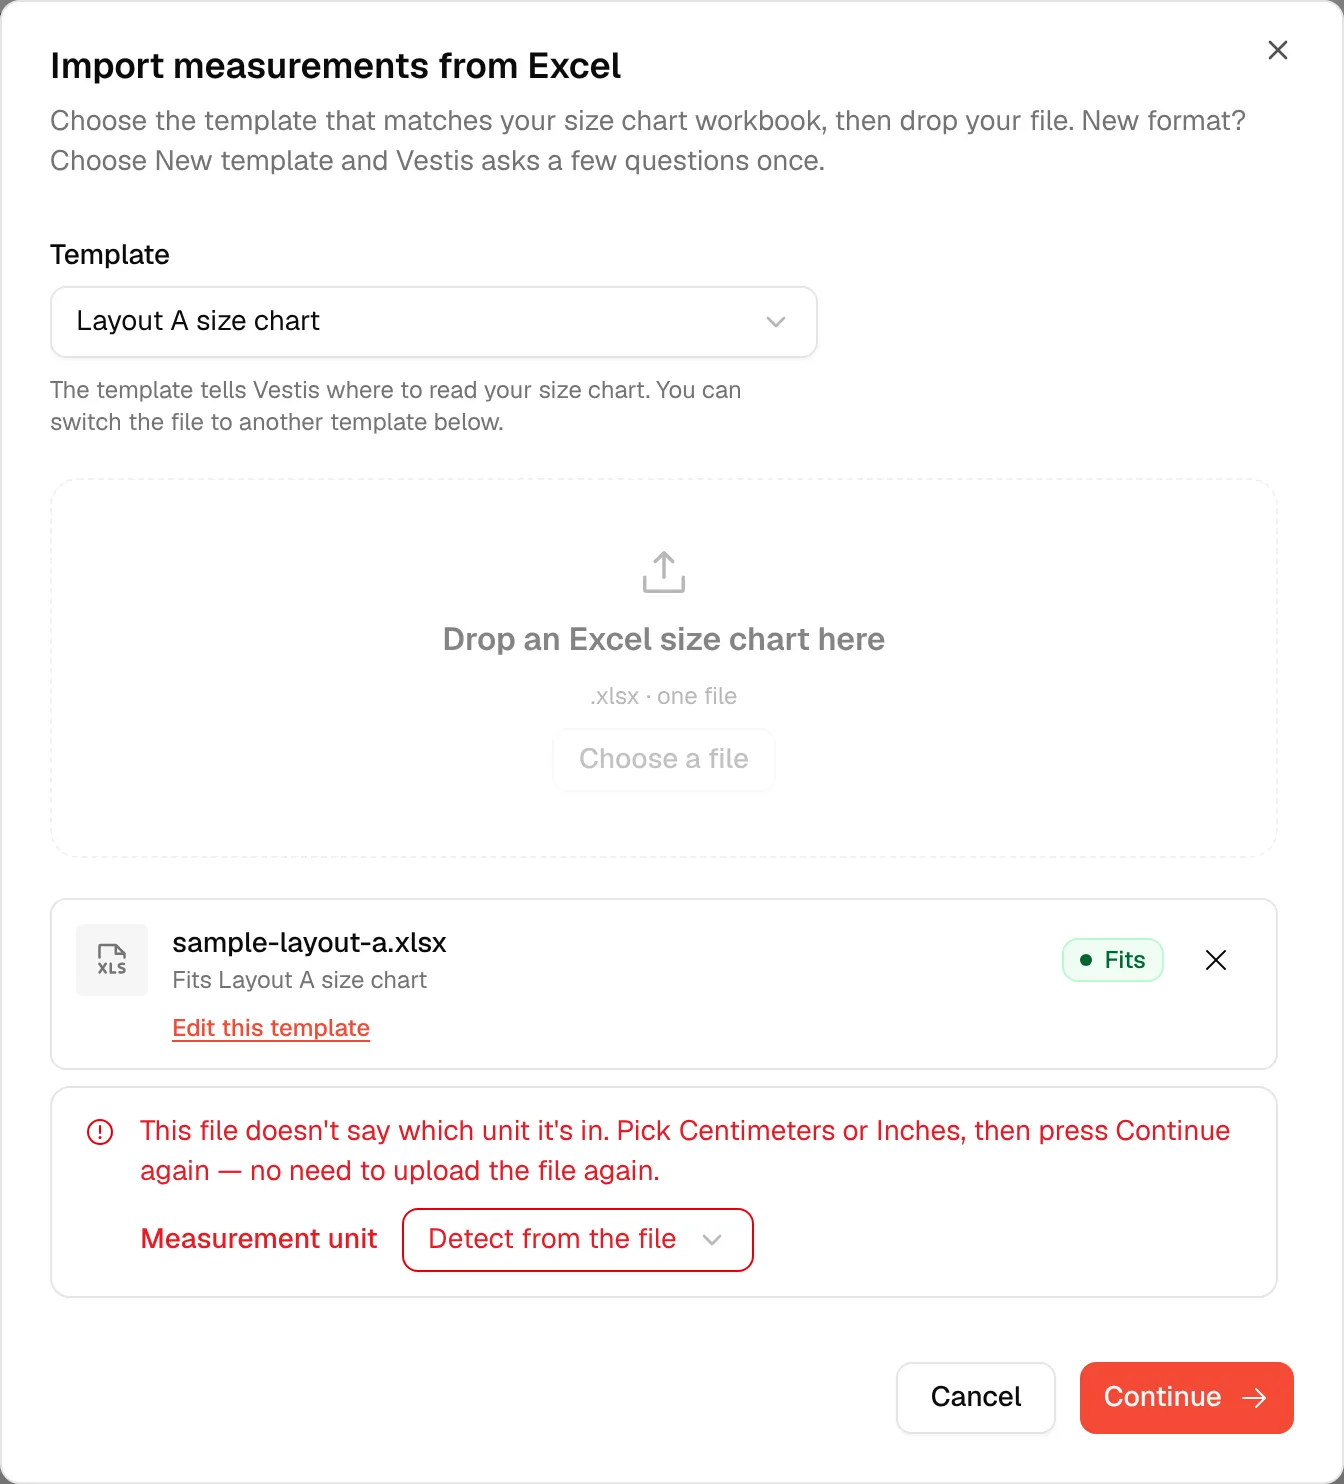
Pick the unit. The message changes to "Unit chosen. Press Continue…".
Press Continue again and you land on Review.
Click Import to finish.
If the file doesn't fit. The status row works just like it does for techpacks. If you chose the wrong template, the file shows a red Doesn't match. If another saved template fits, Vestis says Looks like that template and offers a Use button to switch this file to it. Set up a new template teaches Vestis the format instead. An amber Almost fits has a Fix mapping button.
Sheets without a Code column
Some size charts have no code column at all. The code is written in front of the point name instead, like "A. 1/2 Chest". Vestis imports these sheets too: it keeps the whole name, code letter included, and no separate code is saved for the point. This works for size charts, sample fittings and grading rules, and saved templates keep working.
sample-layout-b.xlsx is built this way. Its "Size chart" sheet imports as a size chart. Its "Sample request 1" sheet imports as a sample fitting in size M, which Vestis reads from the sheet's own "Sample size / color" line.
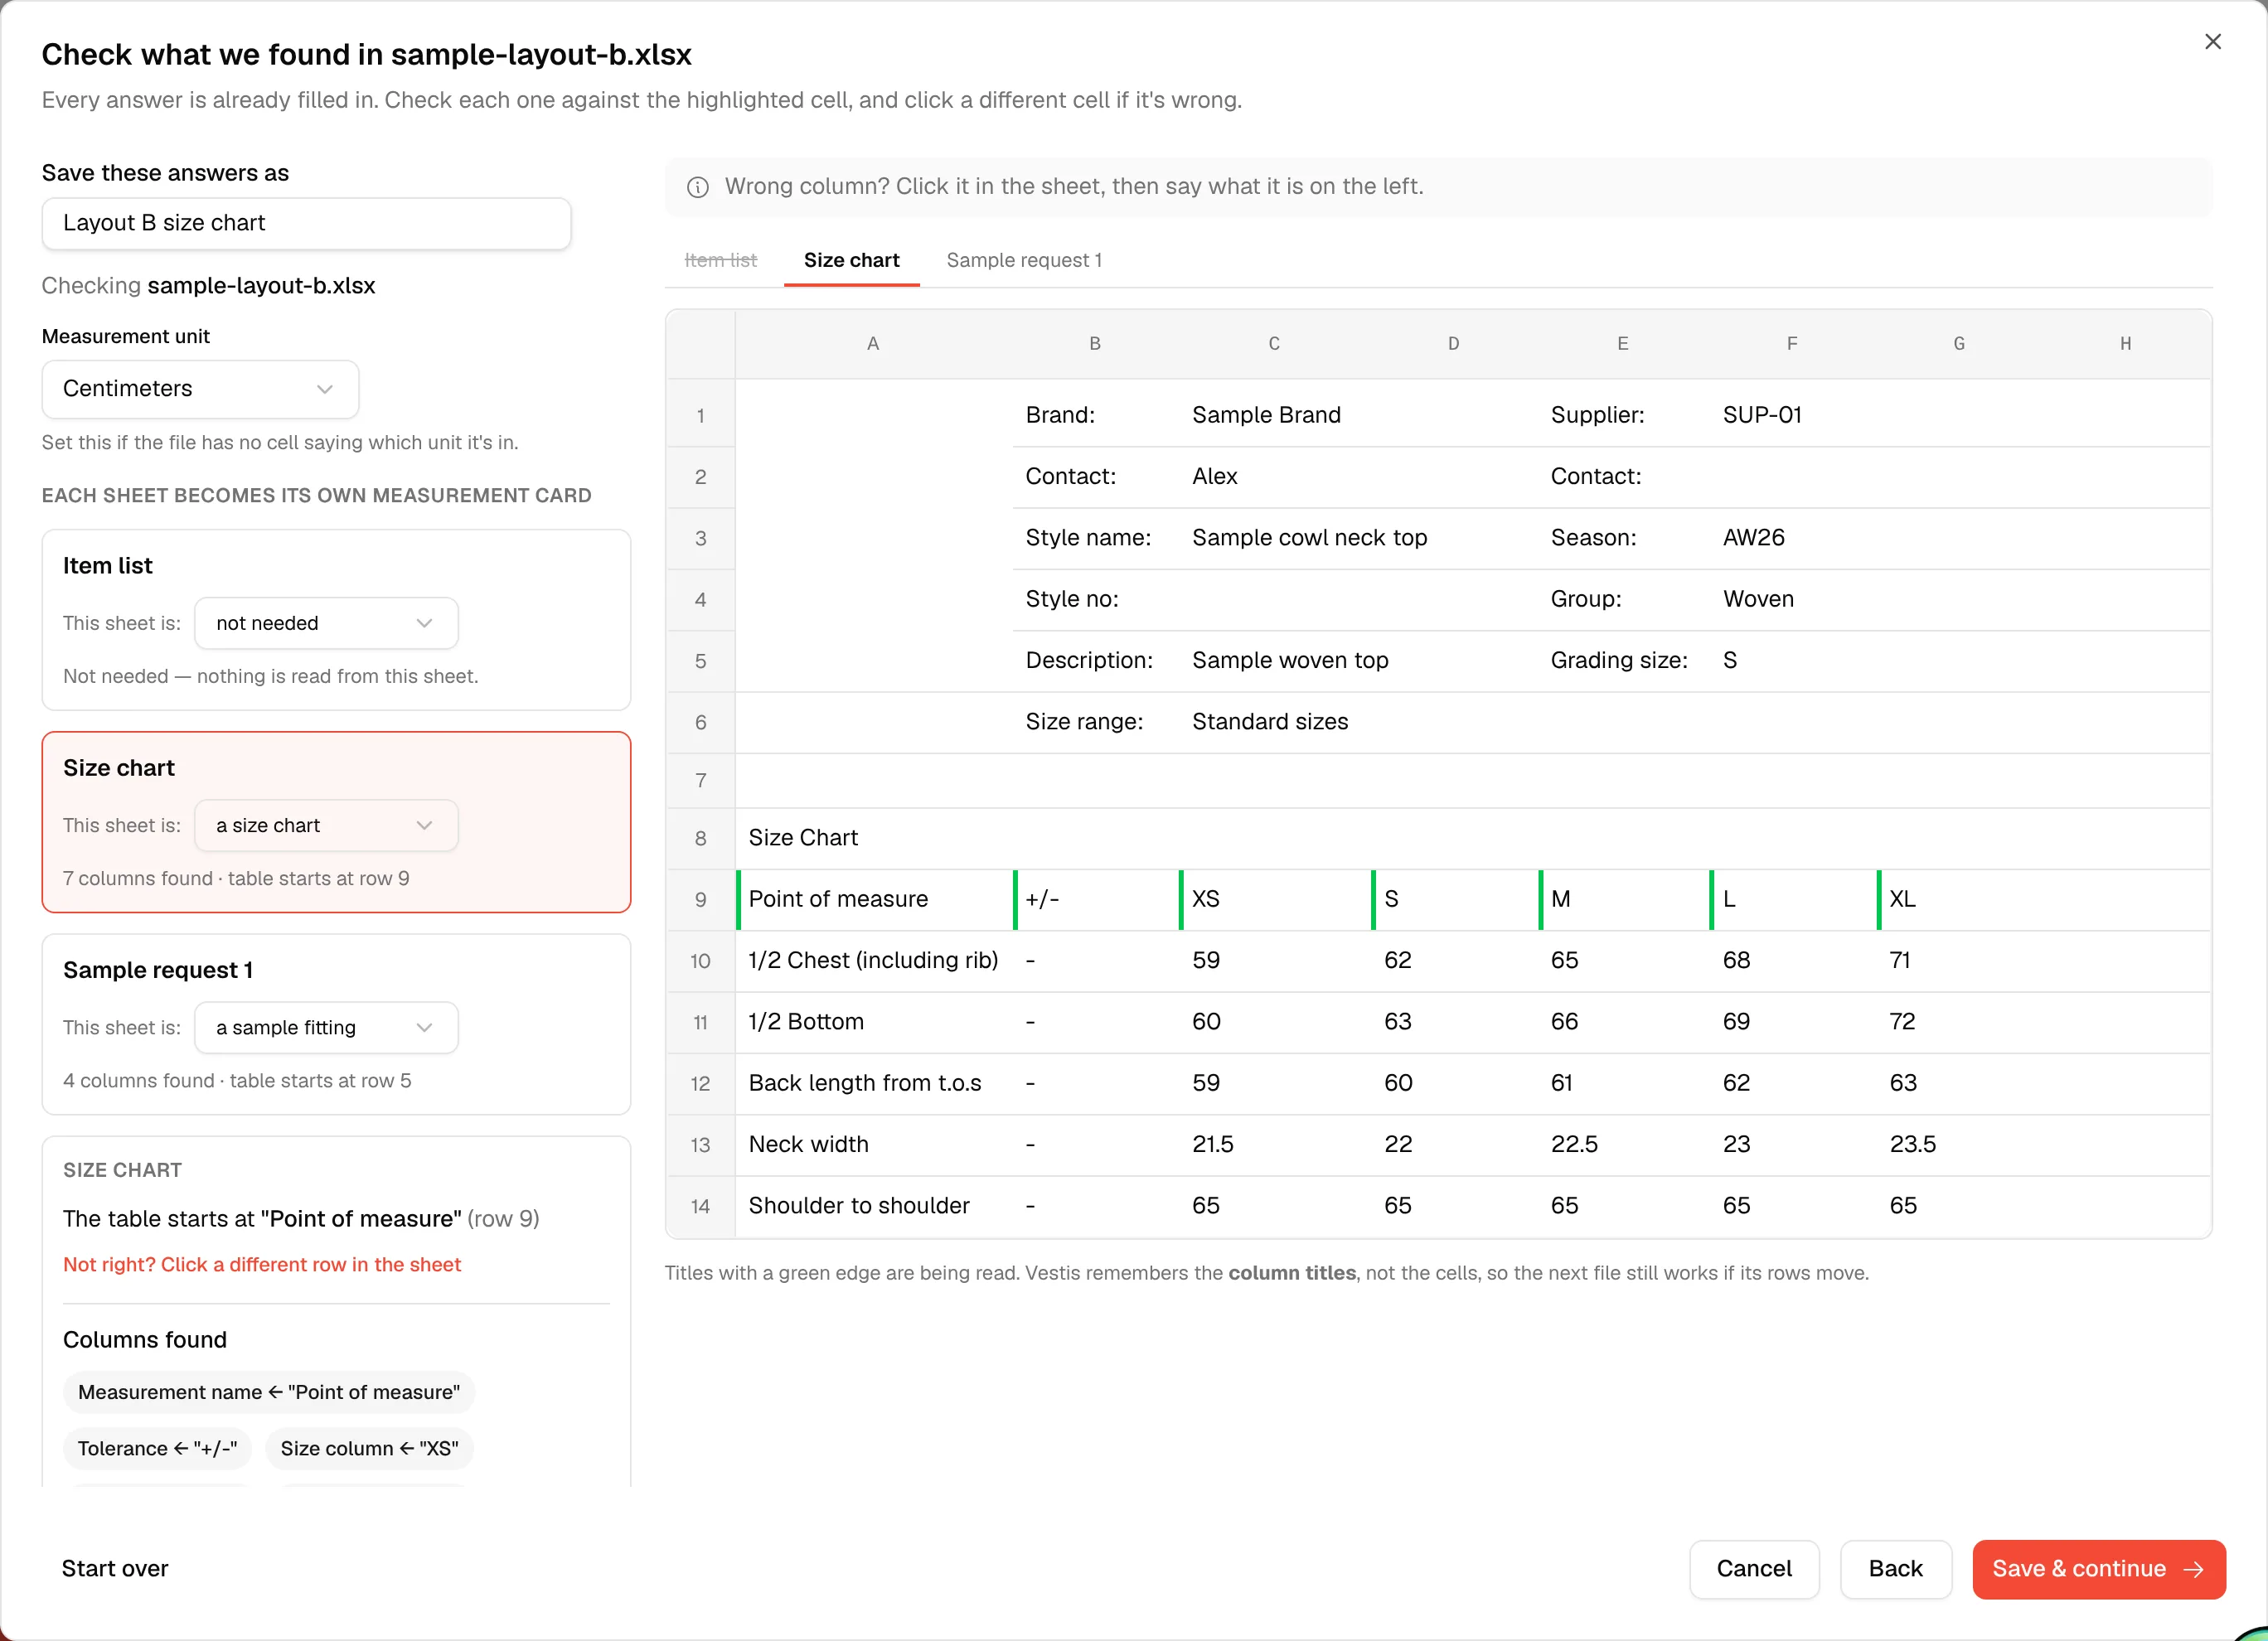
A "Style no:" you left blank stays blank. It no longer picks up the next label ("Group:") as the style code.
Grading rules
A sheet that only holds grading rules is recognised now, with This sheet is: grading rules on its card. It comes in as a grading rule card, and it lands in Library → Measurements as a grading rule template. sample-grading-rules.xlsx shows the idea: one sheet, "Garment grading rules", with a title, then Point of measure | XS | S | M | L | XL and five points in cm. The file doesn't say its unit, so pick Centimeters on the Check screen.
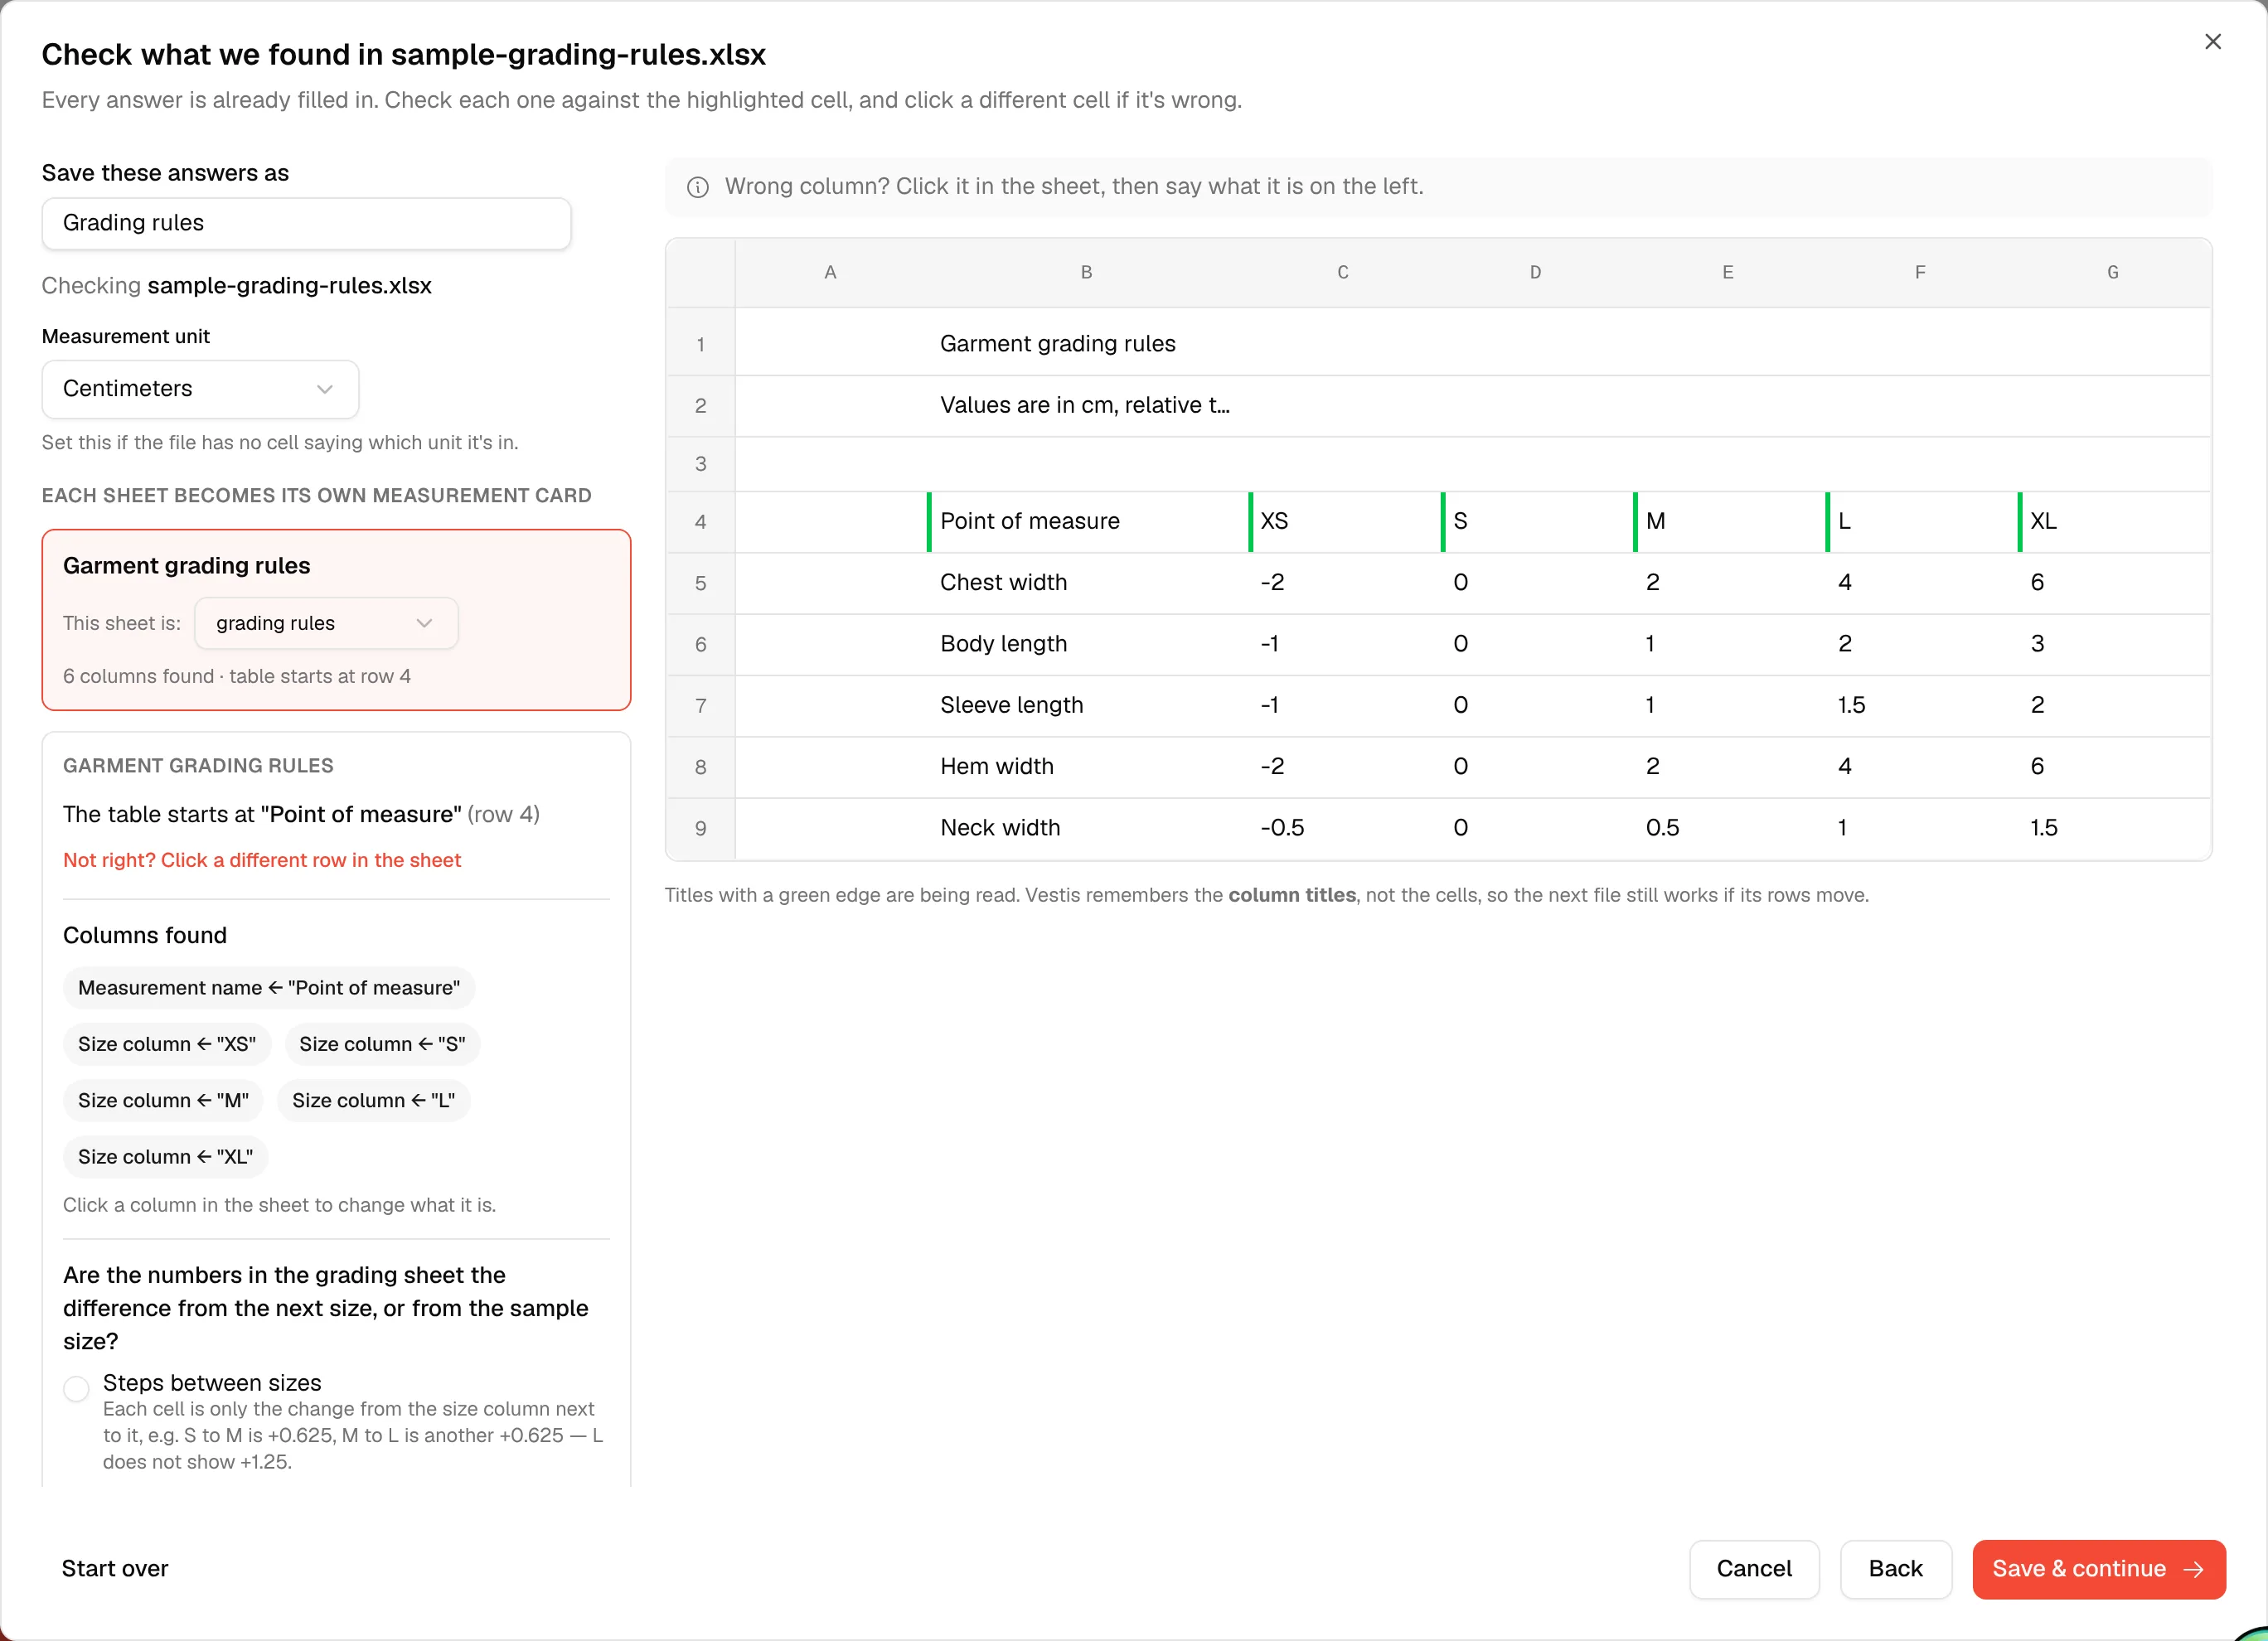
Vestis reads three layouts:
- Sizes across the top.
Point of measure | XS | S | M | L | XL. If one size has only zeros (here S) and the numbers keep growing away from it, that size is the base size and the other numbers are offsets from it. Otherwise each number is read as the step from the size next to it. The Check screen asks "Are the numbers ... steps between sizes or offsets from the sample size?" so you can correct it. - One grade column. Point names with a single Grade, Grading or Increment column.
- Long tables. Written as
Size | Measurement | Value (cm), with the size written once above its measurements. You can have several tables on one sheet, such as women's and men's, or tops and bottoms. Each table becomes its own grading rules sheet on the Check screen, named after the title above it. The base size, which has nothing written, reads as 0. Notes under a table are ignored.
Part 3 — SKUs & barcodes
Once your styles, colours and size ranges exist in Vestis, this import adds SKU codes and barcode numbers to them from a spreadsheet. It never creates a style, a colour or a size range by itself: it only fills in codes and barcodes on what's already there.
We'll use sample-sku-list.xlsx, a simple list with four columns: Style Code, Product Name, Season, and GTIN (the barcode number).
The first time
1. Upload
Go to Styles, click Import, then SKUs & barcodes.
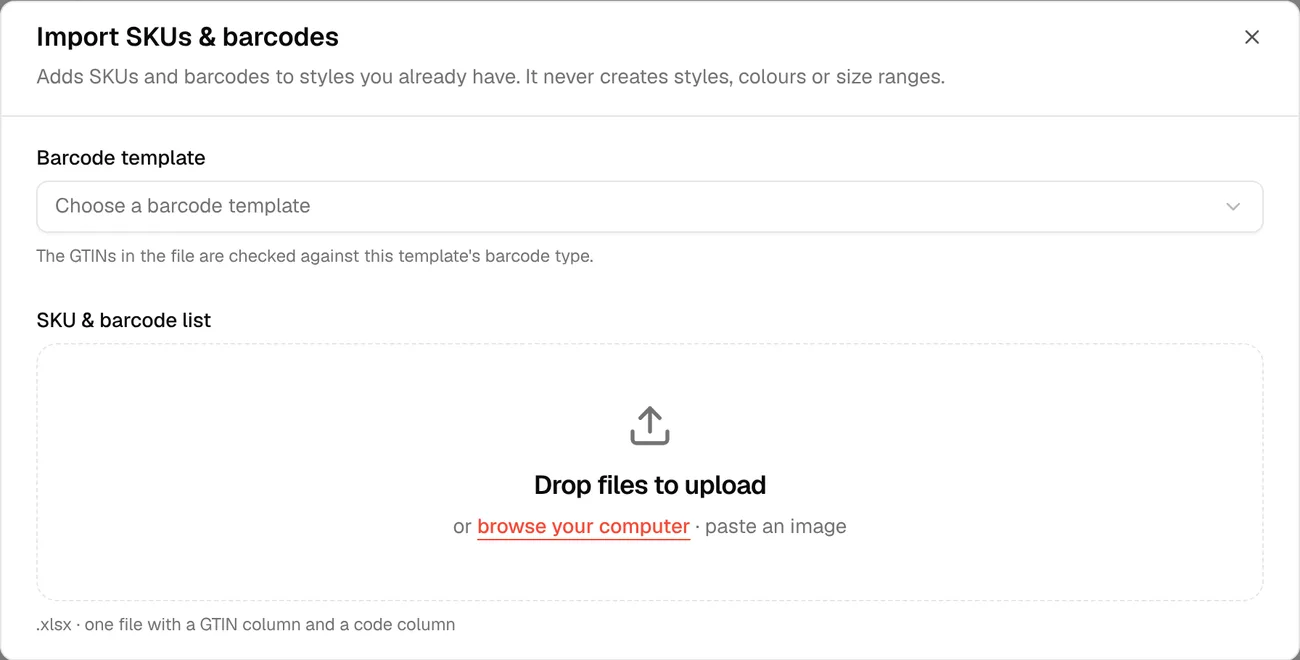
Under Barcode template, choose the kind of barcode your GTINs are. Here there's one option, EAN-13 labels.
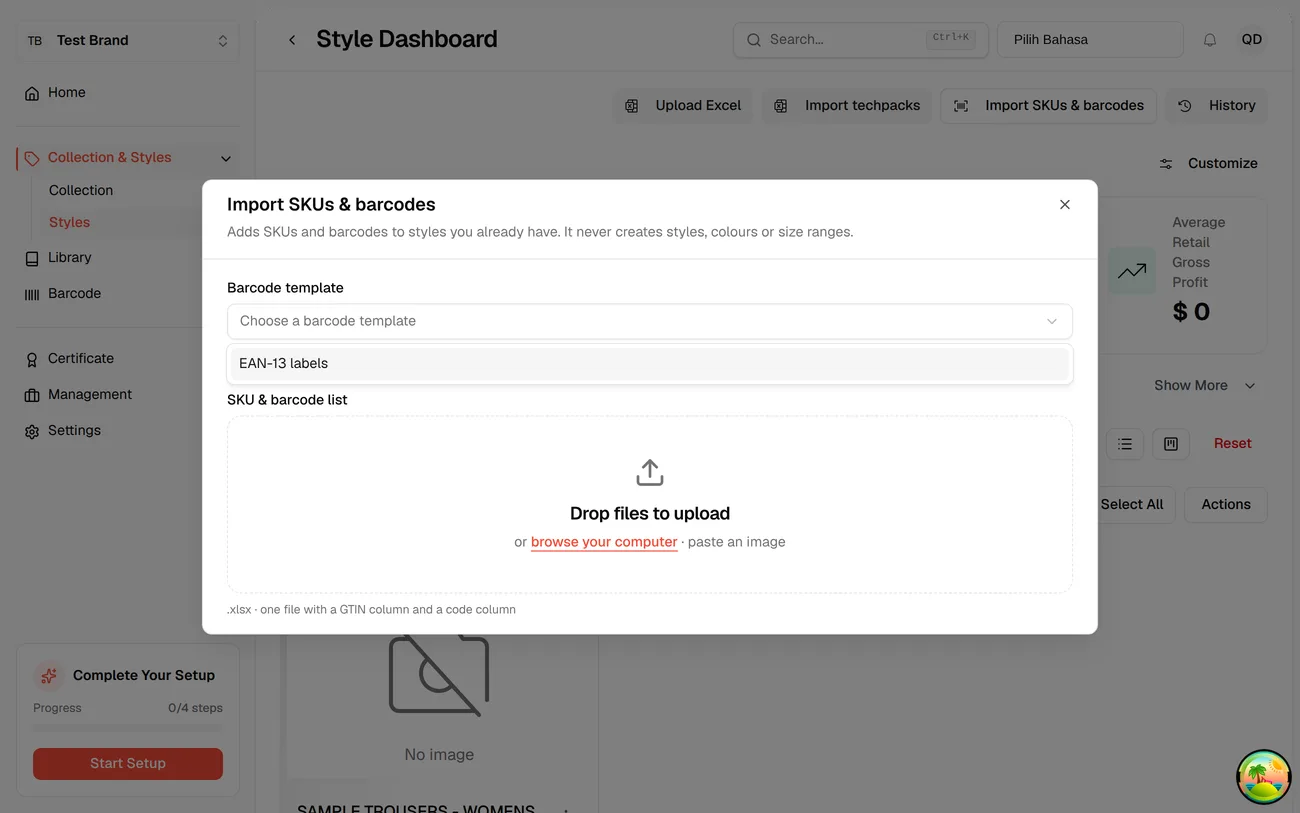
Then drop sample-sku-list.xlsx in.
2. Check what we found
The first time Vestis sees this file's shape, it asks a short set of questions about the columns.
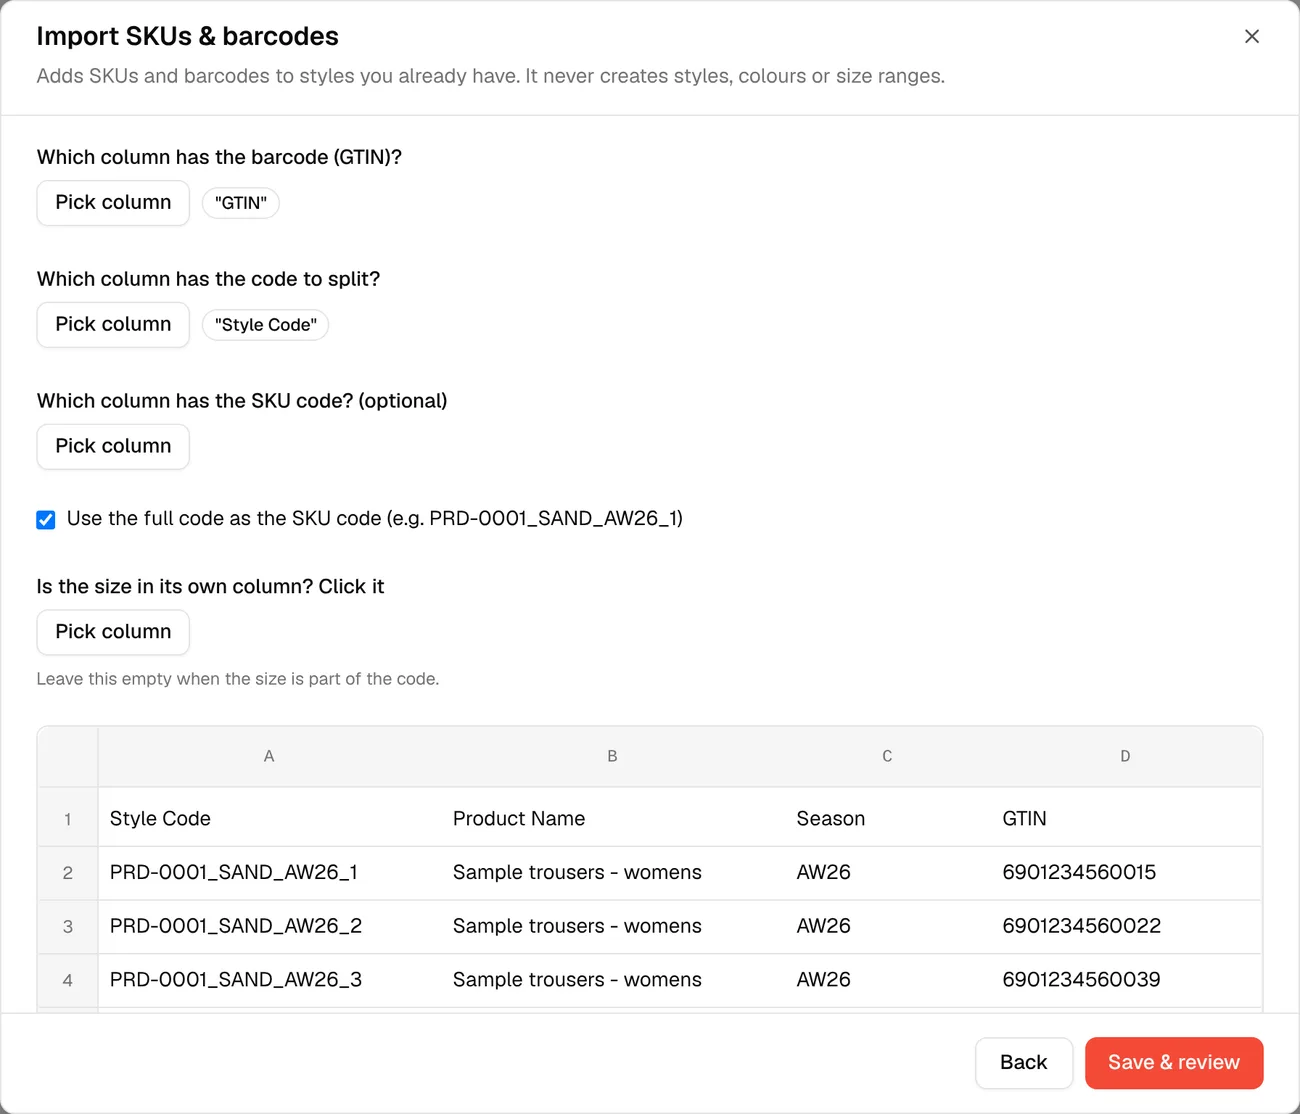
- Which column has the barcode (GTIN)? Vestis found the column named "GTIN".
- Which column has the code to split? Vestis found "Style Code", the column holding a code like
PRD-0001_SAND_AW26_1. - Which column has the SKU code? Leave this blank if your file doesn't have a separate SKU code column of its own.
- Use the full code as the SKU code: tick this so the whole value,
PRD-0001_SAND_AW26_1, becomes the SKU code in Vestis. - Is the size in its own column? Leave this empty when, like here, the size is already part of the code you're splitting.
Underneath, the file's own rows are shown so you can check against the real data.
Scroll down to Split the code. Pick the character the code is built from: here it's an underscore, _.
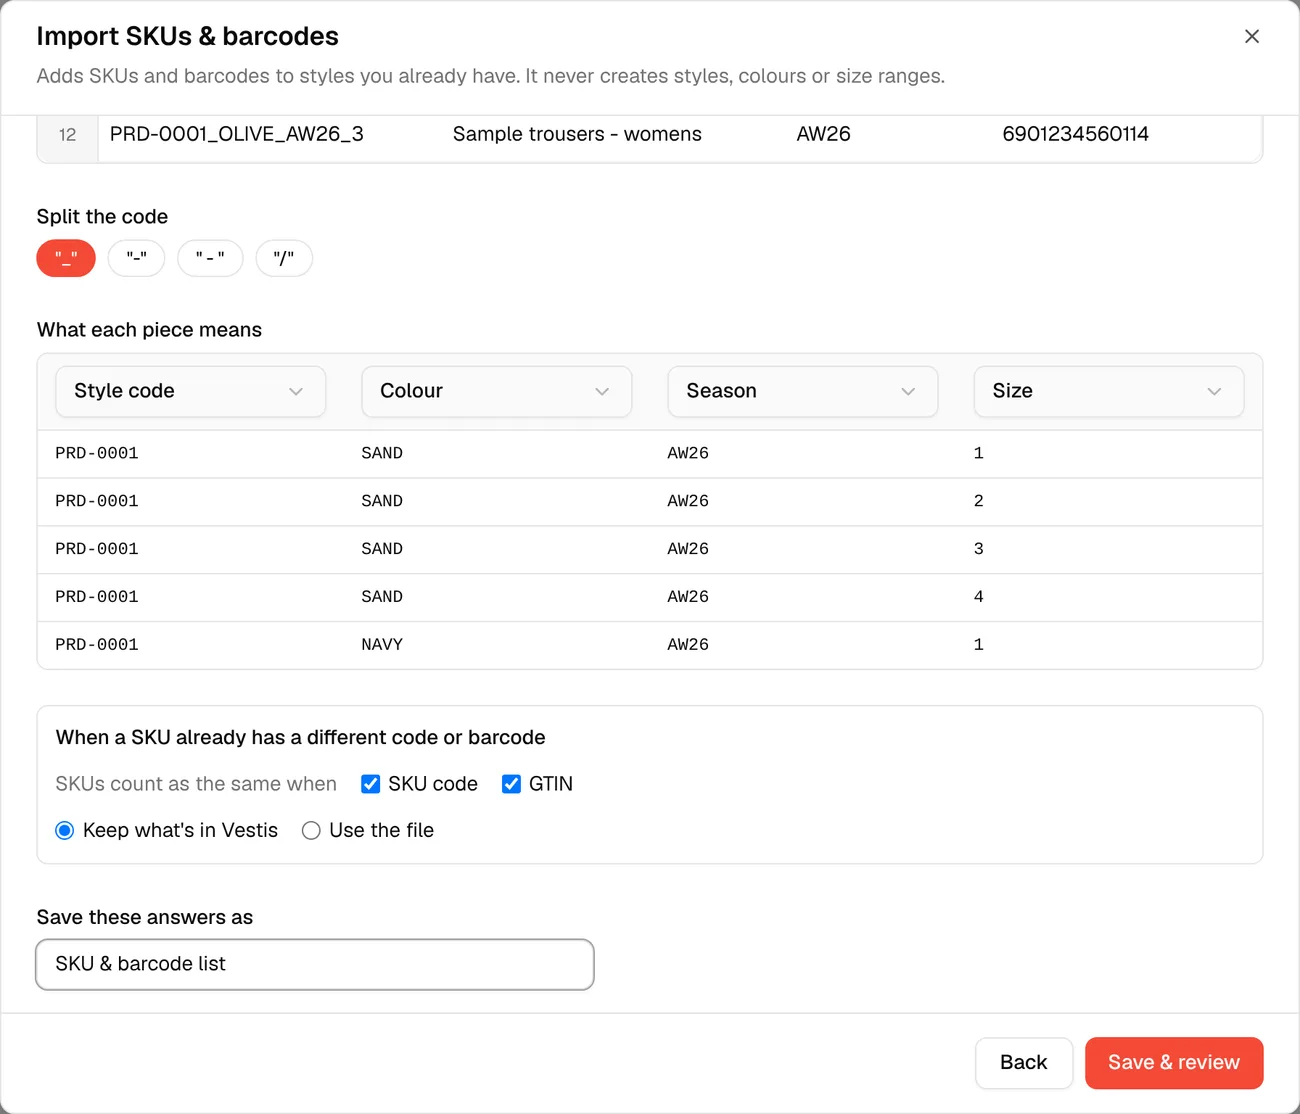
Under What each piece means, tell Vestis what each piece of the split code stands for, in order: Style code, Colour, Season, Size. The rows below update live so you can check it split correctly, for example PRD-0001 · SAND · AW26 · 1.
Further down, When a SKU already has a different code or barcode sets what happens on a re-upload: which fields count as a match (SKU code, GTIN), and whether to Keep what's in Vestis or Use the file when they disagree.
Name this set of answers under Save these answers as, for example "SKU & barcode list", then click Save & review.
3. Review
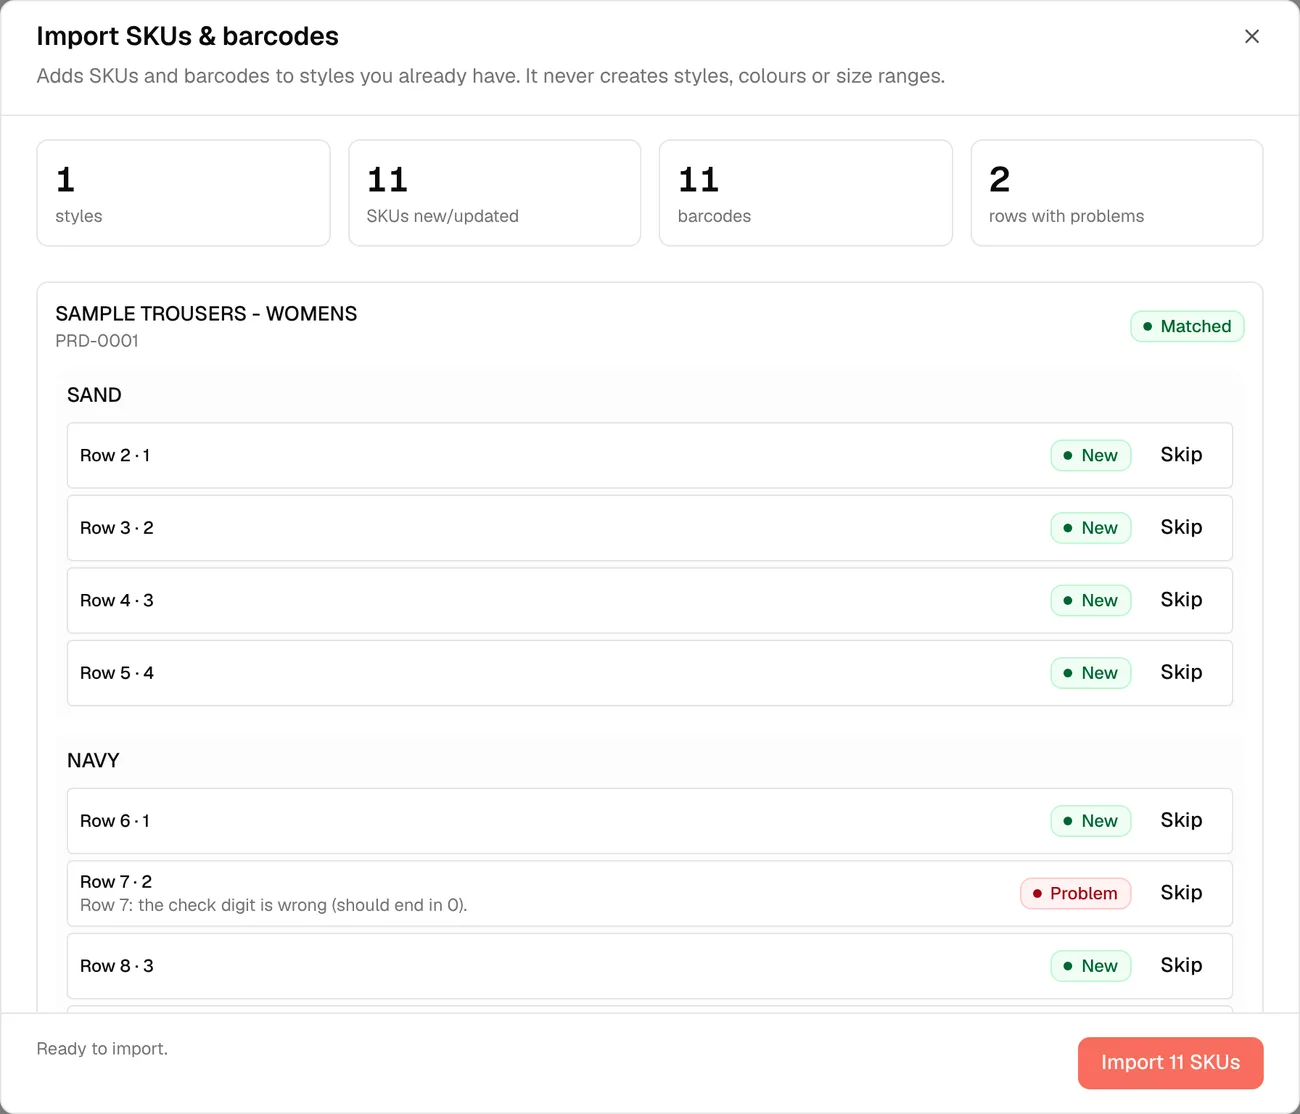
The top bar counts styles, SKUs, barcodes, and rows with a problem. Below, each matched style is grouped by colour, and each row shows its size and a status: New (will be added), or Problem (needs a decision before it can go in). Either way, Skip leaves that one row out.
Two kinds of problems show up in this file:
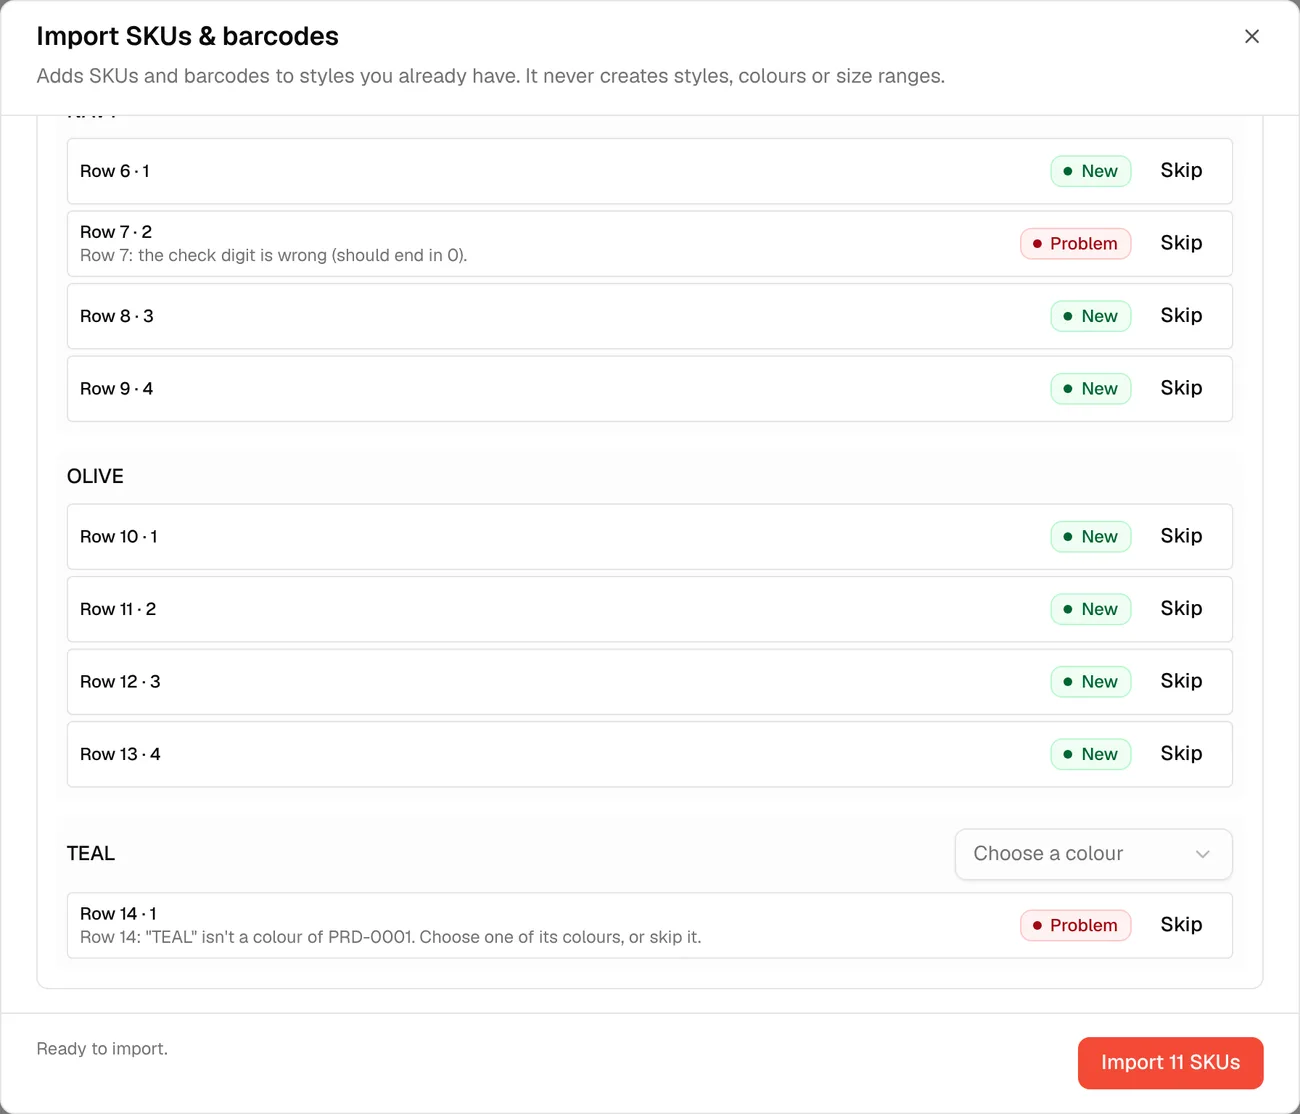
- A wrong check digit. Barcode numbers end in a check digit that's calculated from the rest of the number. Row 7's says plainly what's wrong: "the check digit is wrong (should end in 0)." Fix the number in your file and re-upload, or Skip the row for now.
- A colour that isn't on the style. Row 14's code says "TEAL", but the style only has Sand, Navy and Olive. Click Choose a colour to pick one of the style's real colours for that row, or skip it.
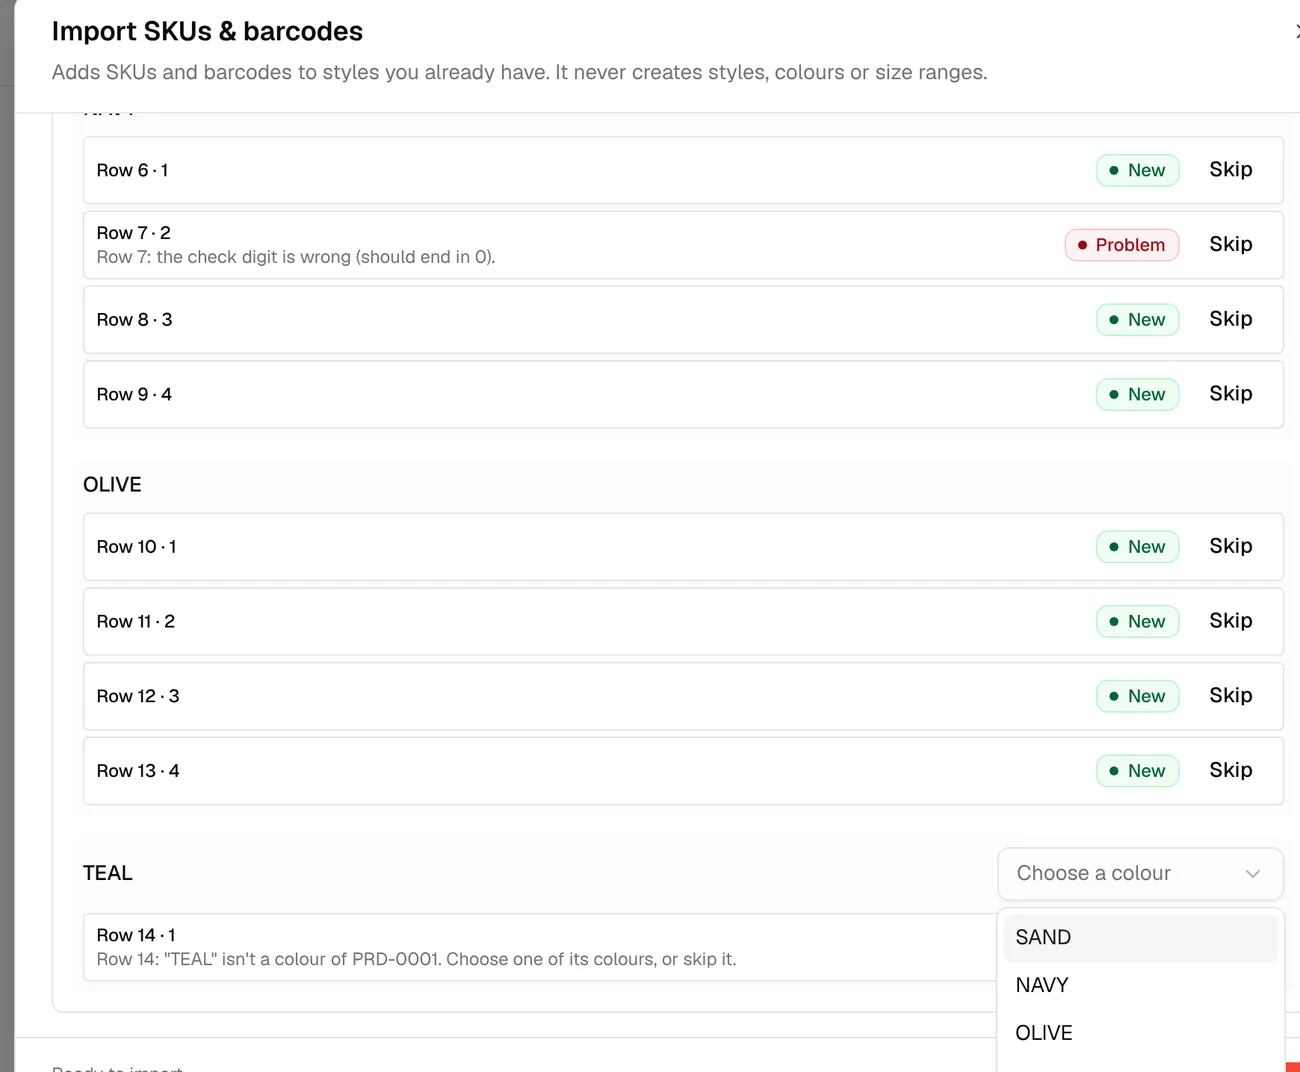
When you're ready, click Import N SKUs. Rows still marked Problem are left out automatically.
4. Import
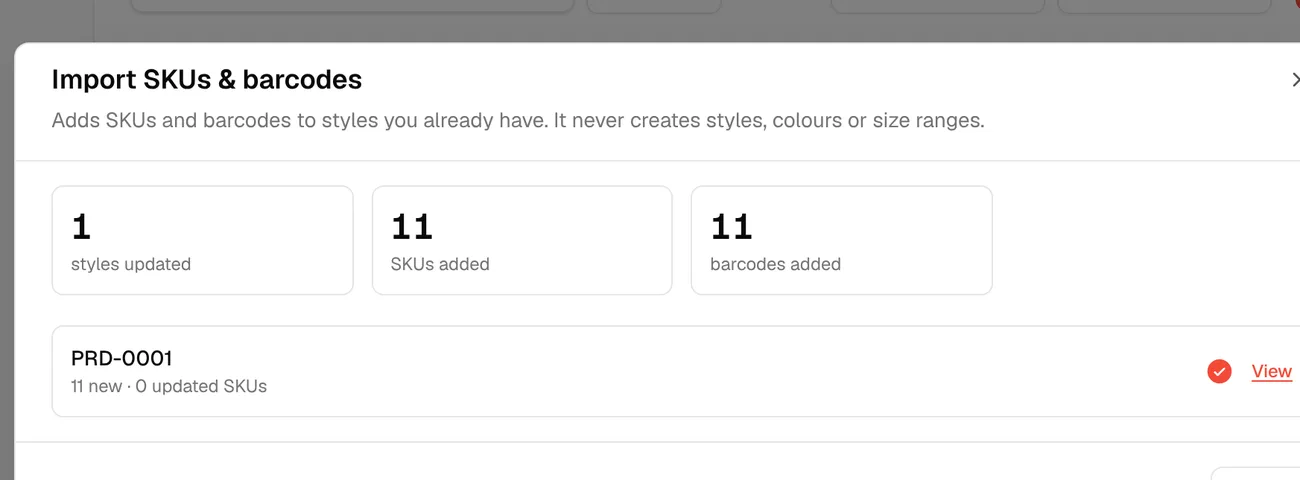
Each style updated shows how many SKUs were added versus updated, with a View link straight to it.
Where to find it on the style
SKU codes and barcode numbers sit on the style's Product ID tab, one set per colour. Barcodes are also ready to print from Barcode → Print Labels.
Good to know. This import never creates a colour: a code for a colour the style doesn't have always needs a choice, never a silent guess. If a SKU doesn't exist yet and your file has no SKU code of its own, create the SKUs on the style first with Auto Generate, then run this import to add the barcodes.
Part 4 — Managing templates
Every saved template, whatever it's for, lives in one place: Library → Import Templates.
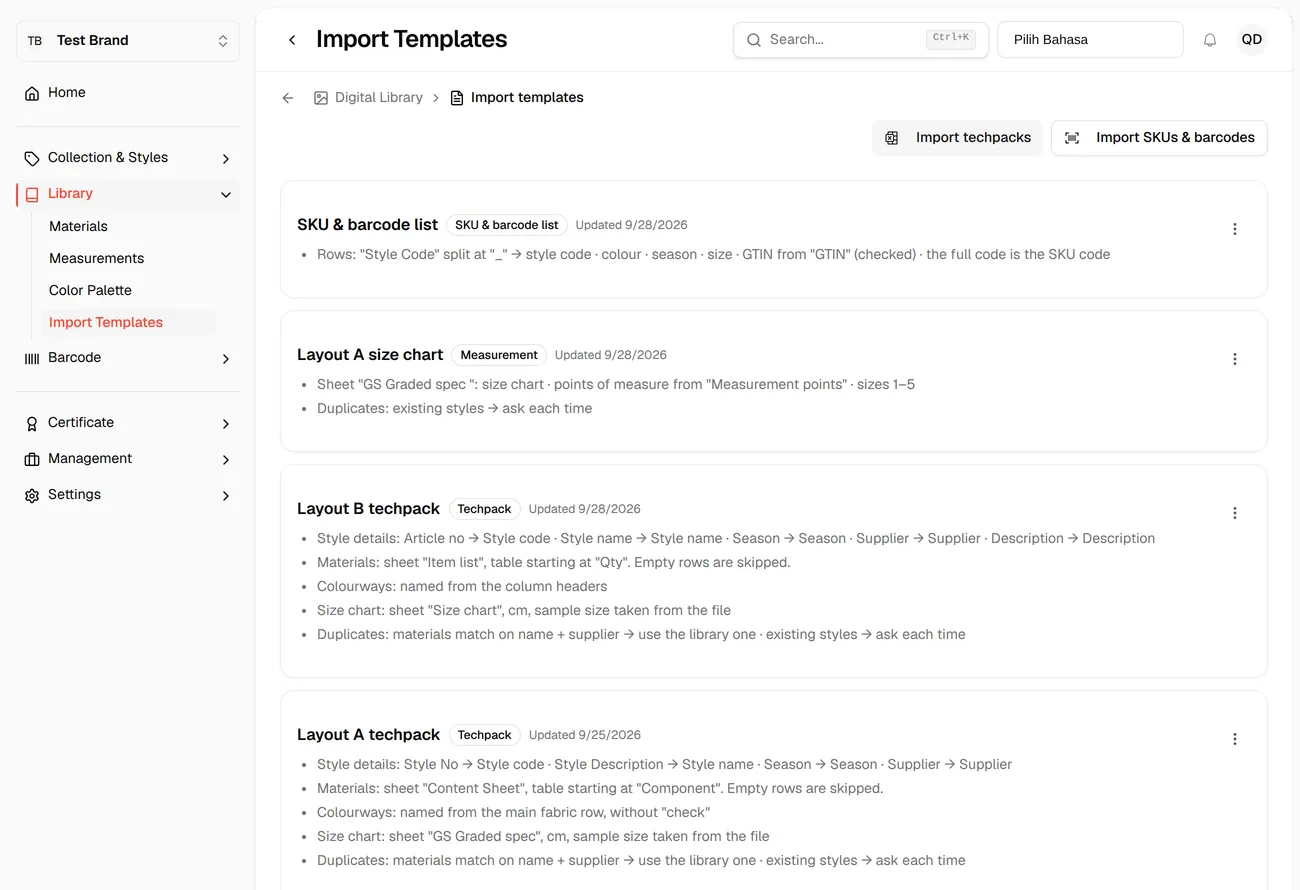
Each card summarises the template in plain language, so you don't need to open it to remember what it does:
- A techpack template lists where style details, materials, colourways and the size chart come from, plus what happens when something already exists.
- A measurement template lists which sheet holds the size chart, where the points of measure come from, and the sizes it covers.
- A SKU & barcode list template lists which column it splits, and what each piece of the code means.
Click the ⋮ menu on any card for:
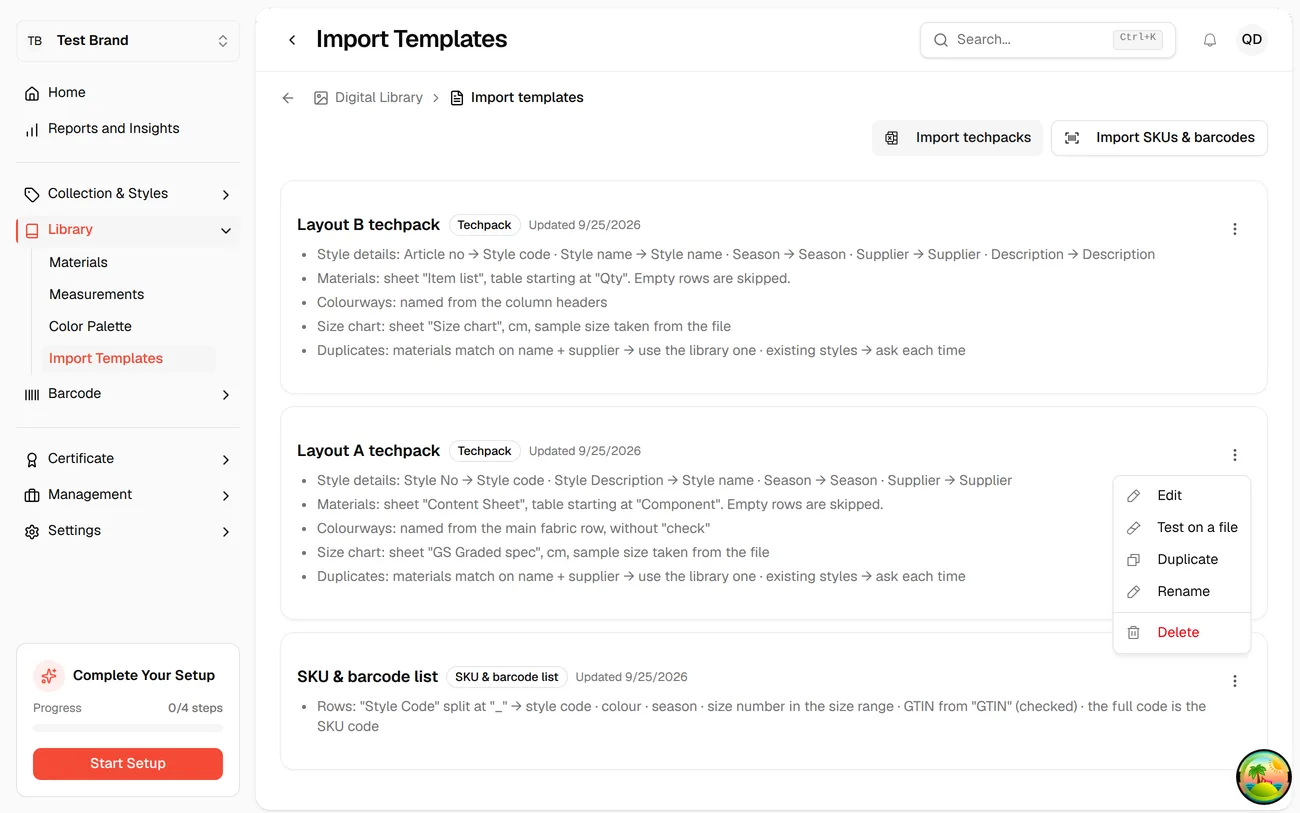
- Edit: reopens the Check what we found screen on the file the template was built from, so you can adjust any answer.
- Test on a file: drop in a file to see what the template would find, without importing anything or changing the template.
- Duplicate: makes a copy to start a close variant from, instead of building one from scratch.
- Rename: changes the name shown in the list, without touching what the template reads.
- Delete: removes the template. Anything you've already imported with it is not affected.
Test on a file is worth using whenever you get a slightly different file and aren't sure it will match:
Troubleshooting
"We couldn't read the sheet "X": Vestis can't tell which column holds the measurement names." Vestis shows this in a warning on the Check screen, with "Pick the right row and columns, or set the sheet to "not needed"." Save & continue stays off until it's fixed. Click the row with your column titles in the sheet, click the column with the point names and set it to Measurement name, or set the sheet to not needed if it holds nothing to import. A second version of the warning says Vestis "can't find the row with your column titles": click that row in the sheet.
"We didn't find measurements on this sheet, so it will be skipped" Vestis found no row with point names plus sizes, a grade or a tolerance. A missing code column is not the reason, because sheets without one import fine. Check that the header row is there and that the sheet has a column of point names.
"We couldn't open this file. Save it as .xlsx and try again."
The file isn't a valid Excel file, or it's in an older format like .xls. Open it in Excel and save a copy as .xlsx.
Style code not found The value isn't where the template expects it. Click Fix mapping (on an Almost fits file) or click the right cell (during first-time setup) to point at where it actually is in this file.
The measurement unit is missing The file doesn't say anywhere whether it's in centimetres or inches. Pick one under Measurement unit at the top of the screen; Continue stays off until you do.
A material shows up twice Check When things already exist → Materials count as the same when these match. If Name and Supplier are both ticked but the file has a small spelling difference between two rows meant to be the same material, they'll come in as two separate materials. Loosen the match (untick Supplier, for example) or fix the spelling in the file.
Size range not matched On the Review screen, use the Size range dropdown on the style card to pick the range by hand, or check that the size chart's column headers on the sheet match a size range Vestis already knows.
A barcode's check digit is wrong Vestis checks every barcode number against its own check digit and tells you exactly what it should end in. Fix the number at the source (your barcode supplier or spreadsheet), then re-upload. Importing with a wrong check digit is skipped rather than saved, so a scanner is never handed a number that can't be real.
"This GTIN is already used by another SKU" Two different rows, or a row and something already in Vestis, claim the same barcode number. Barcodes have to be unique, so check which SKU should really own it and fix the other one in your file.
"This import would create N new styles, but your plan only has room for..." Your plan has a limit on the number of styles. Skip some styles on the Review screen (mark them Skip, or remove the file) to bring the import under your limit, or ask Vestis support about upgrading your plan.
A file says "Doesn't match" It isn't the format of the template you chose. If Vestis says Looks like another template, click Use on that file to switch just that file. Otherwise click Set up a new template, or choose a different template at the top.
The drop zone says "Choose a template first" Pick a template (or + New template) in the Template field. The drop zone stays locked until you do.
A batch with more than one template Each file is checked against the template you chose. If some files don't fit it, switch those files one at a time to the template they do fit, or upload them in a separate batch.