GEO readiness
Vestis already holds the most complete picture of your product: materials, compositions, suppliers, digital product passport data, pricing, and commerce attributes.
Under review. This page is published while we check it against the live app, so some details may have changed.
Screenshots may be out of date.
Vestis already holds the most complete picture of your product: materials, compositions, suppliers, digital product passport data, pricing, and commerce attributes. AI-Ready Product Data activates that existing data — structuring it, enriching it, and making it legible to AI search engines, commerce platforms, and digital product passport systems without asking brands to do anything twice.
CORE PURPOSE
Help brands use the product, material, DPP, and commerce data they already manage in Vestis to make their products more AI-readable, searchable, structured, and commerce-ready without extra manual work.
Step by step
Learn how to use the Vestis Labs dashboard to improve your product listings for AI search engines. This guide covers how to populate required metadata, generate GEO-optimized copy, and embed product schema on your website to increase visibility.
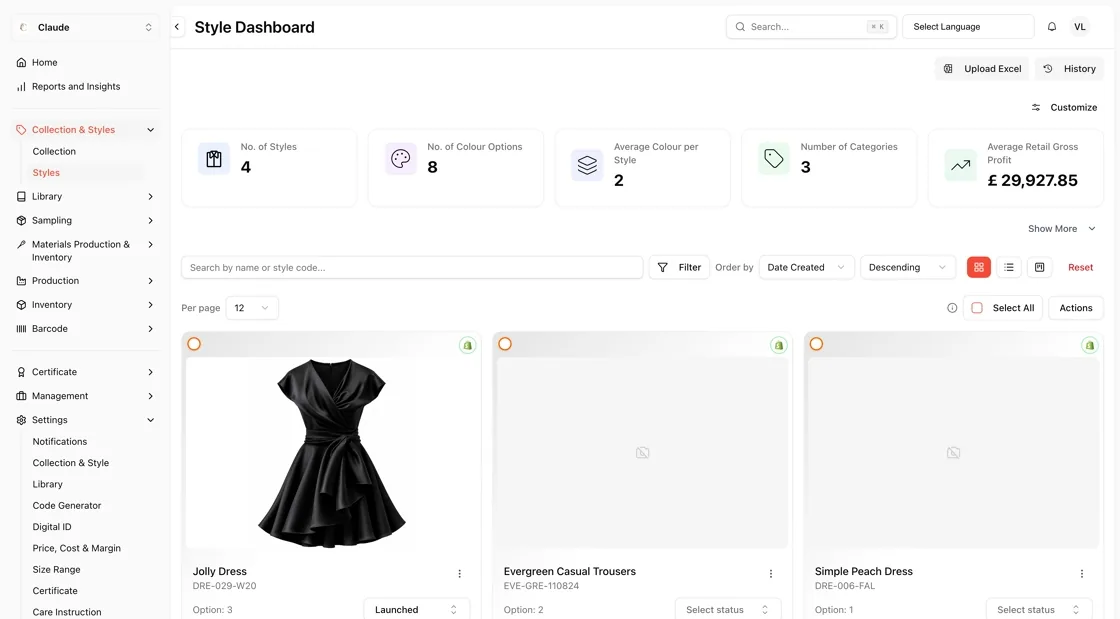
Open the Style Dashboard
In the left sidebar, click Collection & Styles, then select Styles. The Style Dashboard shows your full style list with summary metrics at the top. You will also notice a small green Shopify icon on style cards that are connected to Shopify.
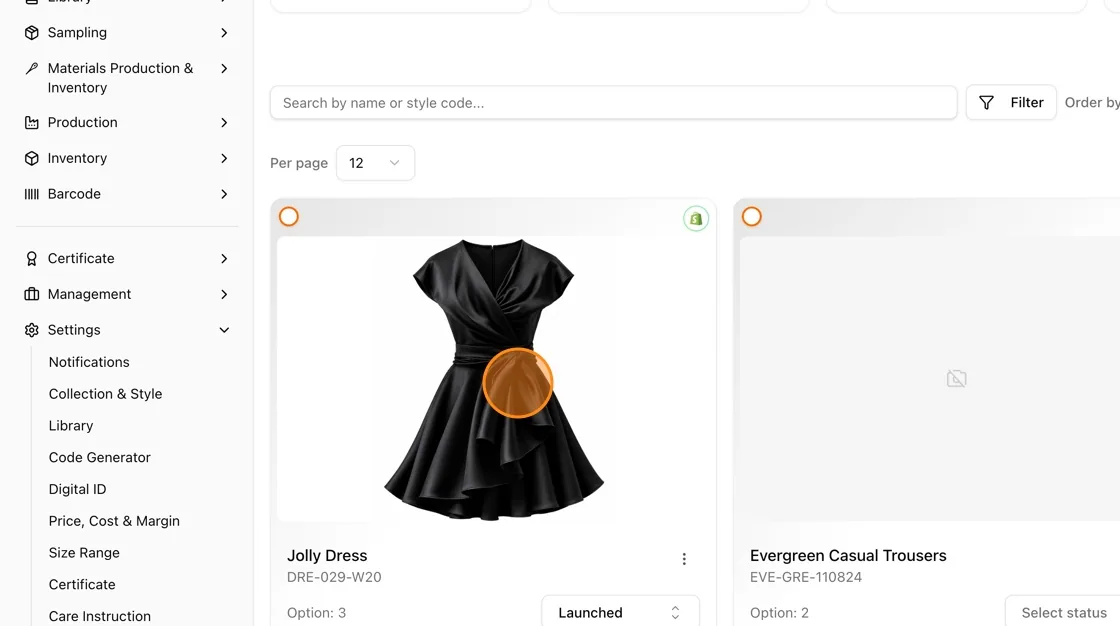
Open a Style to Edit
Click on a style card (e.g. Jolly Dress) to open it. You can also click the three-dot menu on a card and select Edit. The style detail page opens with tabs across the top: Details, Design & Development, Sampling, Tech Pack, Costs, Price, Product ID, Production, and Integrations.
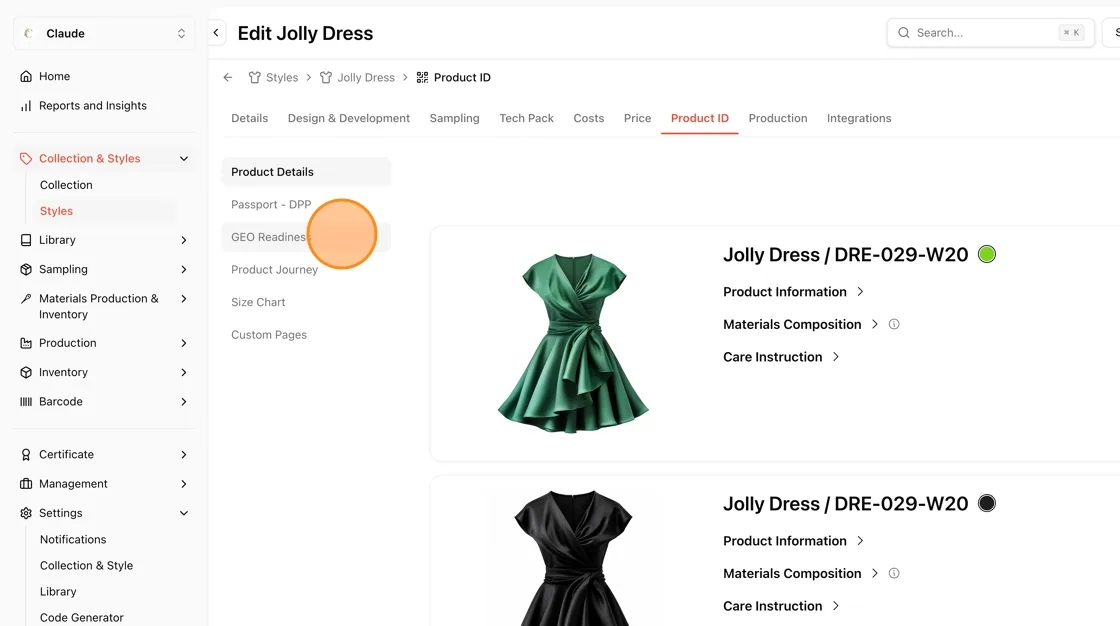
Click the GEO Readiness tab
Click the GEO Readiness tab in the style's top navigation, next to Integrations. The GEO Readiness page loads, showing your AI / GEO readiness score for this style. The tab appears only when GEO Readiness is switched on for your brand and you have the GEO readiness permission. Old links to Product ID → GEO Readiness redirect here.
Read the Readiness Score
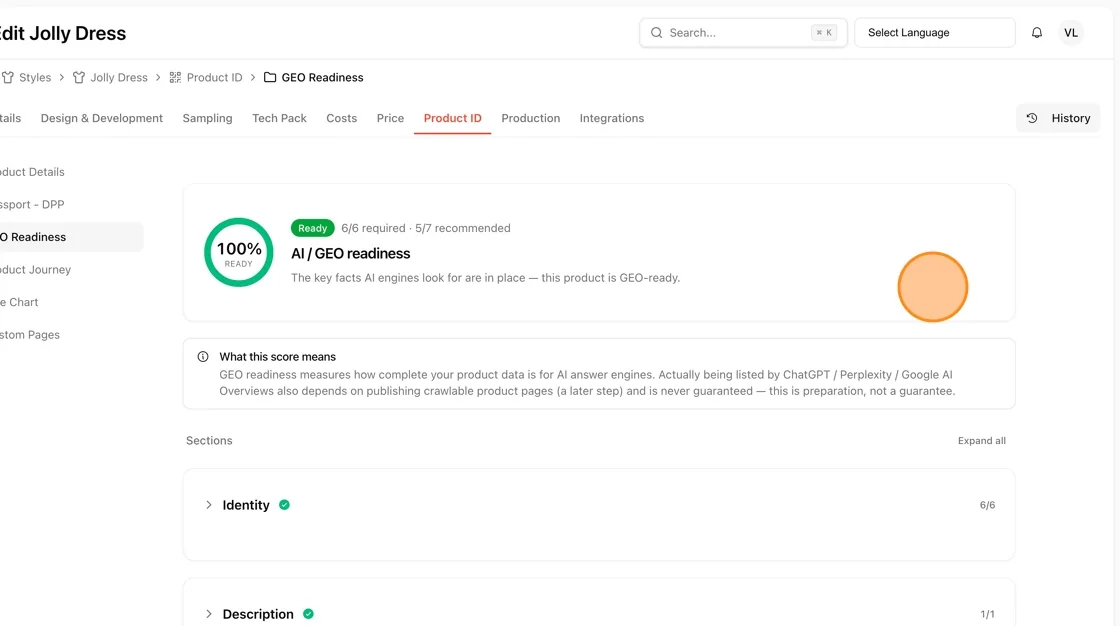
At the top of the GEO Readiness page you will see a circular score indicator (e.g. 100% ready) with a badge, Publishable or Not publishable yet, and the required and recommended field counts (e.g. 6/6 required · 5/7 recommended). The badge turns to Publishable when every required field is filled in. The percentage also counts recommended fields, so it shows how complete your data is.
What this score means
GEO readiness measures how complete your product data is for AI answer engines. Actually being listed by ChatGPT / Perplexity / Google AI Overviews also depends on publishing crawlable product pages (a later step) and is never guaranteed — this is preparation, not a guarantee.
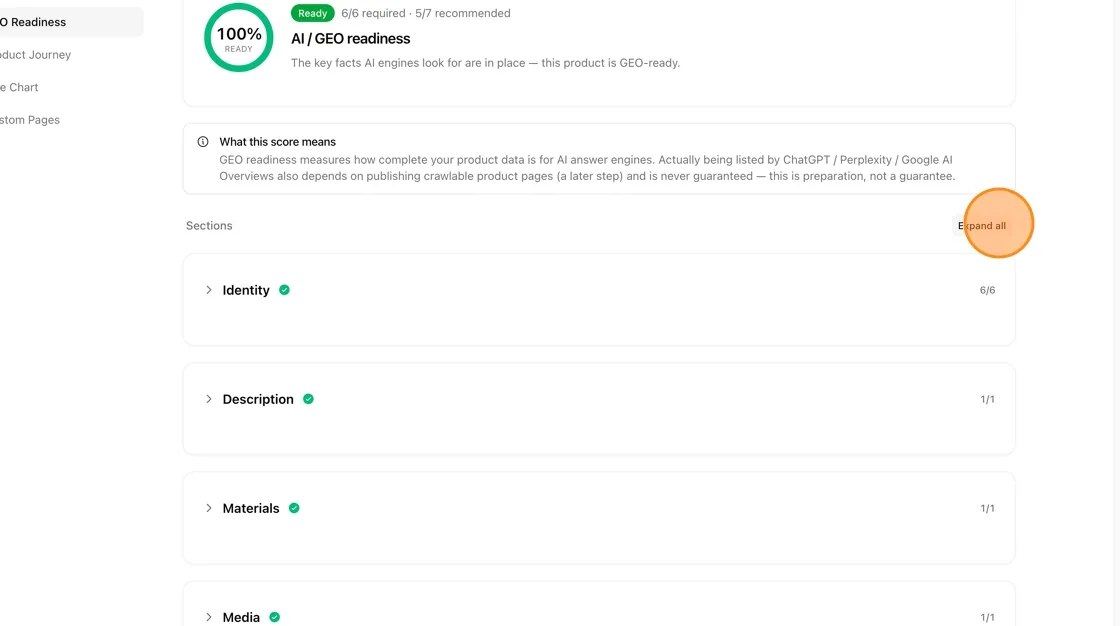
Expand All Sections
Click Expand all in the top-right of the Sections area to open all readiness sections at once. Each section shows a completion count (e.g. 6/6, 1/1). Sections with a green tick are fully complete. Sections with an amber dot have incomplete recommended fields.
Review the Identity Section (6/6)
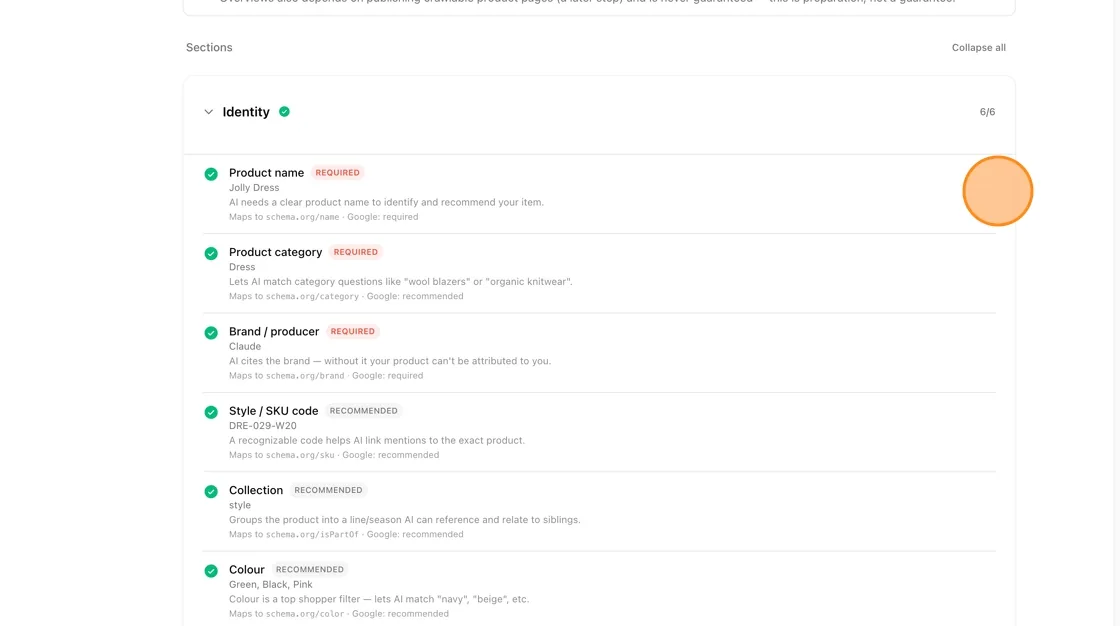
The Identity section covers the core fields AI engines use to identify and recommend your product. Each field entry shows:
- The field name and whether it is REQUIRED or RECOMMENDED
- The current value pulled from your Vestis style data
- Why it matters for AI (e.g. “AI needs a clear product name to identify and recommend your item”)
- The schema.org mapping and Google status (e.g. Maps to schema.org/name · Google: required)
Fields in the Identity section:
- Product name (REQUIRED) — e.g. Jolly Dress. Maps to schema.org/name.
- Product category (REQUIRED) — e.g. Dress. Maps to schema.org/category.
- Brand / producer (REQUIRED) — e.g. Claude. Maps to schema.org/brand.
- Style / SKU code (RECOMMENDED) — e.g. DRE-029-W20. Maps to schema.org/sku.
- Collection (RECOMMENDED) — e.g. style. Maps to schema.org/isPartOf.
- Colour (RECOMMENDED) — e.g. Green, Black, Pink. Maps to schema.org/color.
Review the Description Section (1/1)
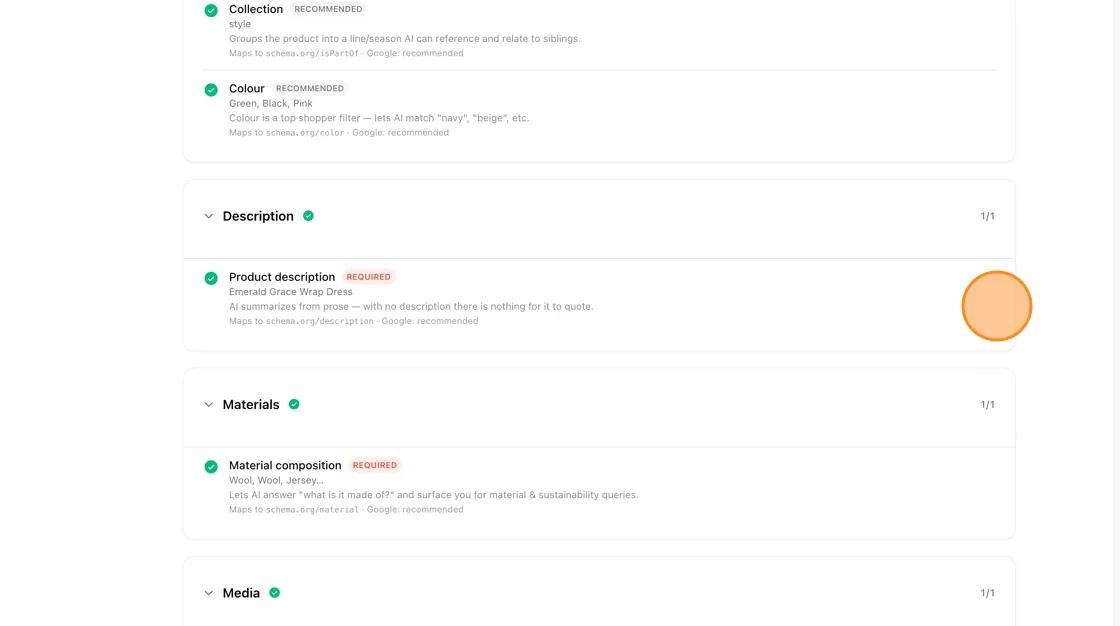
The Description section contains:
- Product description (REQUIRED) — e.g. Emerald Grace Wrap Dress. AI summarises from prose; with no description there is nothing for it to quote. Maps to schema.org/description.
Tip
Write your product description in full sentences in the Style Details > Short Description field. Bullet lists are harder for AI to quote naturally.
Review the Materials Section (1/1)
The Materials section contains:
- Material composition (REQUIRED) — e.g. Wool, Wool, Jersey… Lets AI answer “what is it made of?” and surface you for material & sustainability queries. Maps to schema.org/material.
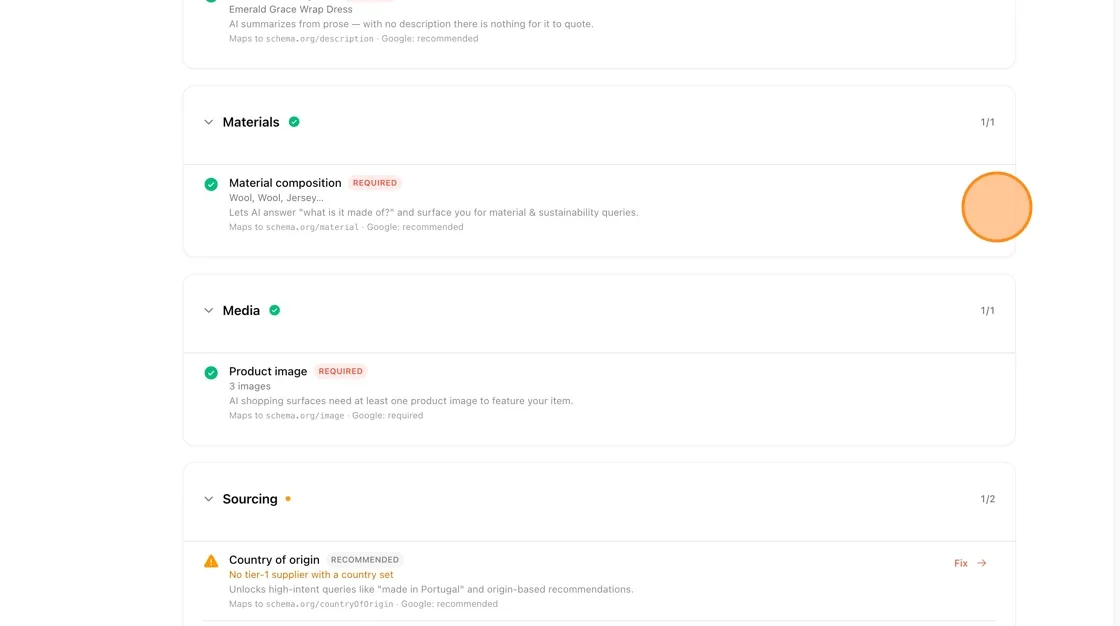
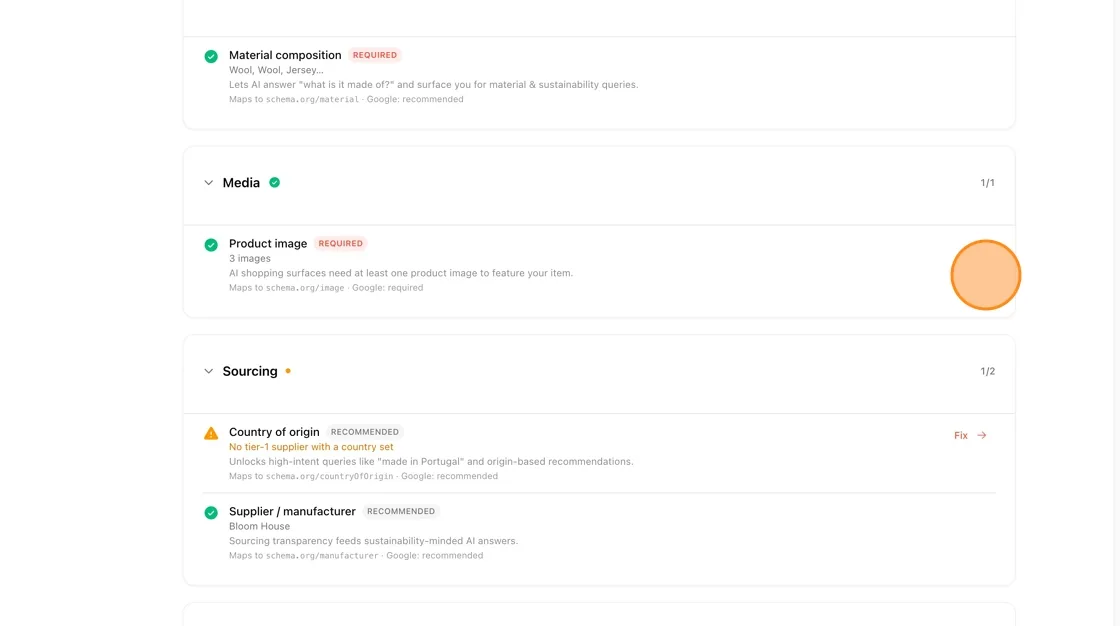
Review the Media Section (1/1)
The Media section contains:
- Product image (REQUIRED) — must have at least 1 image (e.g. 3 images). AI shopping surfaces need at least one product image to feature your item. Maps to schema.org/image.
Tip
Upload at least one clean product image per colour option. Multiple images improve the chance of being featured across AI shopping surfaces.
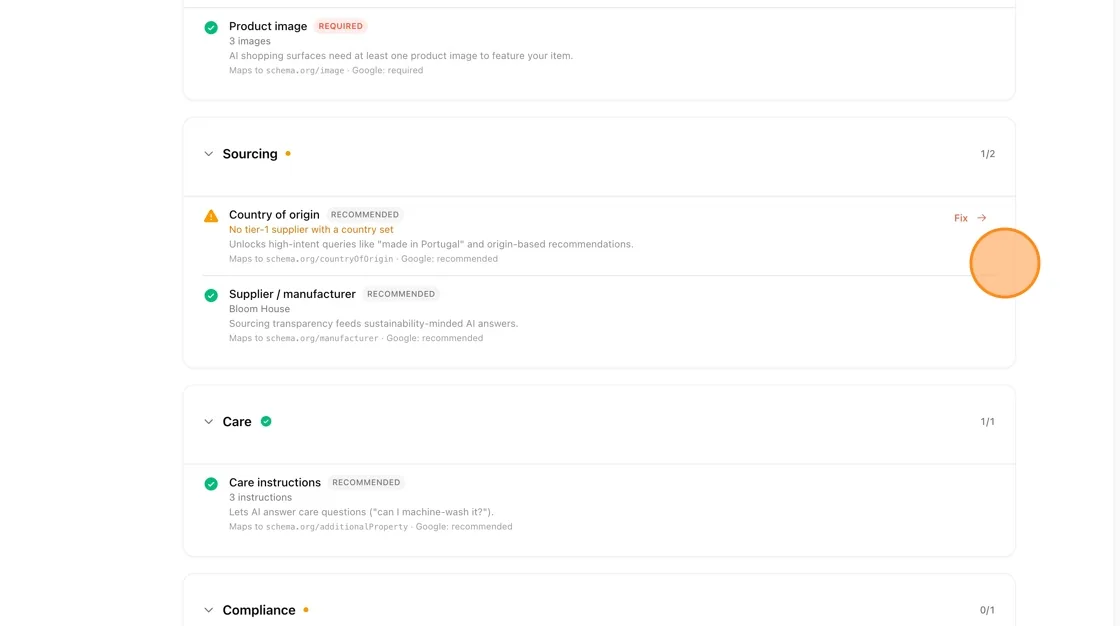
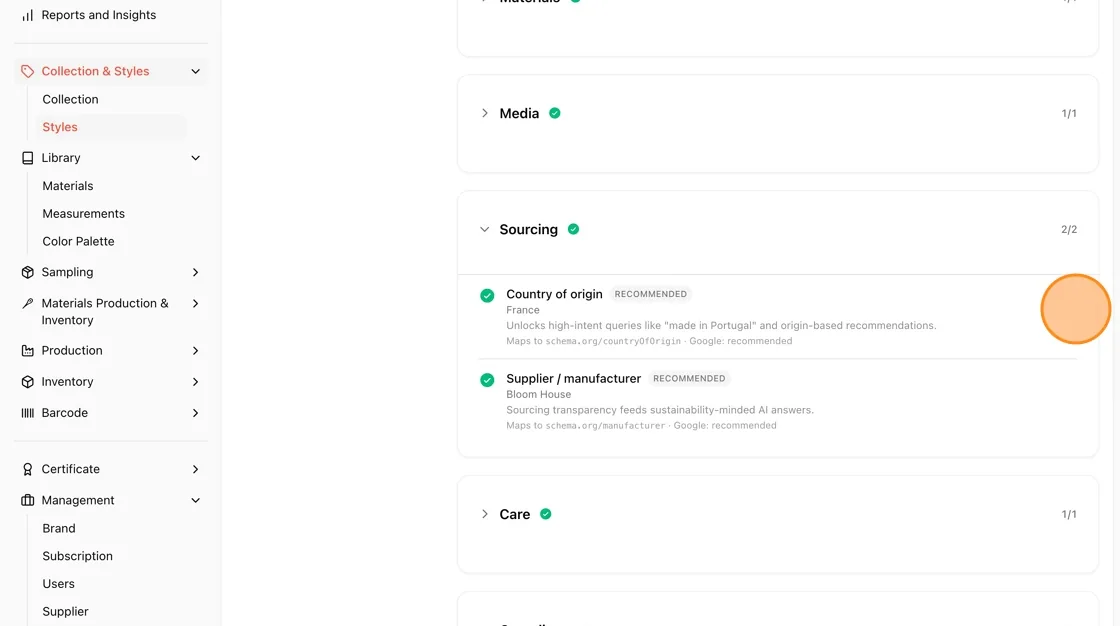
Review the Sourcing Section (1/2)
The Sourcing section has two fields. An amber dot on the section means at least one recommended field is incomplete:
- Country of origin (RECOMMENDED) — if showing “No tier-1 supplier with a country set”, the field is incomplete. Unlocks high-intent queries like “make in Portugal” and origin-based recommendations. Maps to schema.org/countryOfOrigin.
- Supplier / manufacturer (RECOMMENDED) — e.g. Bloom House. Sourcing transparency feeds sustainability-minded AI answers. Maps to schema.org/manufacturer.
Review the Care Section (1/1)
The Care section contains:
- Care instructions (RECOMMENDED) — e.g. 3 instructions. Lets AI answer care questions (“can I machine-wash it?”). Maps to schema.org/additionalProperty.
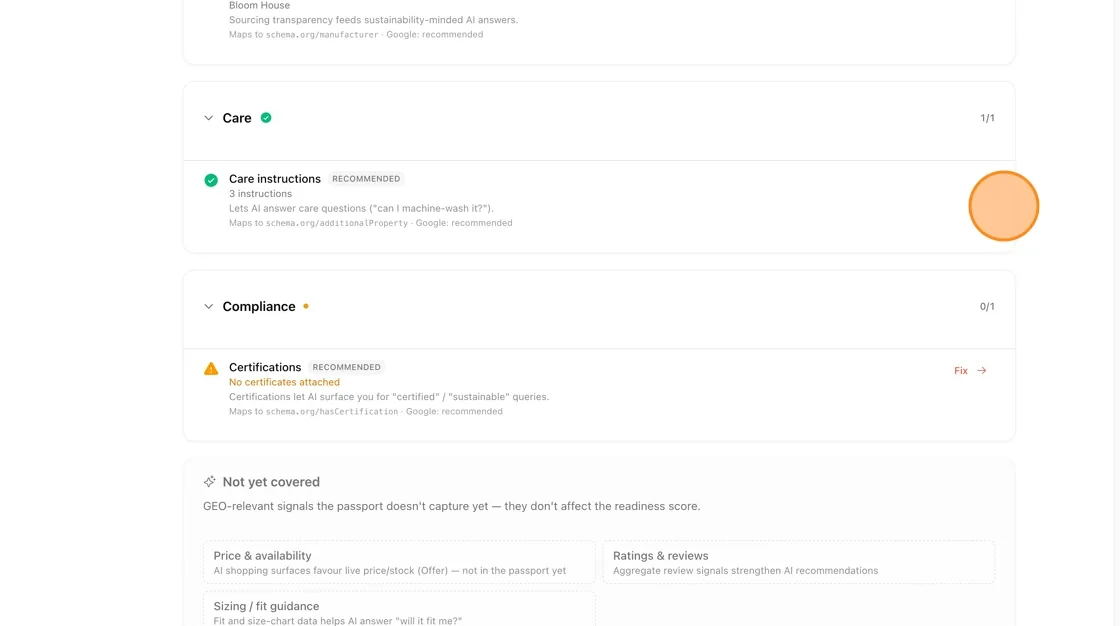
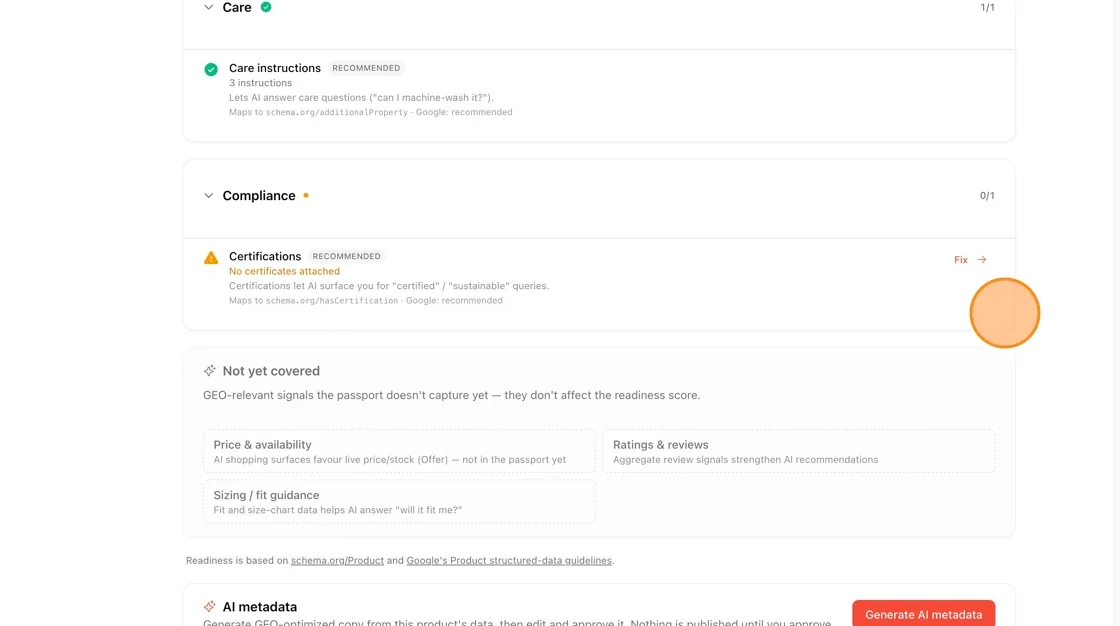
Review the Compliance Section (0/1)
The Compliance section contains:
- Certifications (RECOMMENDED) — if showing “No certificates attached”, no certifications have been linked. Certifications let AI surface you for “certified” / “sustainable” queries. Maps to schema.org/hasCertification. Click Fix → to go directly to the certificates section.
Not yet covered
Some GEO-relevant signals are not yet captured in the passport and do not affect your readiness score. These include: Price & availability (AI shopping surfaces favour live price/stock — Offer schema, not in the passport yet), Ratings & reviews (aggregate review signals strengthen AI recommendations), and Sizing / fit guidance (fit and size-chart data helps AI answer “will it fit me?”).
Fixing incomplete fields
Use the Fix Button for Quick Navigation
Any field showing an amber warning icon and a Fix → link can be fixed directly. Click Fix → next to the field (e.g. Country of origin) to jump directly to the relevant section in Vestis where you can add the missing data.
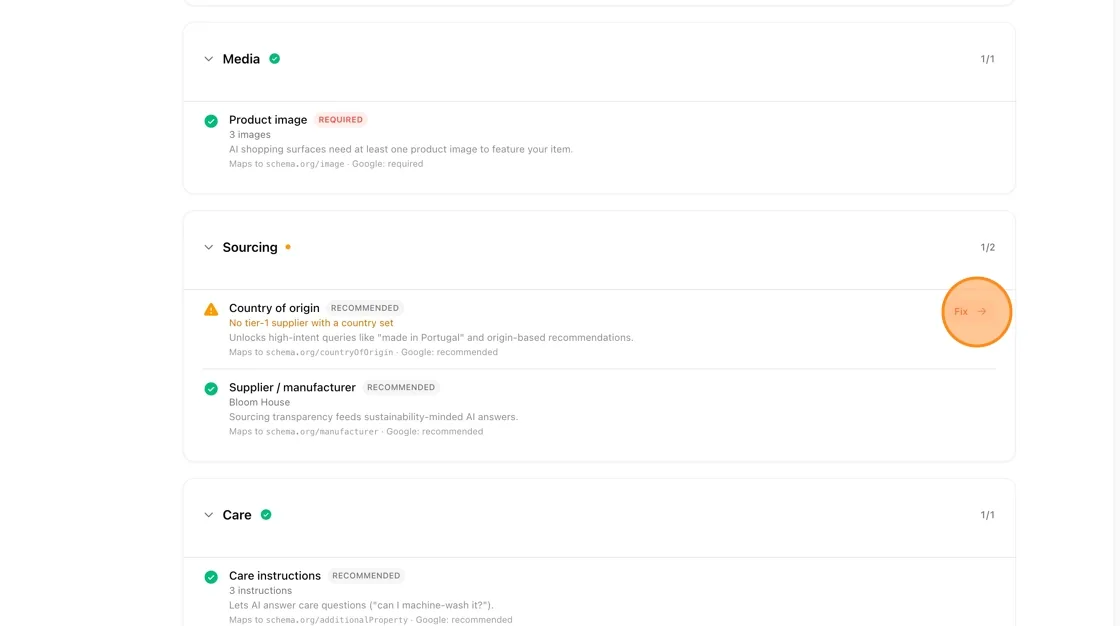
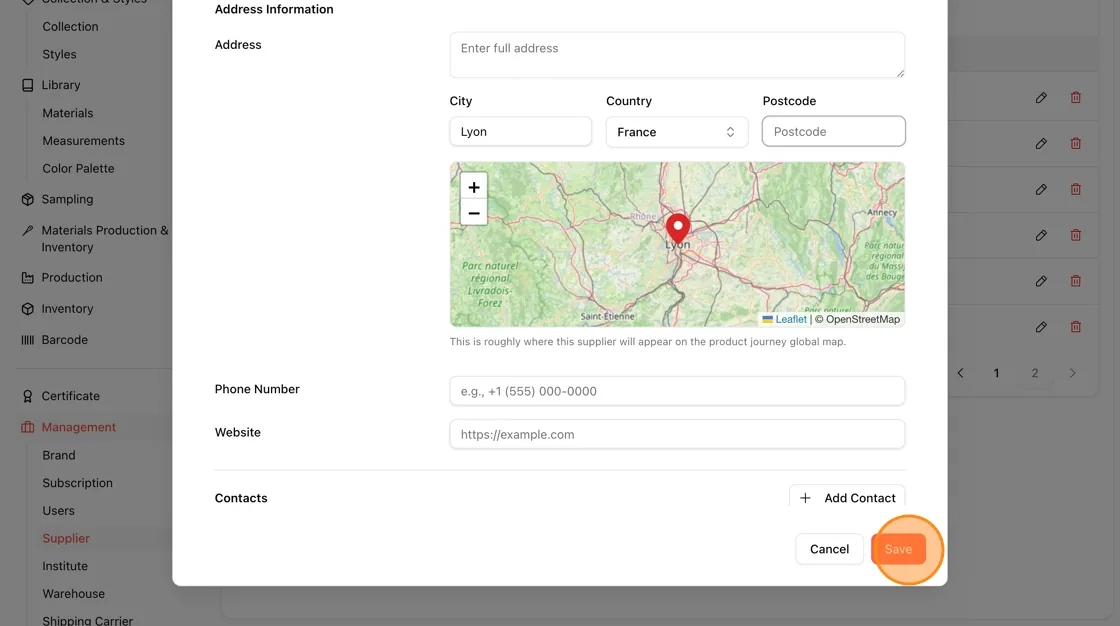
Add Country of Origin via the Supplier Record
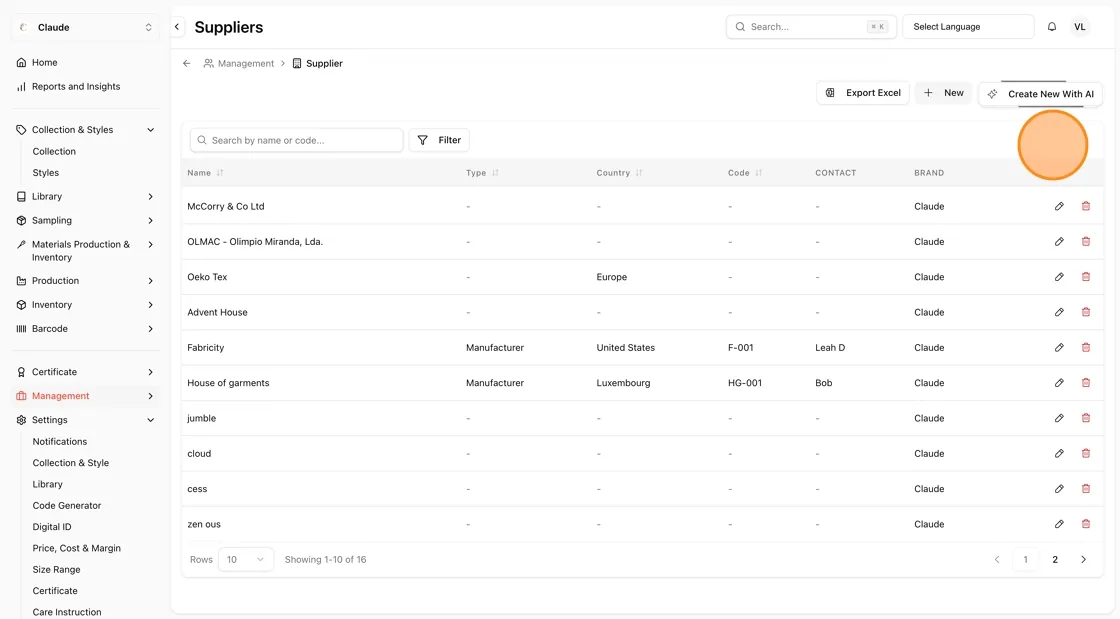
Country of origin is set at the supplier level, not the style level. To fix it:
- Go to Management > Supplier in the left sidebar.
- Find the relevant tier-1 supplier and click the edit (pencil) icon.
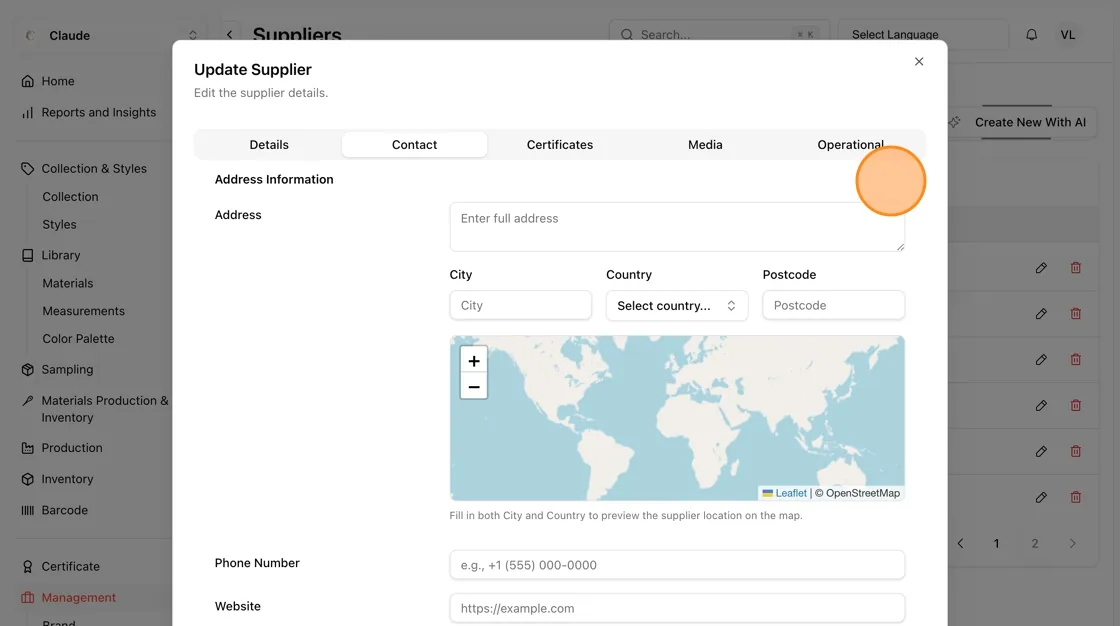
- In the Update Supplier dialog, click the Contact tab.
- Under Address Information, enter the City, select the Country from the dropdown (e.g. France), and optionally add a Postcode.
- The map preview will update to show the supplier’s approximate location.
- Click Save to update the supplier record.
Tip
Once a country is set on a tier-1 supplier and that supplier is linked to a style’s BOM, the Country of origin field in GEO Readiness will automatically resolve.
Generating and approving AI metadata
Find the AI Metadata Section
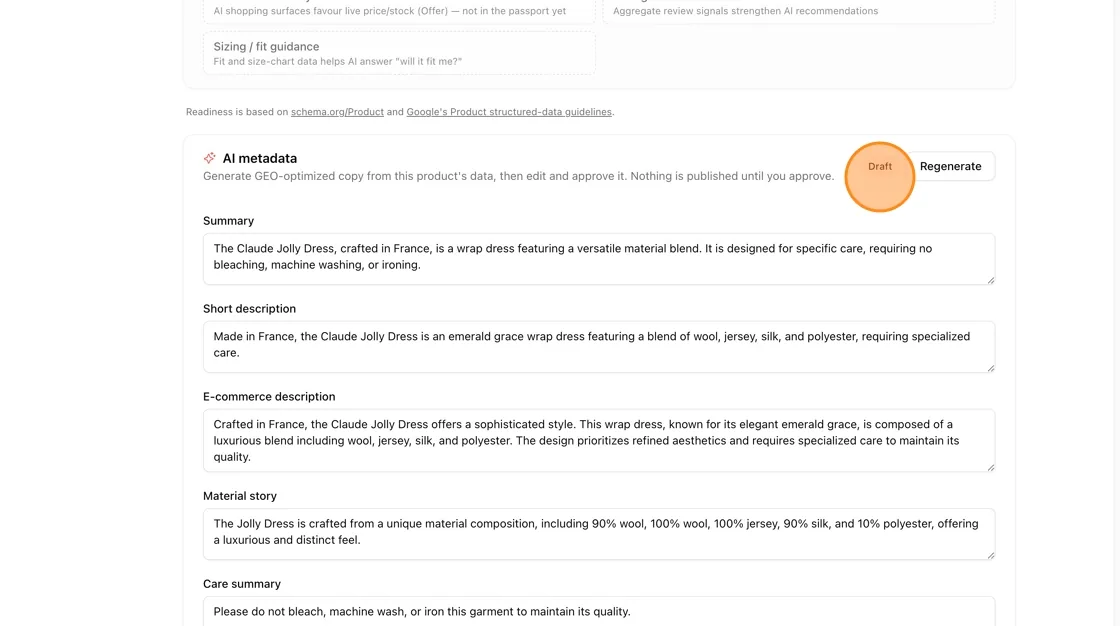
Scroll to the bottom of the GEO Readiness page, below the Not yet covered section. You will find the AI metadata panel. The description reads: “Generate GEO-optimized copy from this product’s data, then edit and approve it. Nothing is published until you approve.”
Important
If AI metadata has not been generated yet, the panel will show: “No AI metadata yet — click Generate AI metadata to draft it from this product’s data.” The Embed on your website section below it will be locked until AI metadata is approved.
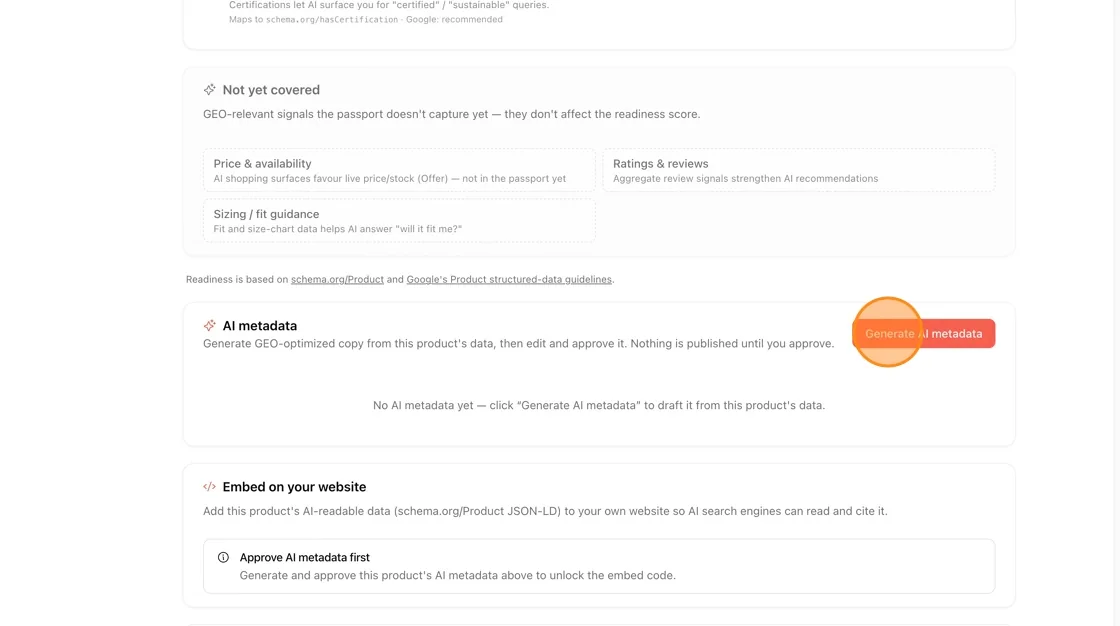
Generate the AI Metadata Draft
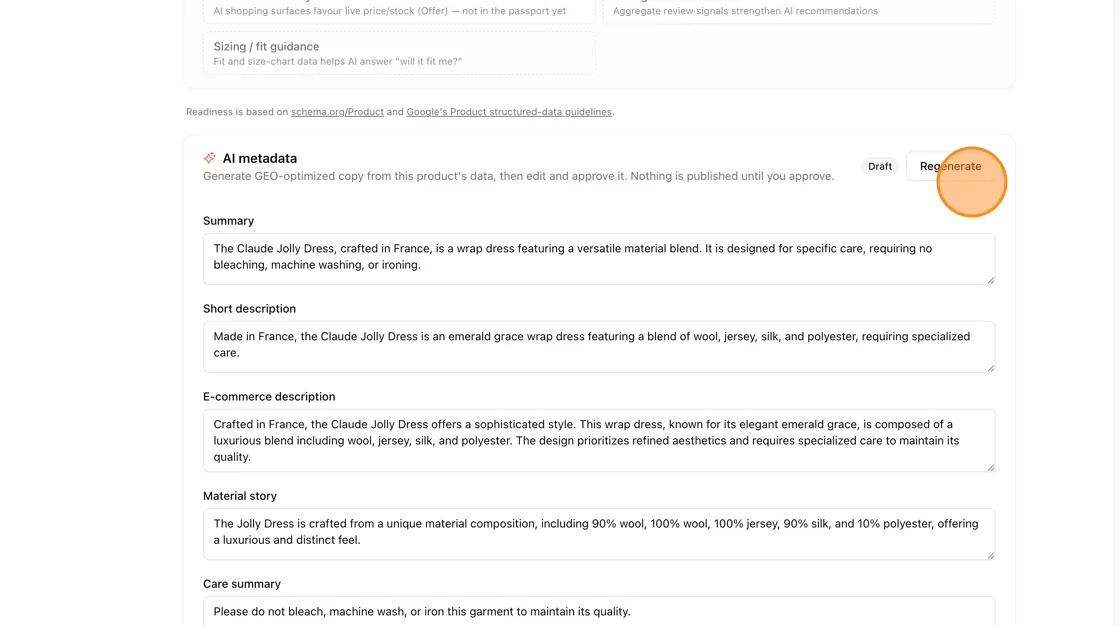
Click Generate AI metadata. Vestis reads all available product data and generates a draft. The panel status shows Draft with a Regenerate button alongside. The following editable text fields appear:
- Summary — a concise AI-friendly product summary (e.g. “The Claude Jolly Dress, crafted in France, is a wrap dress featuring a versatile material blend…”)
- Short description — a compact description optimised for structured data
- E-commerce description — a longer product page description
- Material story — a narrative about the product’s material composition
- Care summary — a plain-language care instruction summary
Tip
Click Regenerate at any time to produce a new draft from your Vestis data. Each regeneration may produce slightly different copy — use the version that best matches your brand voice.
Review, Edit, and Add Tags and Search Terms
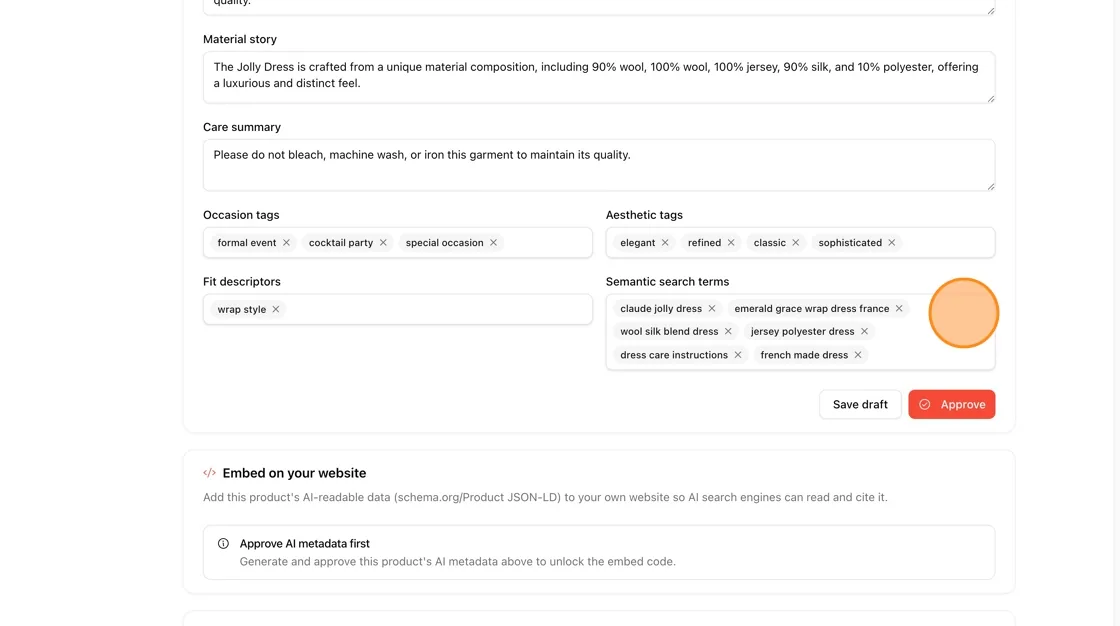
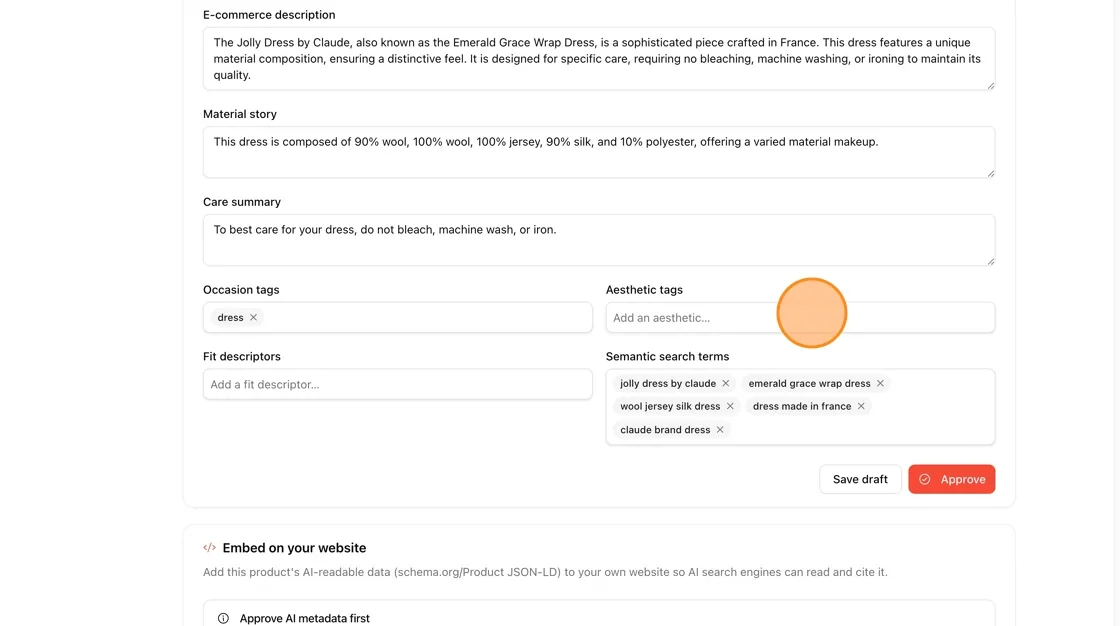
All generated copy fields are fully editable — click into any text box and type to update. Below the copy fields, four tag sections let you manually update and check your AI targeting:
- Occasion tags — searchable occasion descriptors (e.g. formal event, cocktail party, special occasion). Click into the field to type and add new tags.
- Aesthetic tags — visual and style descriptors (e.g. elegant, refined, classic, sophisticated). The field shows “Add an aesthetic…” when empty — type to add your own.
- Fit descriptors — how the garment fits (e.g. wrap style). Shows “Add a fit descriptor…” when empty. Add descriptors that help AI match sizing and fit queries.
- Semantic search terms — AI-targeted keyword phrases generated from your product data (e.g. jolly dress by claude, emerald grace wrap dress, wool jersey silk dress, dress made in france). These are the exact phrases Vestis expects AI engines to match your product against.
For all tag fields you can:
- Add — click into the field and type a new tag, then press Enter to confirm
- Remove — click the × next to any existing tag to delete it
- Check — review all generated terms and verify they are accurate and on-brand before approving
Tip
Semantic search terms are the most impactful field for AI discoverability. Check every generated term carefully — remove inaccurate ones and add specific phrases your target customer would use to search for this product.
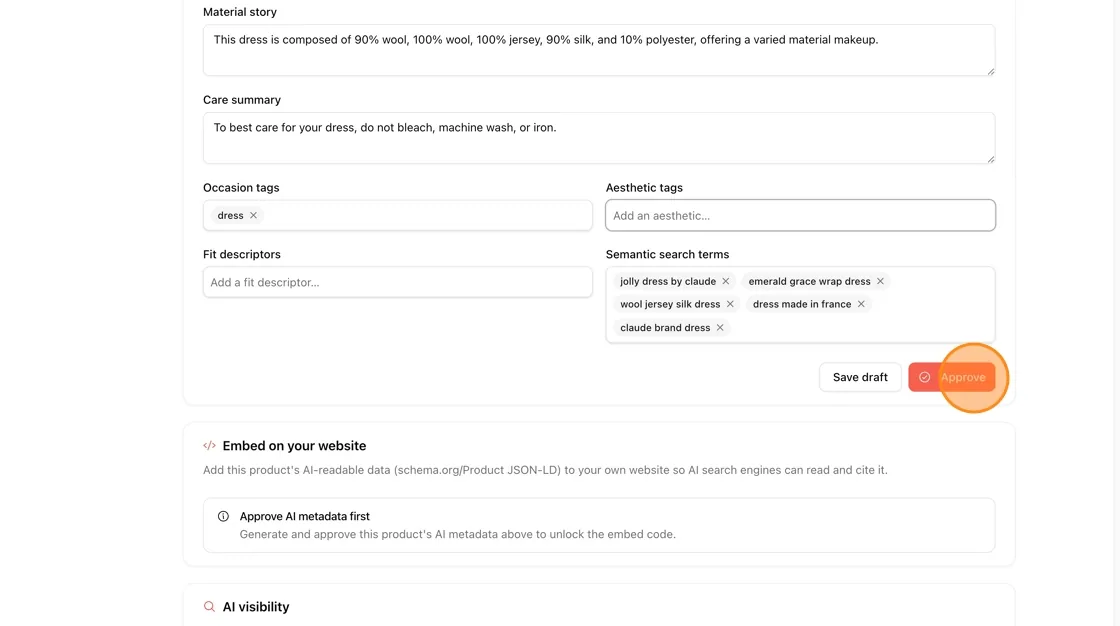
Save as Draft or Approve
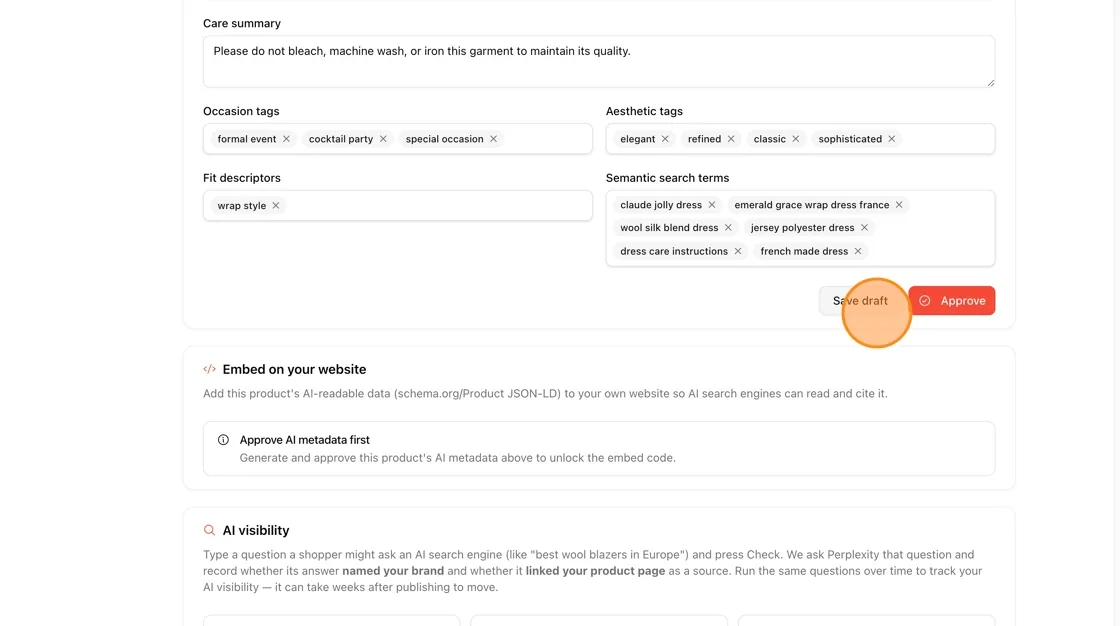
At the bottom of the AI metadata panel you have two actions:
- Save draft — saves your edits without publishing. The metadata status remains Draft. Use this to continue editing later.
- Approve — marks the metadata as approved and unlocks the Embed on your website section. Nothing is published to your website until the embed code is placed on your product page.
After approval
Once approved, the metadata panel shows a green Approved badge alongside the Regenerate button. You can regenerate and re-approve at any time — this updates the structured data.
Embedding AI metadata on your website
Find the Embed on Your Website Section
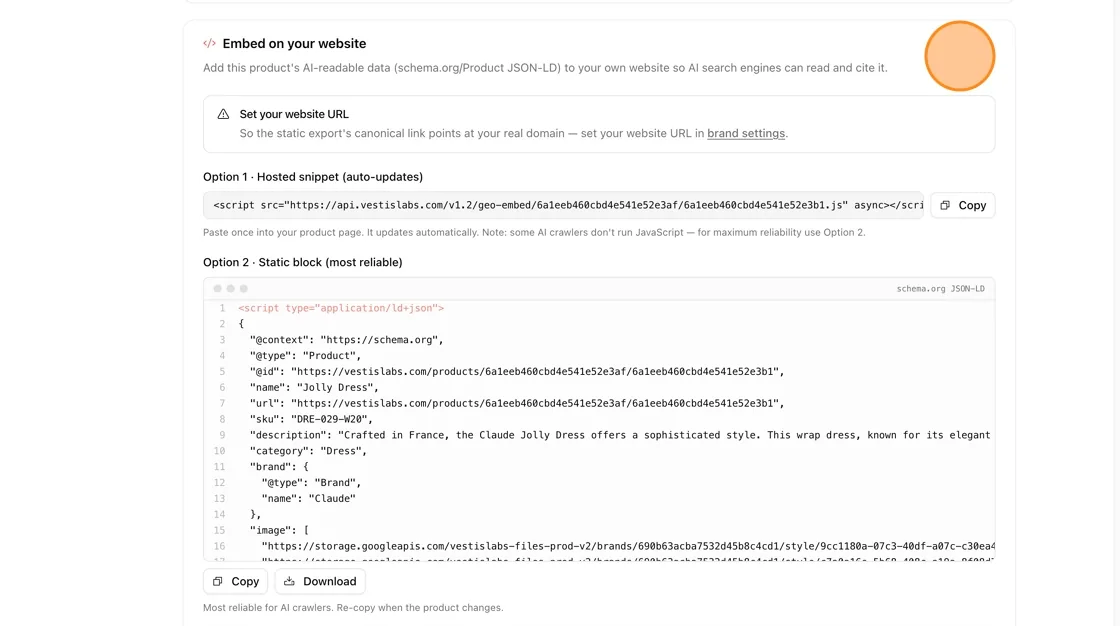
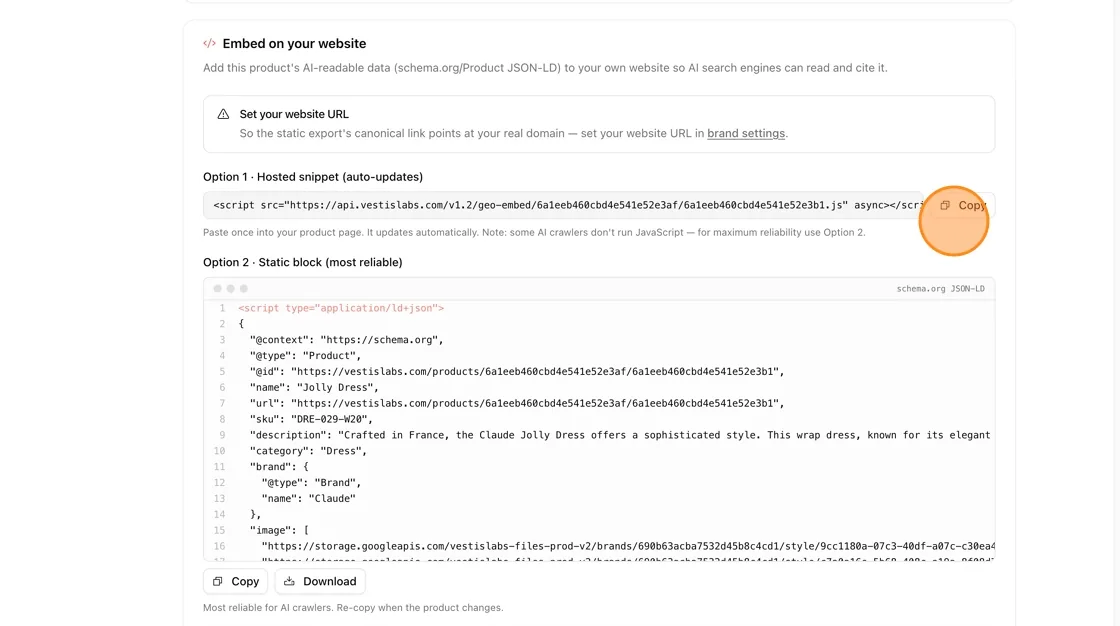
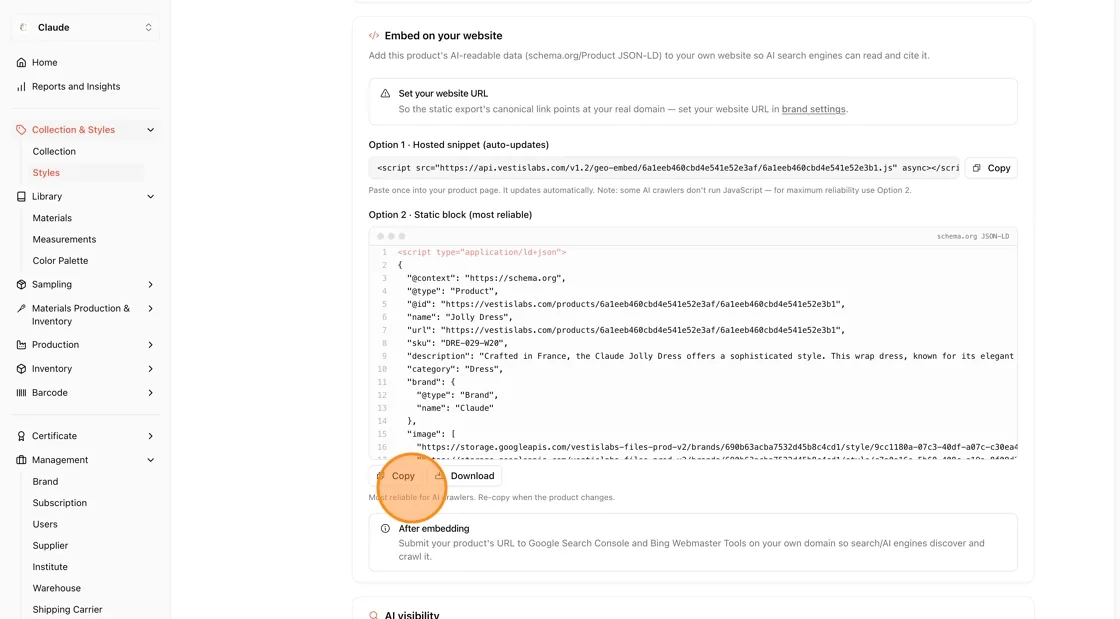
Below the AI metadata panel, you will see the Embed on your website section. The description reads: “Add this product’s AI-readable data (schema.org/Product JSON-LD) to your own website so AI search engines can read and cite it.”
Prerequisite
If AI metadata has not yet been approved, this section shows: “Approve AI metadata first — Generate and approve this product’s AI metadata above to unlock the embed code.” Complete Steps 17–20 before proceeding.
Copy or Download the Static Block
Below the JSON-LD code preview, two buttons are available: Copy (copies the full JSON-LD to your clipboard) and Download (saves it as a file). Use either to get the code, then paste it into the <head> or <body> of your website’s product page.
After embedding
Submit your product’s URL to Google Search Console and Bing Webmaster Tools on your own domain so search and AI engines discover and crawl it. This is mentioned in the “After embedding” note below the embed section.
For each time you:
- Add — click into the field and type a new tag, then press Enter to confirm
- Remove — click the × next to any existing tag to delete it
- Check — review all generated terms and verify they are accurate and on-brand before approving
Approve to unlock embedding
- Click Approve to confirm the AI metadata is finalized. Nothing is published until this approval step is completed.
- Once approved, this unlocks the Embed on your website section below, which provides schema.org/Product JSON-LD code you can add to your own site so AI search engines can read and cite the product data.
- Before approval, this section stays locked with the message: "Approve AI metadata first — Generate and approve this product's AI metadata above to unlock the embed code."
- After approving, you'd typically move on to the AI visibility section to check how discoverable the product is to AI shopping tools.
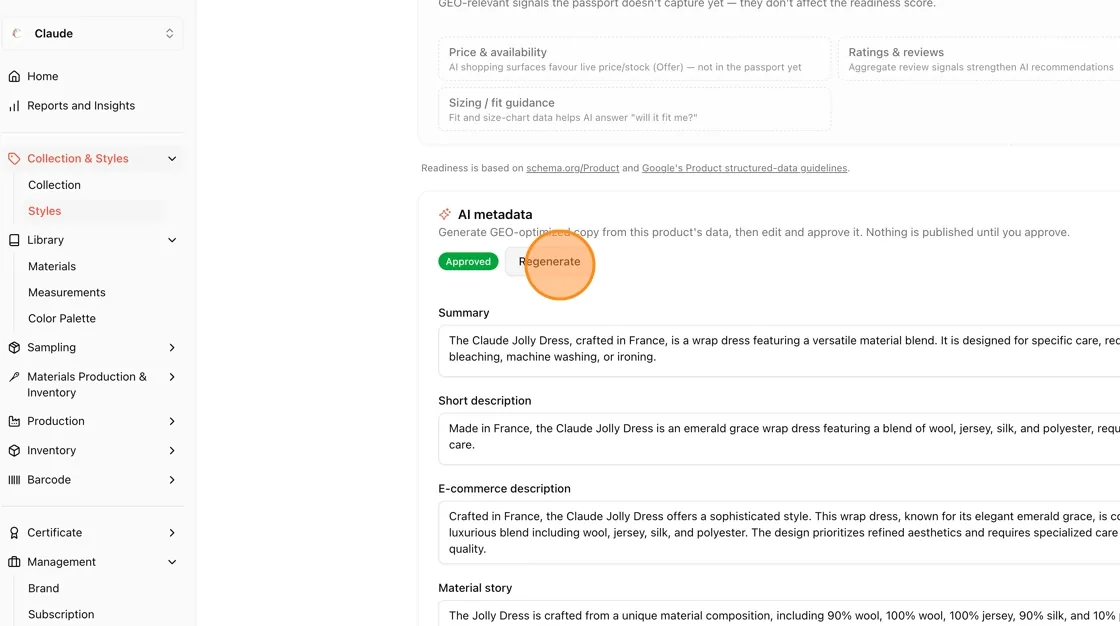
Regenerate the AI-generated metadata
- In the AI metadata section, note the status shows Approved (green badge), meaning this metadata is currently live/finalized.
- Click the Regenerate button (highlighted with the orange cursor indicator) if you want the AI to produce a new version of the copy based on the product's underlying data.
Integrating GEO readlines into Shopify
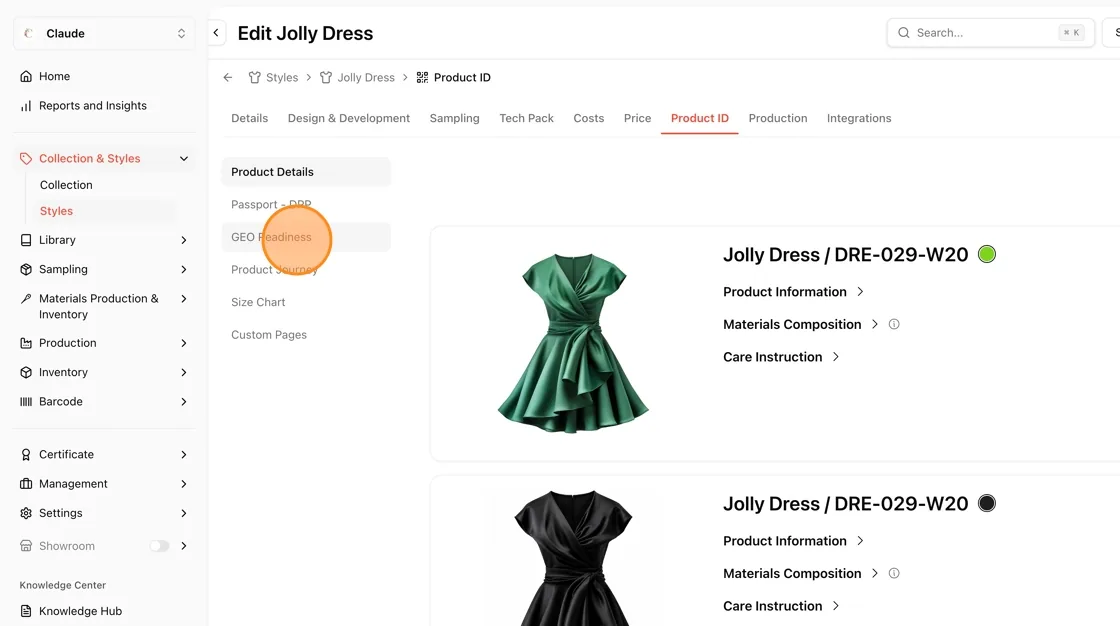
Open GEO Readiness
— Click the GEO Readiness tab in the style's top navigation. This is where you generate AI/search-engine-readable product data (schema.org JSON-LD).
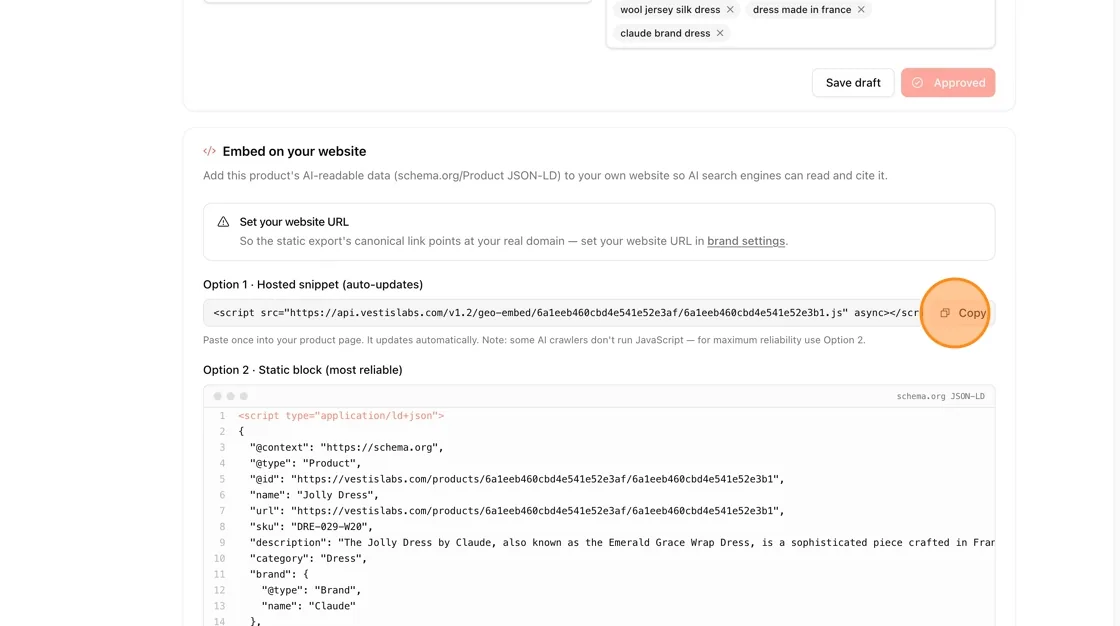
Copy the embed snippet
— Scroll to "Embed on your website." You'll see two options:
- Option 1 – Hosted snippet (auto-updates): a <script> tag pointing to api.vestislabs.com/v1.2/geo-embed/...js
- Option 2 – Static block (most reliable): a raw JSON-LD <script type="application/ld+json"> block
Click Copy next to the option you want (Option 1 shown here is the simplest — one script tag that stays in sync).
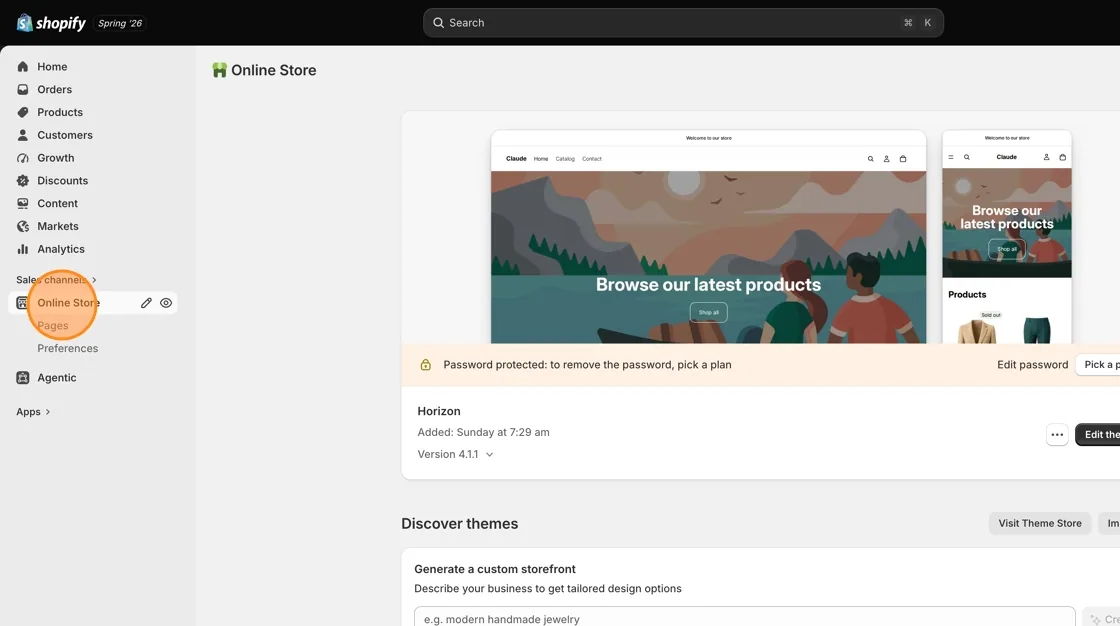
Navigate to your Shopify Account
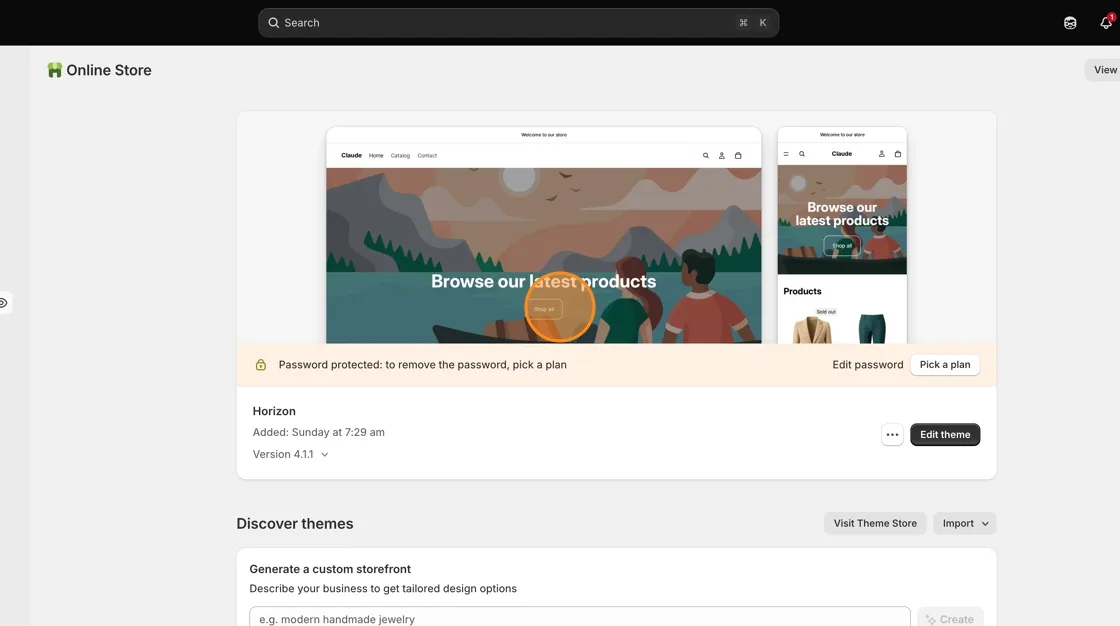
Go to Online Store
— In your Shopify admin sidebar, click Online Store.
Edit your theme
— On the Online Store page, find your active theme (e.g. Horizon) and click Edit theme.
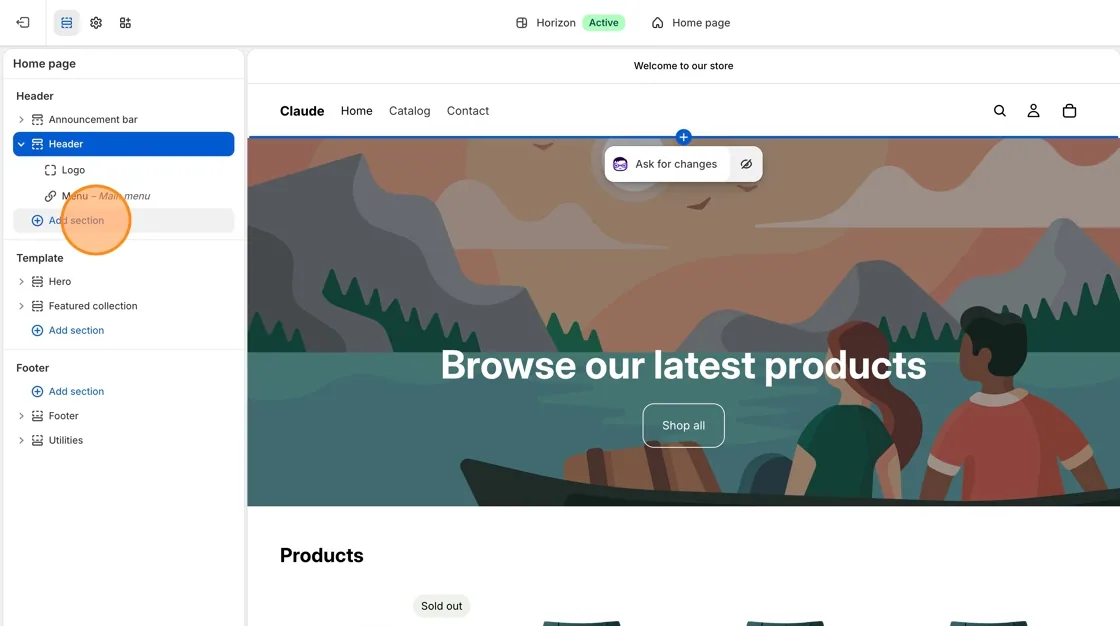
Add a section
— In the theme editor, select where you want the snippet to live (e.g. under Header) and click Add section.
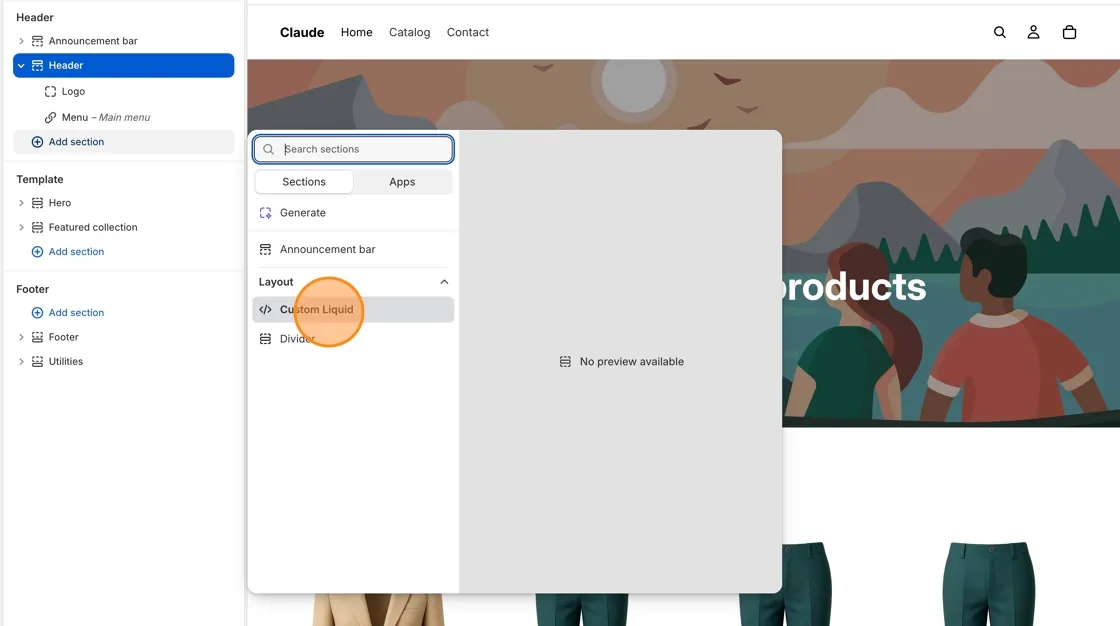
Choose Custom Liquid
— In the "Add section" panel, under Layout, select Custom Liquid.
Paste the script
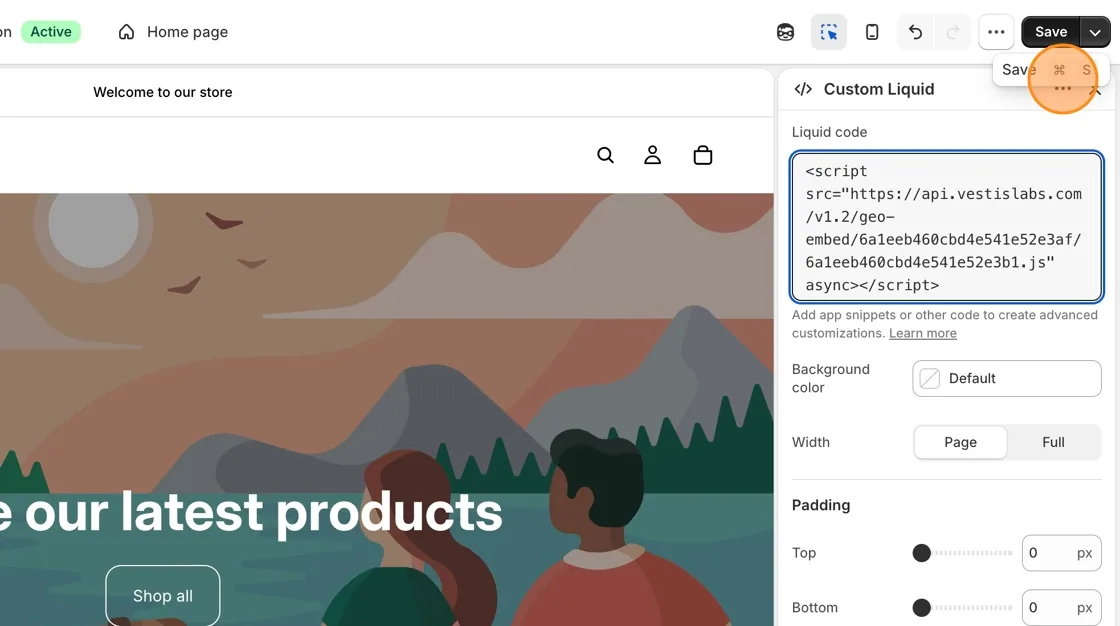
— With the Custom Liquid section selected, click into the Liquid code box and paste the script tag you copied from Vestis Labs.
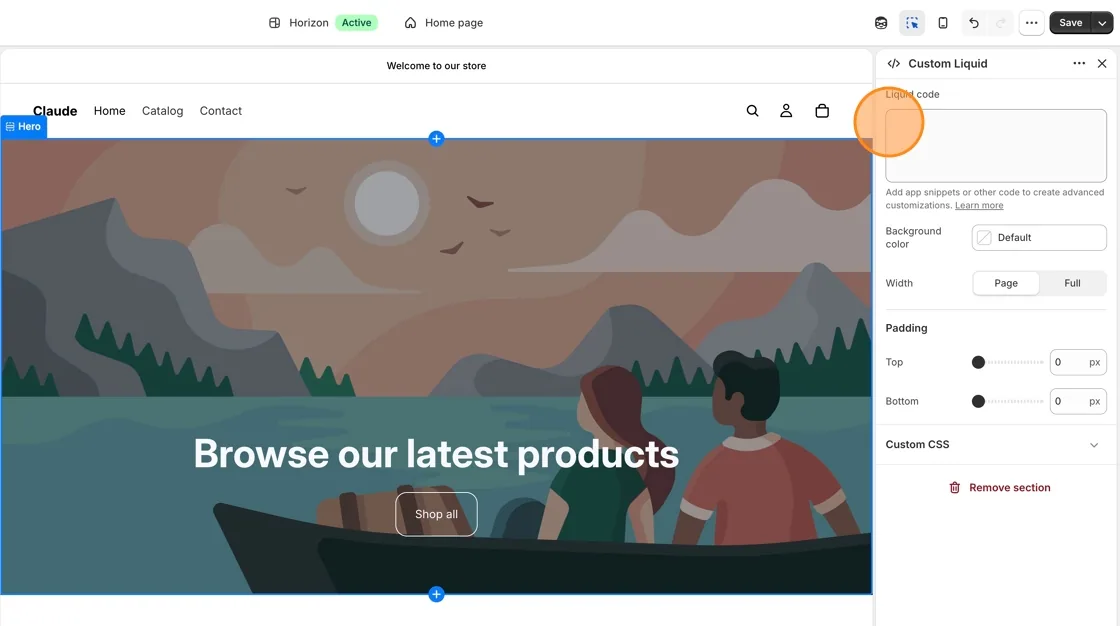
Save
— Click Save (top right) to publish the change live to your storefront.