
Style dashboard
Learn how to efficiently manage your product styles, customize views, and perform bulk exports within the Vestis Labs dashboard.
Under review. This page is published while we check it against the live app, so some details may have changed.
Learn how to efficiently manage your product styles, customize views, and perform bulk exports within the Vestis Labs dashboard. This guide walks you through uploading data, adjusting column visibility, and utilizing advanced export features to streamline your workflow.
**Open the Style Dashboard
**
Collection & StylesStyles
Permission: VIEW_STYLE
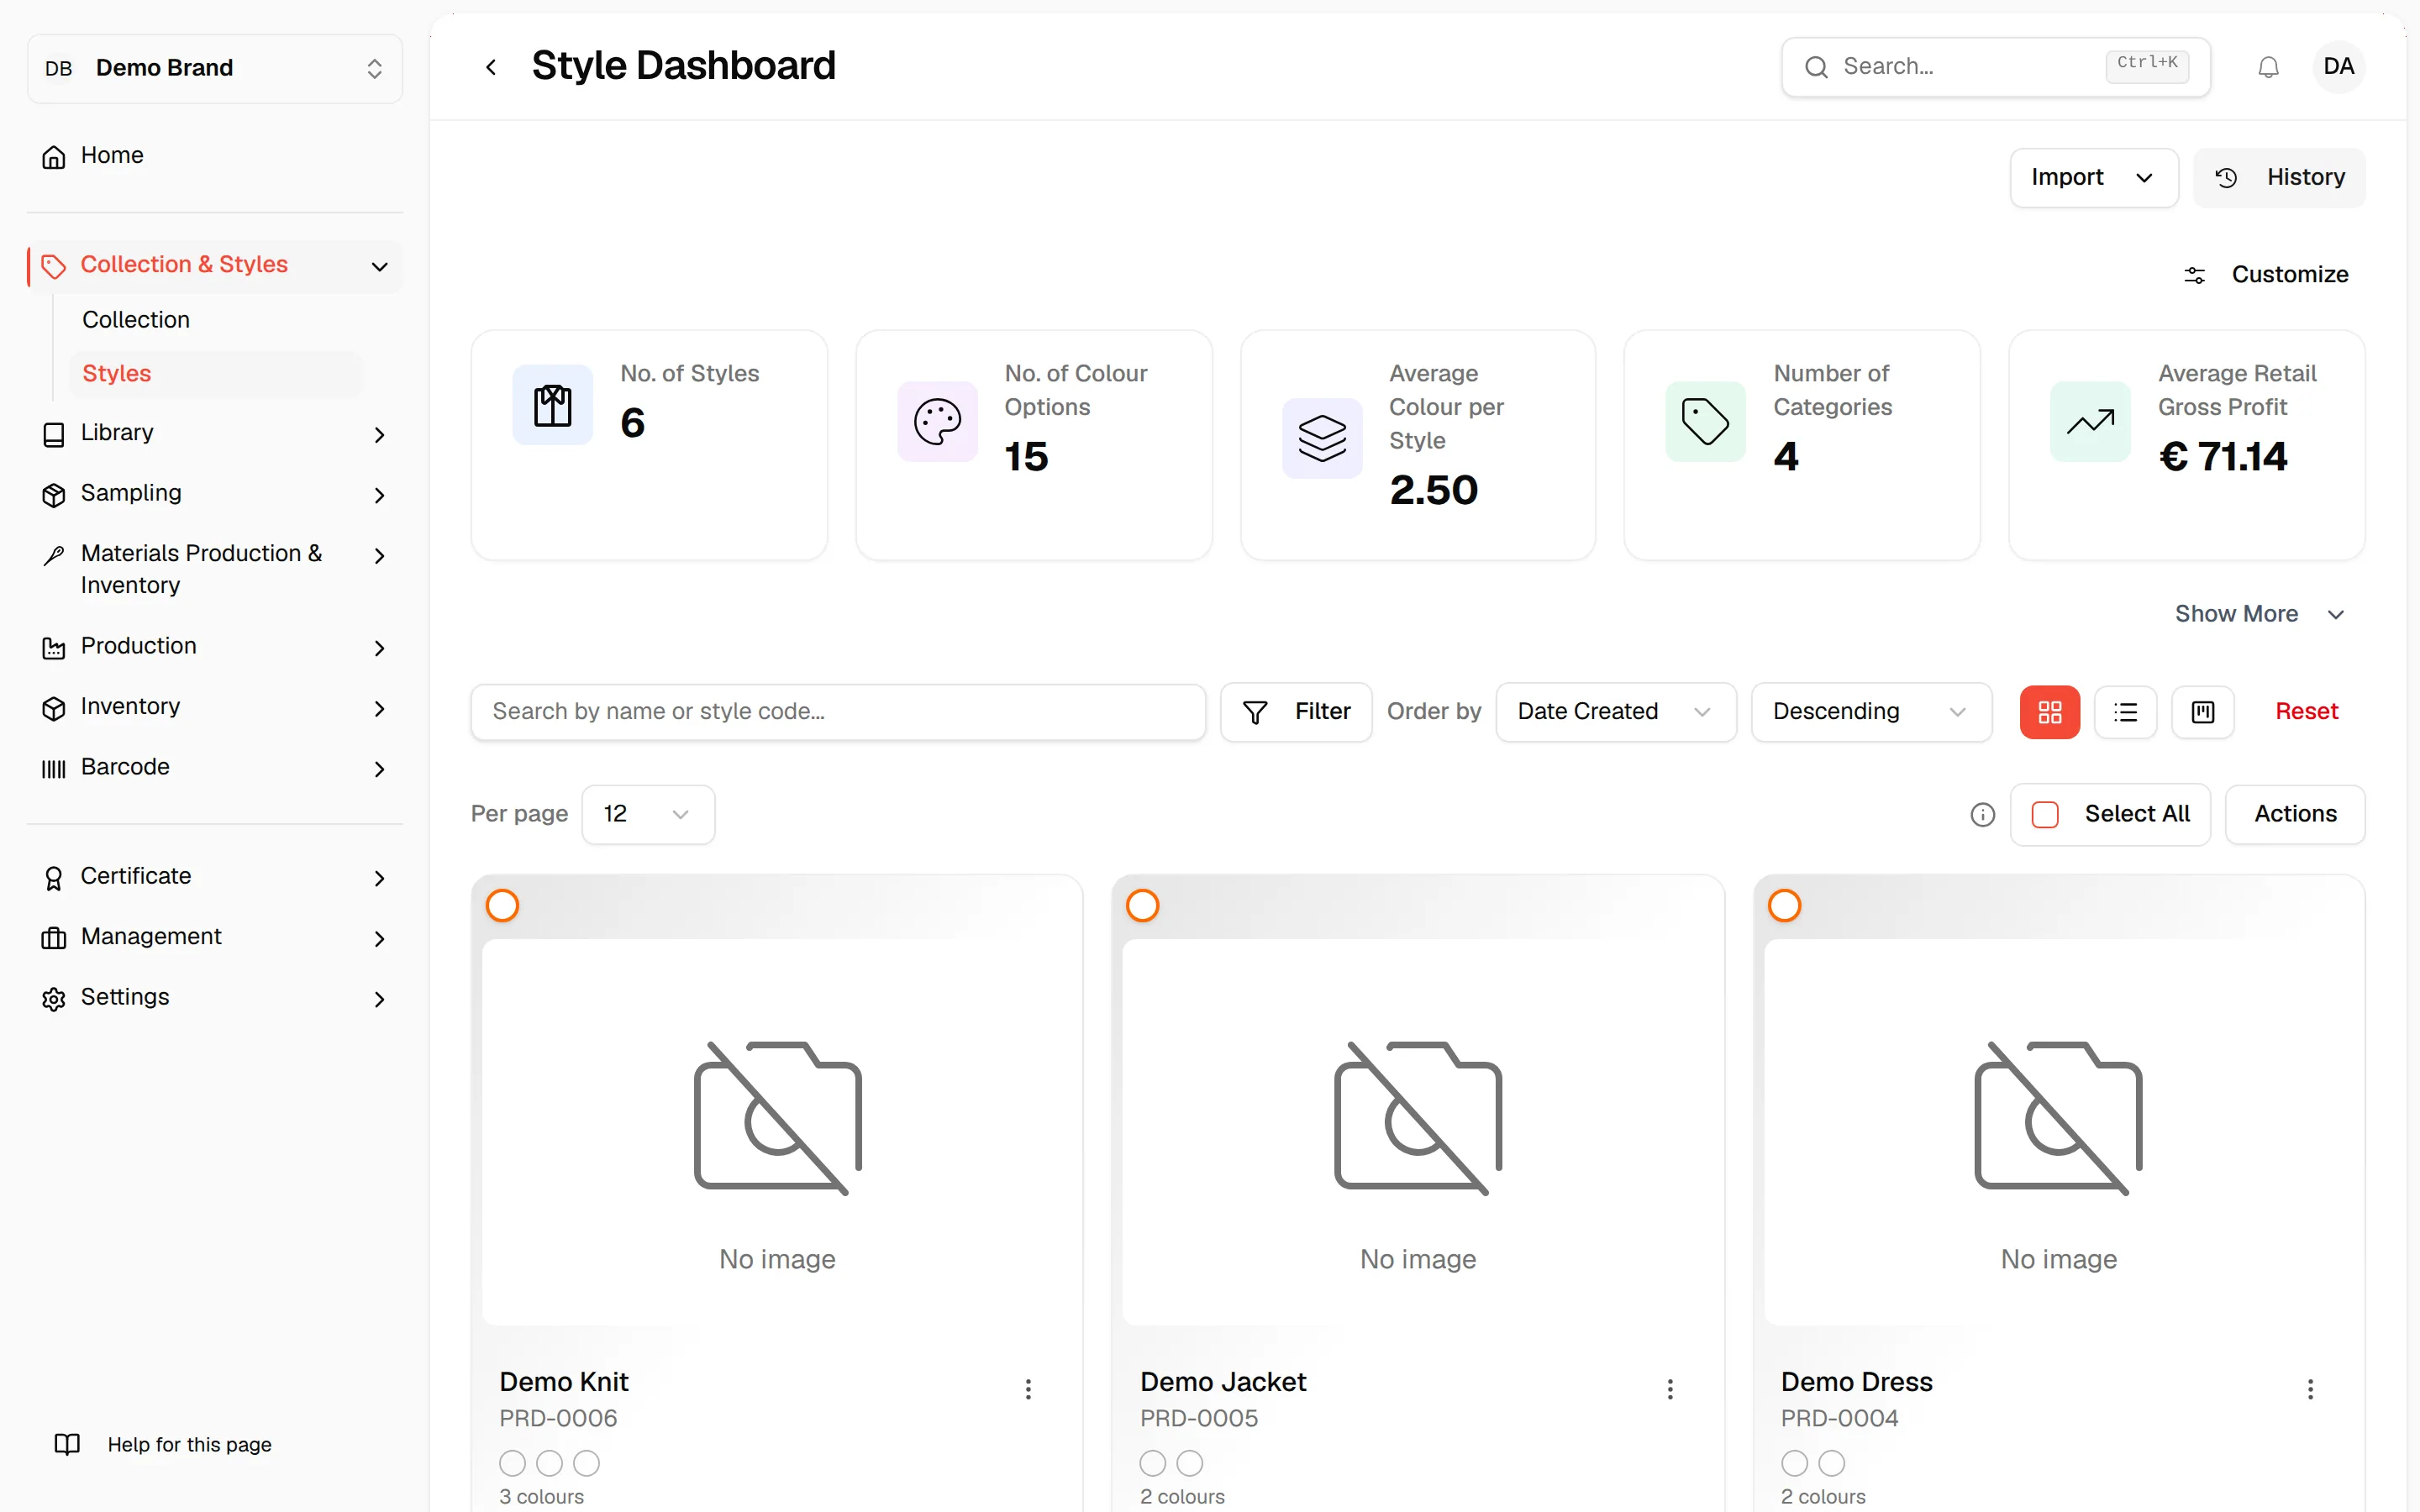
In the left sidebar, click on Collection & Styles to expand the menu. Then select Styles from the sub-menu. The page is titled Style Dashboard.
Note
The Style Dashboard shows summary metrics at the top: number of styles, colour options, average colours per style, categories, and average retail gross profit.
**Review Dashboard Metrics
** At the top of the Style Dashboard, you will see key statistics for your collection at a glance:
- No. of Styles
- No. of Colour Options
- Average Colour per Style
- Number of Categories
- Average Retail Gross Profit

Click Show More
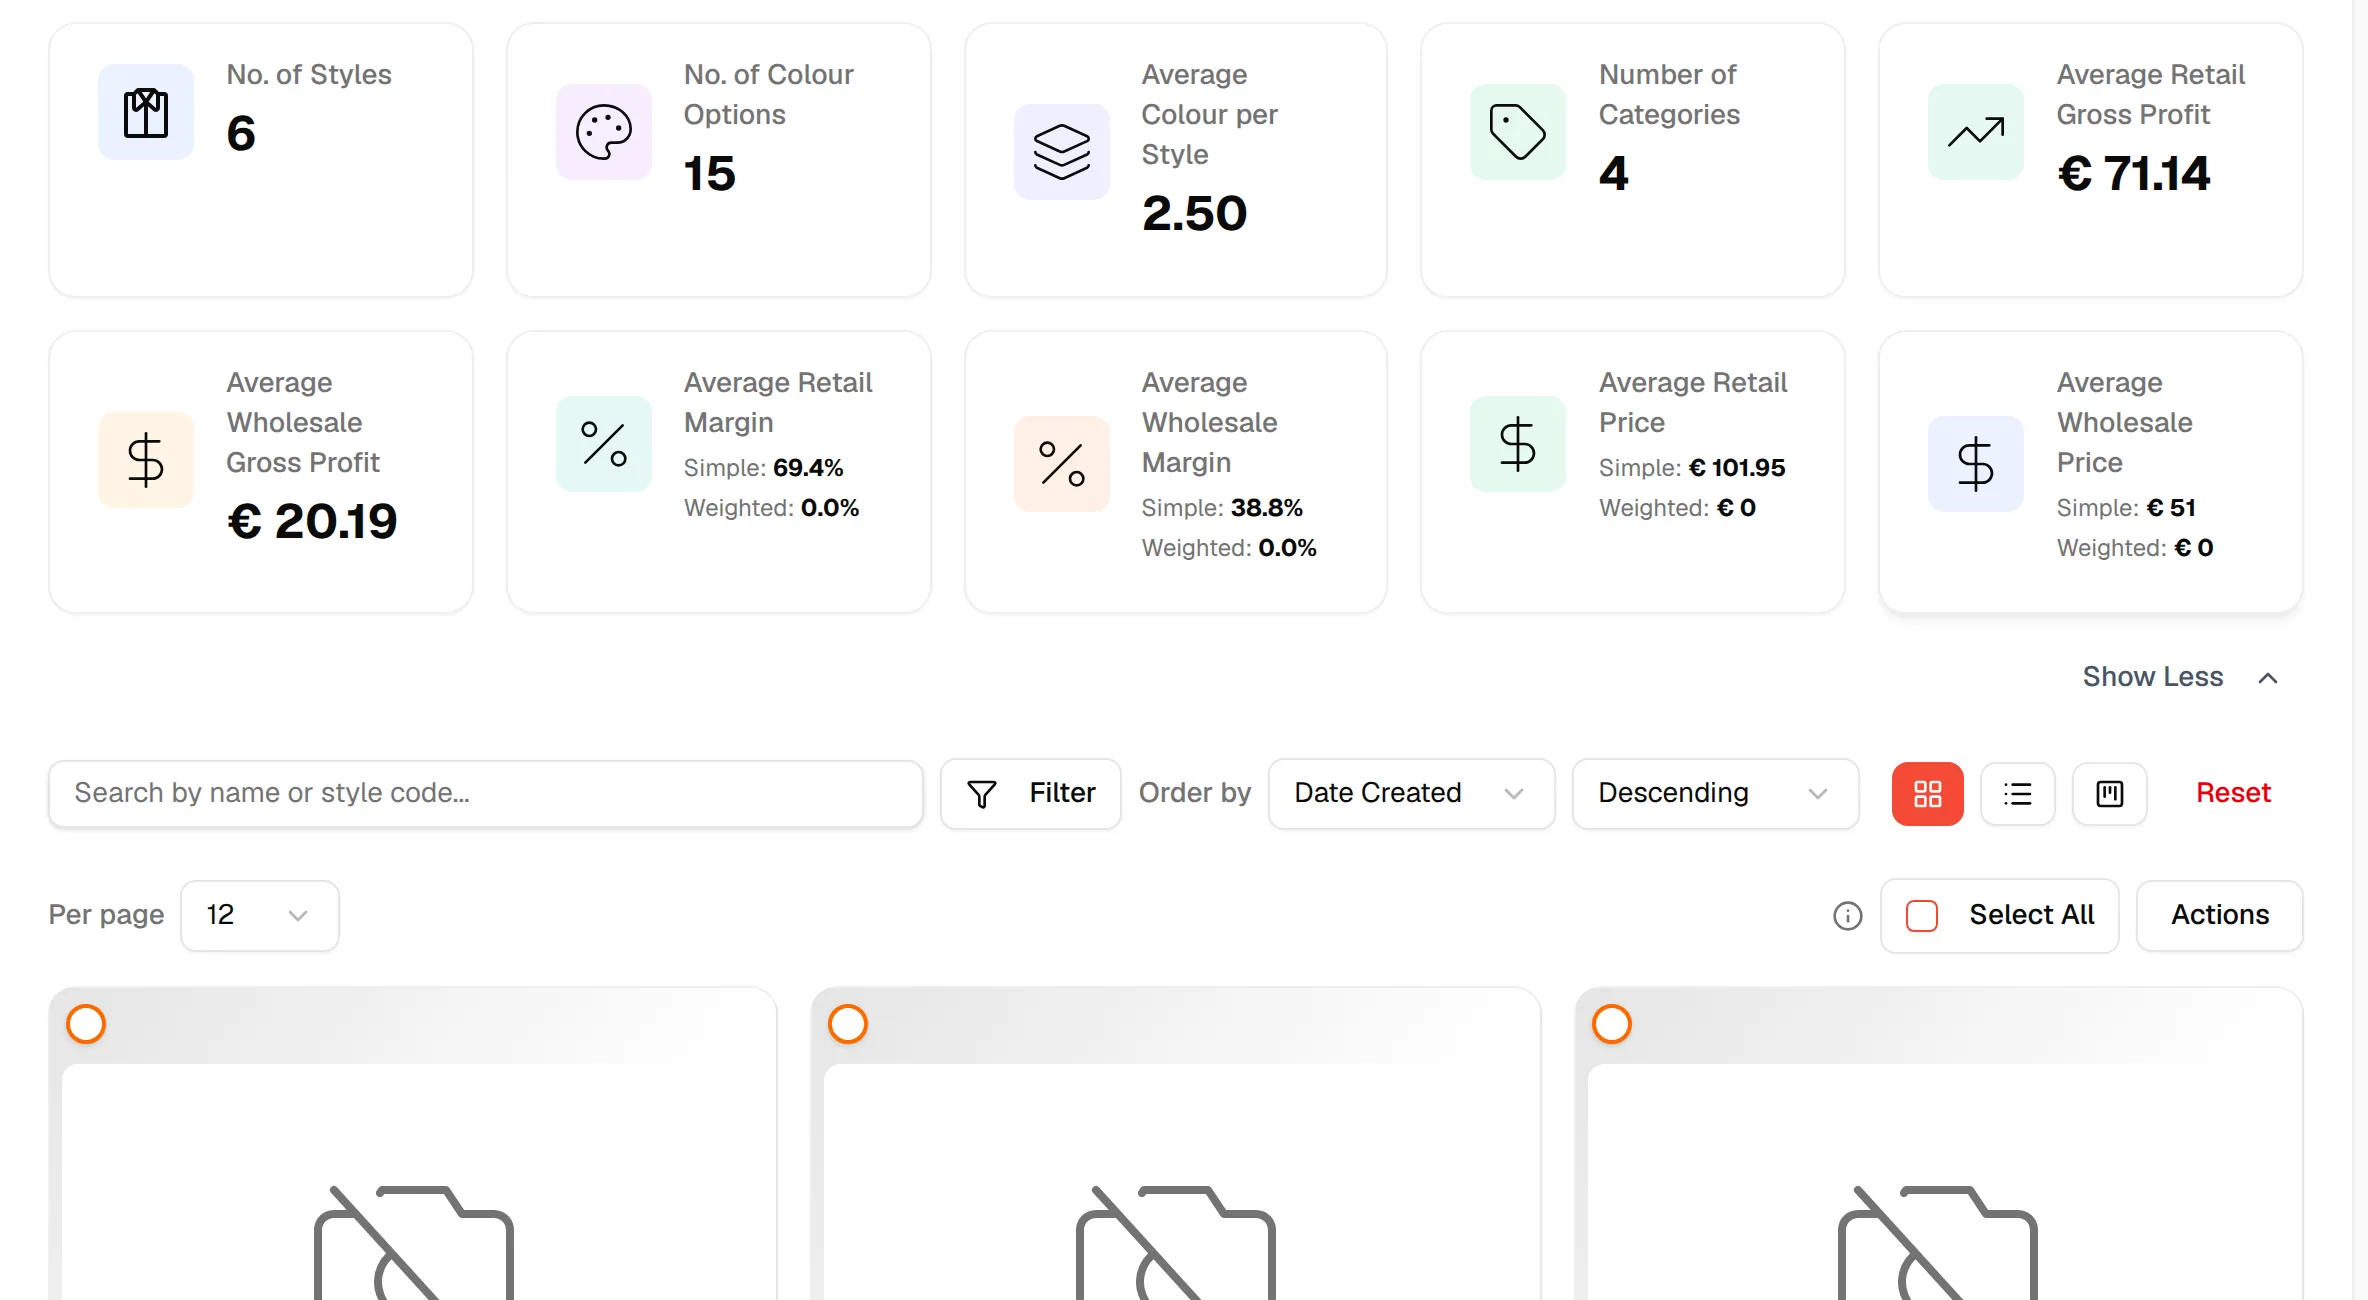
At the top of the Style Dashboard, below the summary metric cards, click Show More to expand the summary section. Additional metrics will appear, including:
- Average Wholesale Gross Profit
- Average Retail Margin (Simple and Weighted)
- Average Wholesale Margin (Simple and Weighted)
- Average Retail Price (Simple and Weighted)
- Average Wholesale Price (Simple and Weighted)
Switching dashboard view options
Open View Options
In the Style Dashboard toolbar, click the List View icon (the middle icon in the view toggle group, next to the Card and Kanban icons). A tooltip will appear explaining the three available view options:
- Card View – visual overview with images and key info
- List View – compact table-style view for faster scanning
- Kanban View – view your styles arranged by status

Use List View
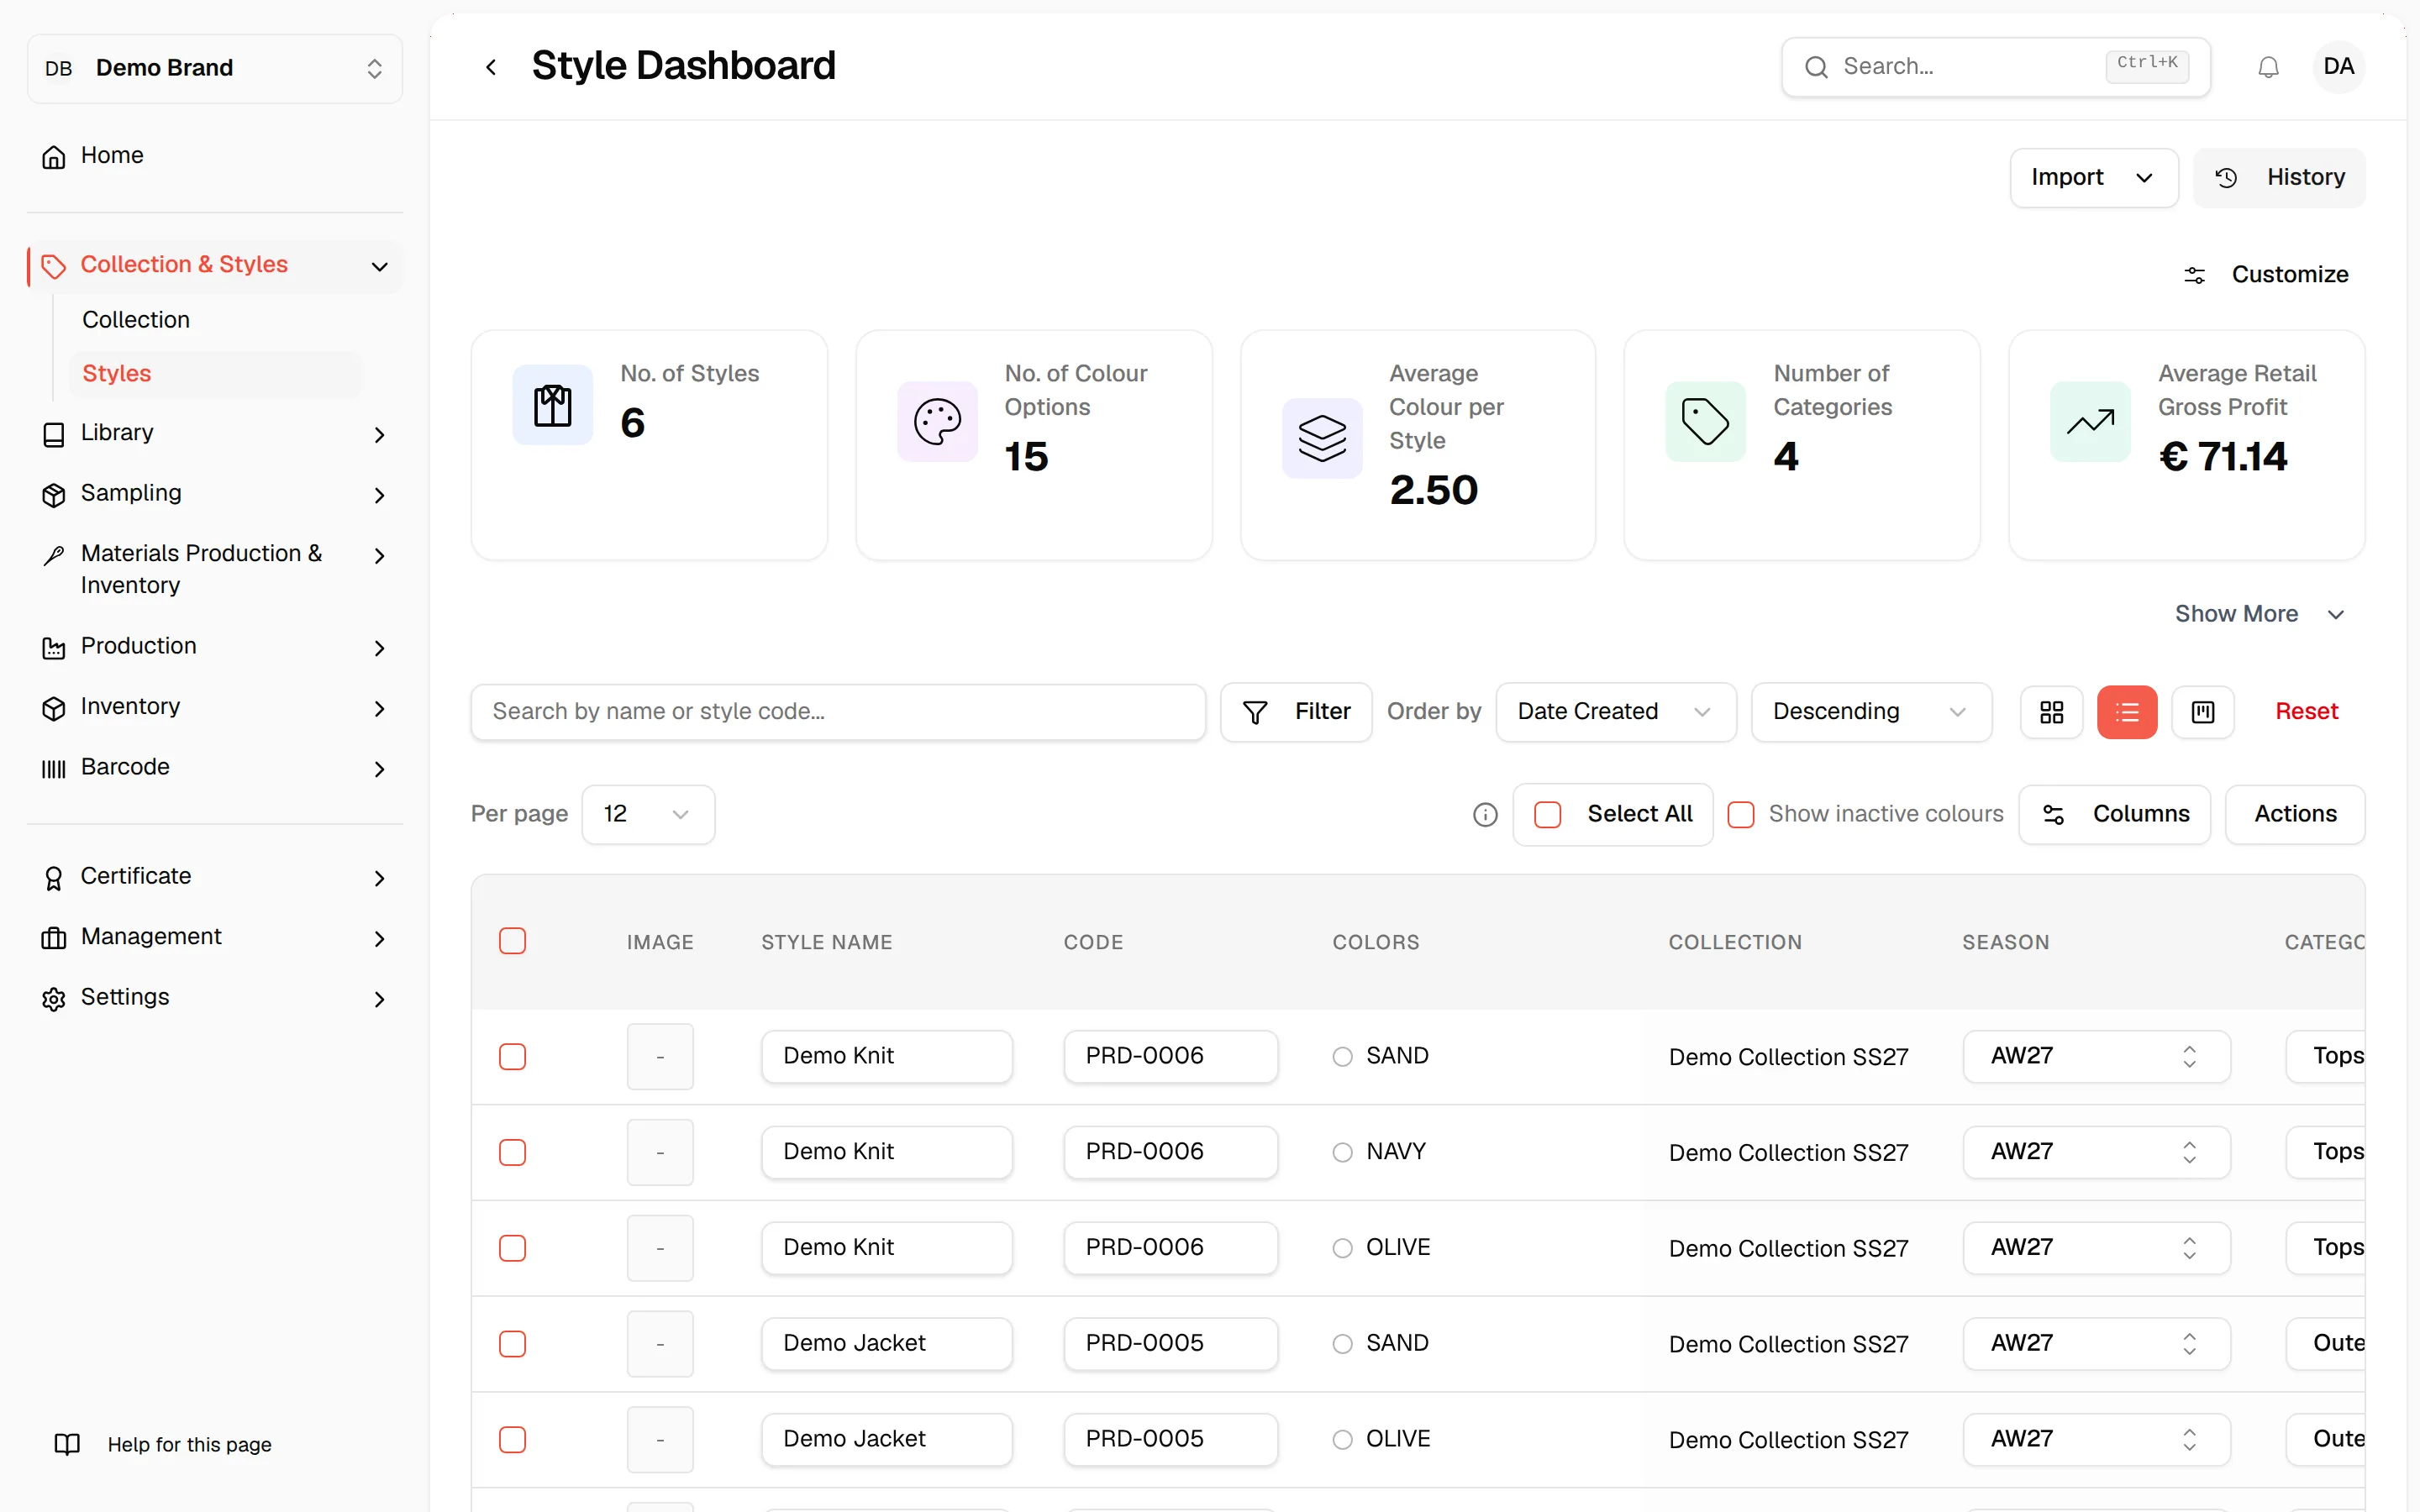
Click the List View icon to switch to a compact table-style layout. In List View, all styles are displayed as rows in a table with columns for Image, Style Name, Code, Colors, Collection, Season, Category, Short Description, Size Range, and Attributes. You can also access a Columns button in the toolbar to show or hide specific columns.
Note
List View is best for quickly scanning and editing large numbers of styles without scrolling through image cards.
Use Kanban View
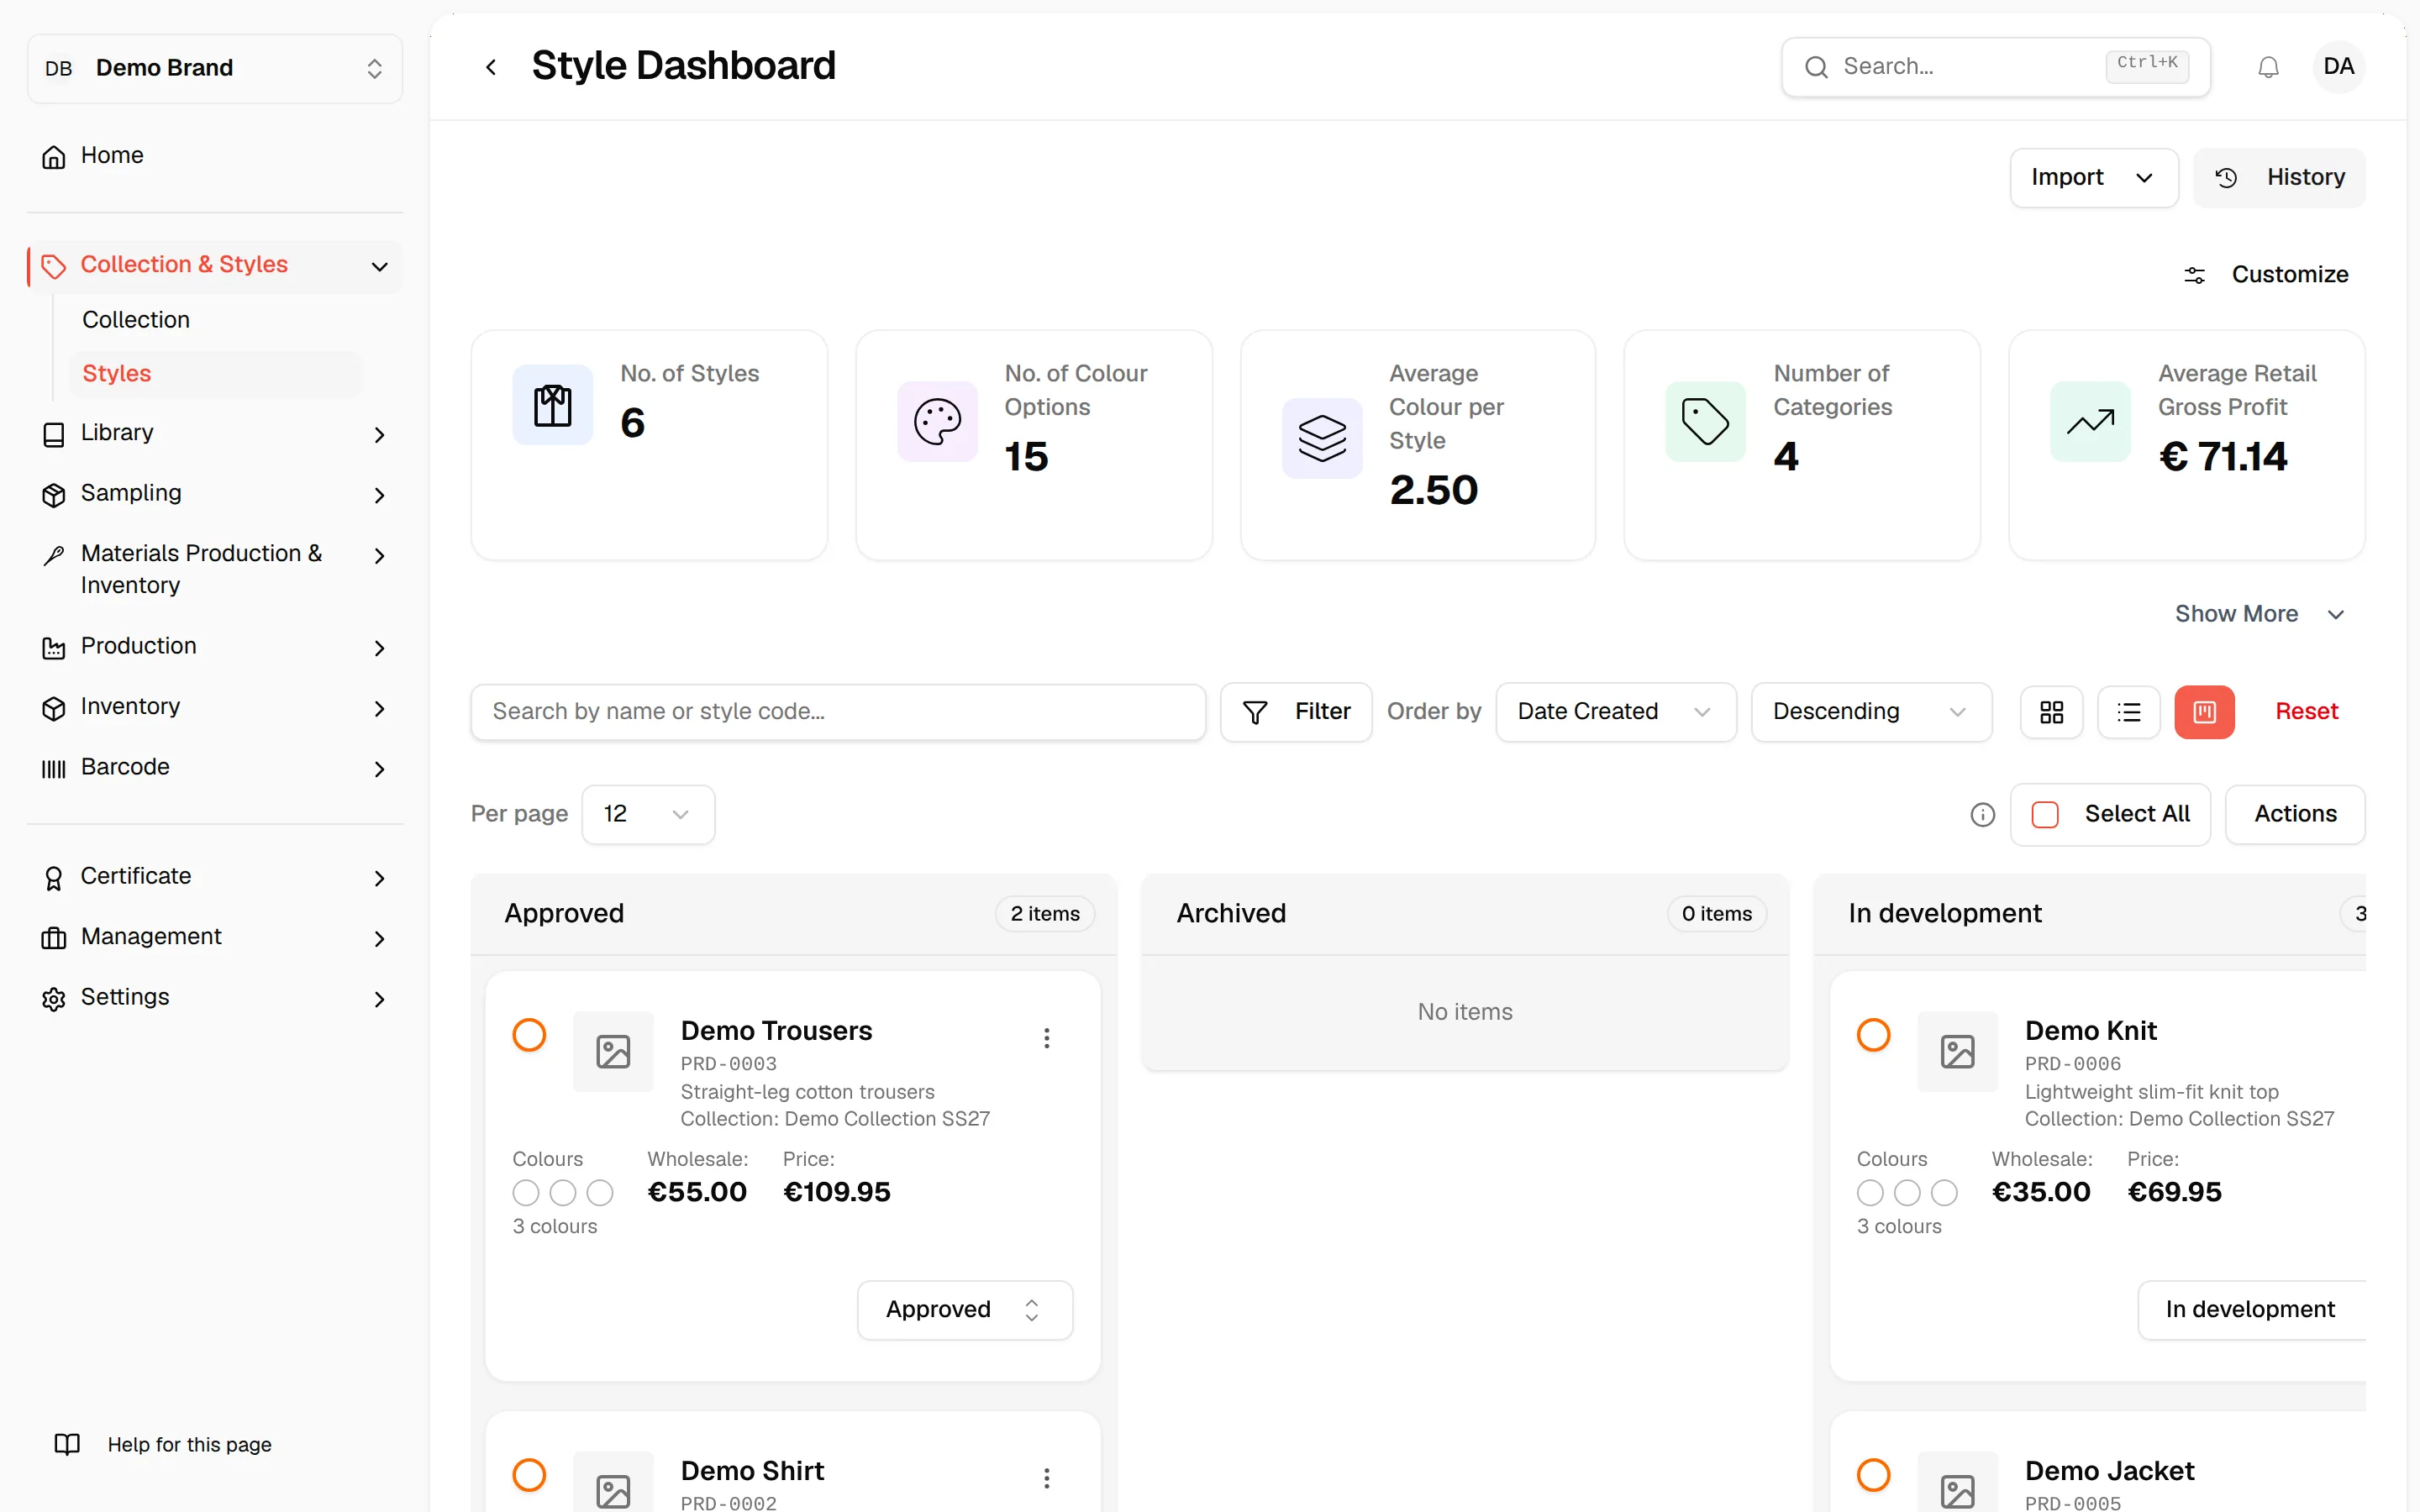
Click the Kanban View icon (rightmost in the view toggle) to switch to a status-based board layout. Styles are arranged in columns by their status (e.g. In development, Launched, New Drops style). Each card shows the style image, name, code, description, collection, option count, wholesale price, and retail price. You can update status directly from each card.
Importing styles from Excel
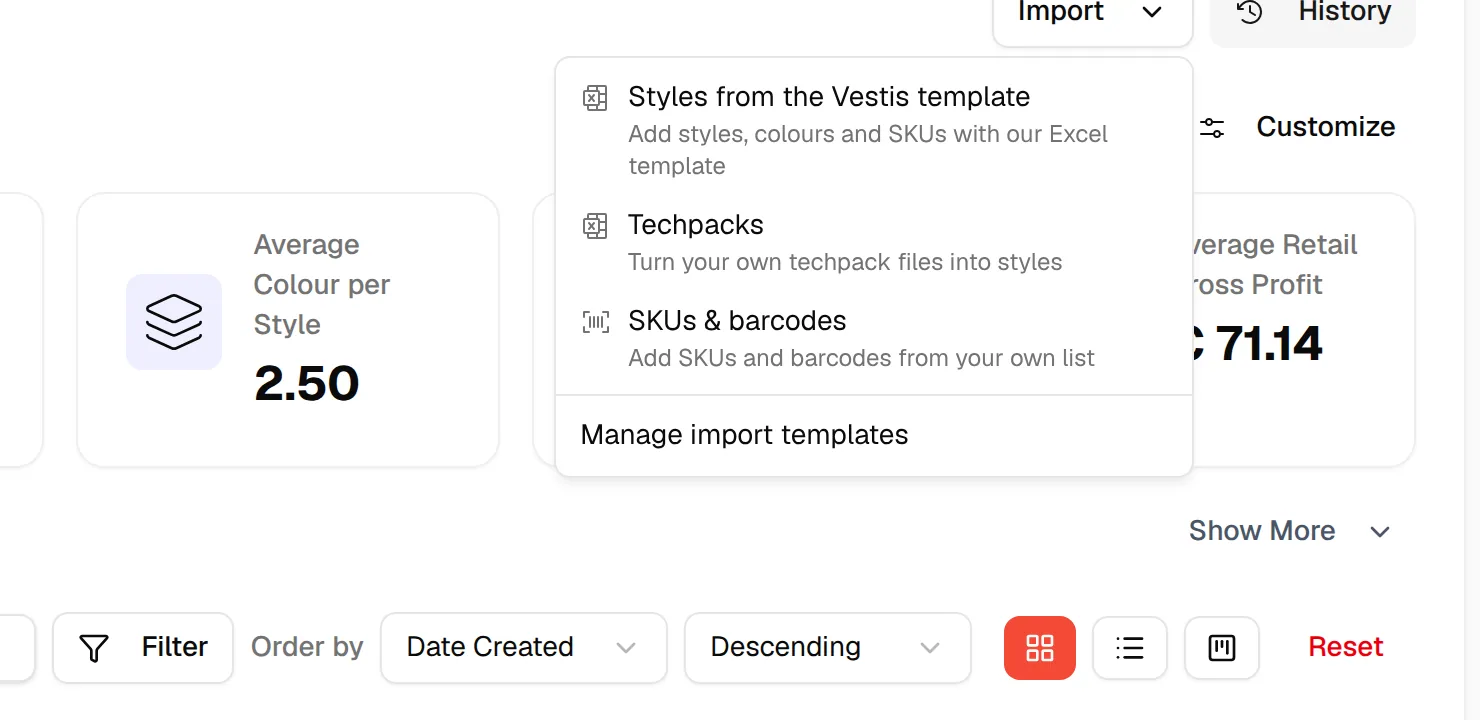
Click Import
In the top-right area of the Style Dashboard, click the Import button, then select Styles from the Vestis template. The menu can also offer Techpacks, SKUs & barcodes and Manage import templates, depending on your permissions and the features switched on for your brand. See Excel import for the full import steps.
**Download the Template (if needed)
**
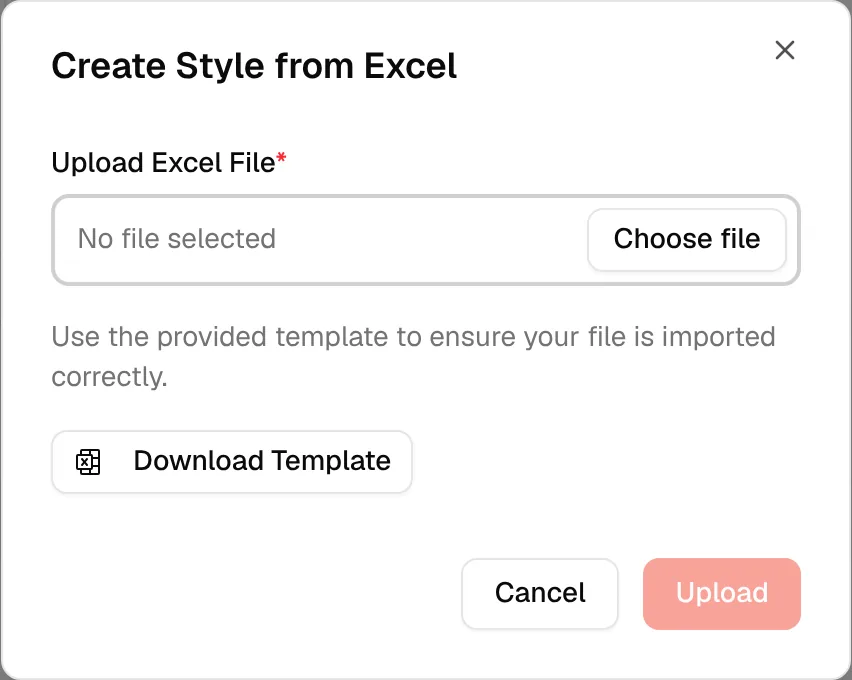
In the Create Style from Excel dialog that appears, click Download Template to get the correct Excel format. Fill in your style data using that template before uploading.
**Choose Your File
**
Click Choose file in the Upload Excel File field and select your completed Excel file from your computer.
**Click Upload
**
Once your file is selected, click the Upload button (highlighted in orange) to import the styles. Click Cancel at any time to dismiss the dialog without uploading.
Note
Only upload Excel files that follow the downloaded template format. Incorrect formats may cause import errors.
**Open the History Panel
**
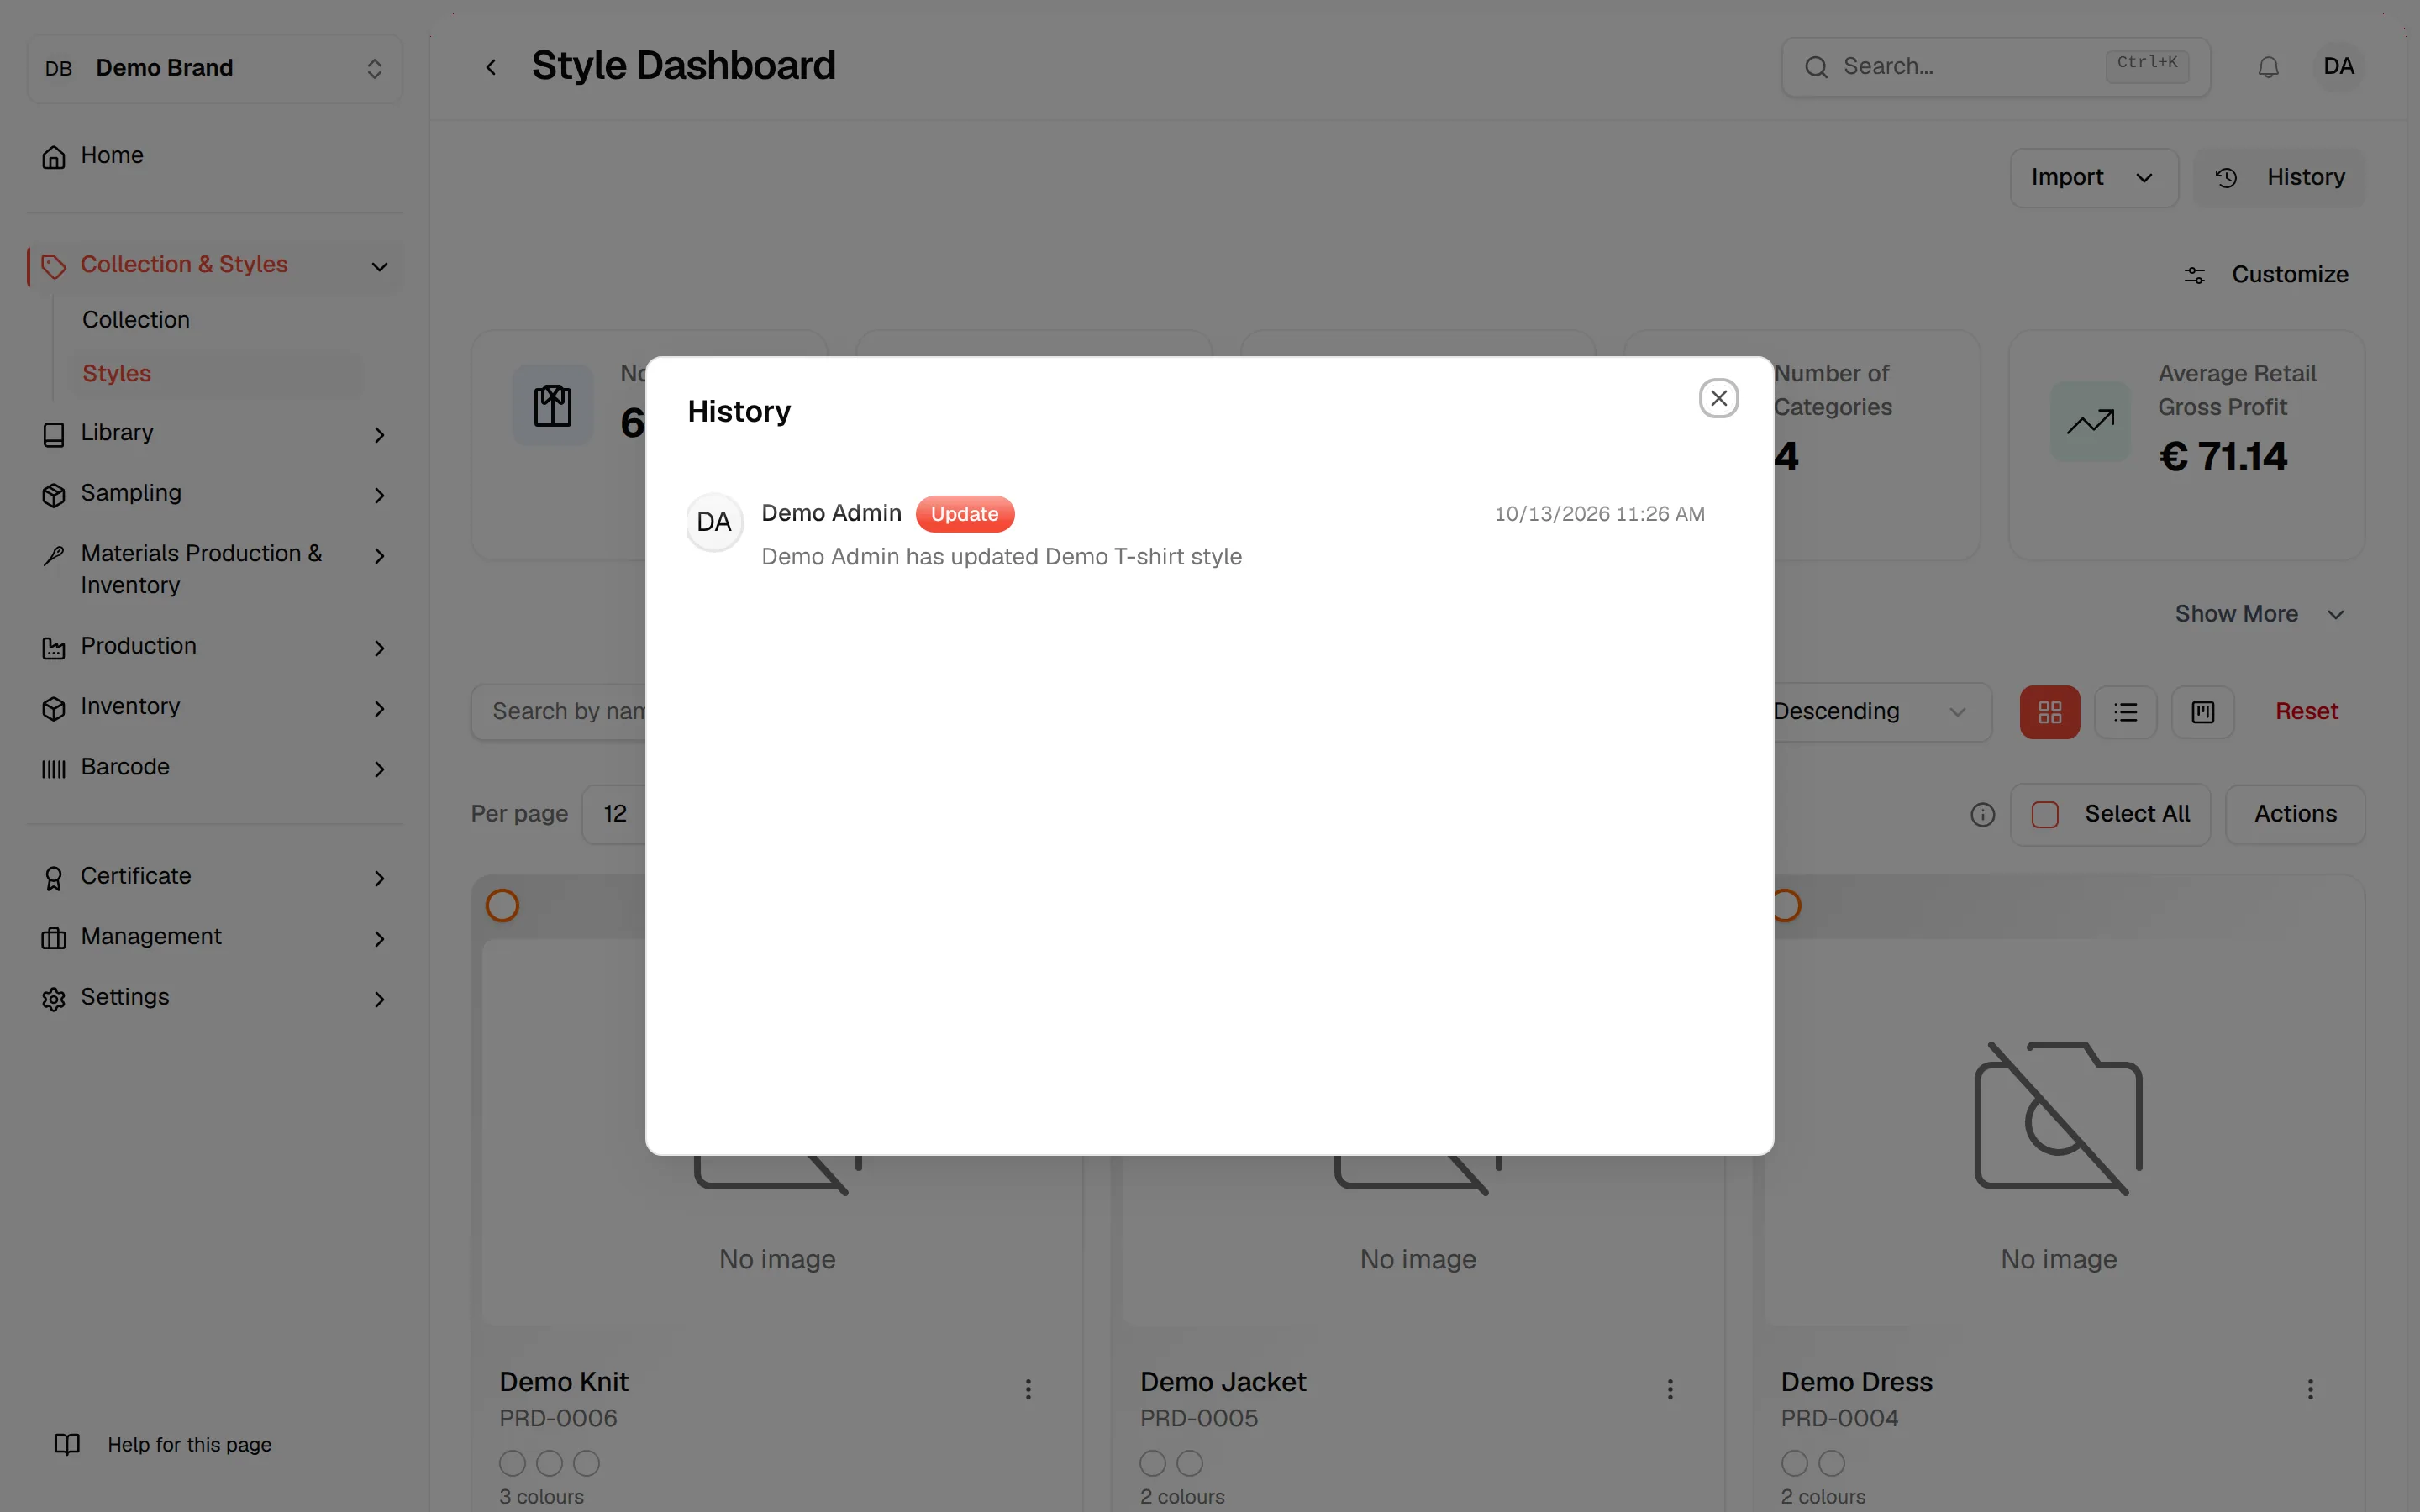
Click the History button in the top-right of the Style Dashboard. A tooltip will appear explaining that History keeps track of all actions transparency on collection changes.
Note
Use the History panel to audit changes and understand how your collection evolves over time. It is especially useful for teams collaborating on style updates.
Customising the dashboard view
**Open Customize
**
Click the Customize button in the top-right of the Style Dashboard. A tooltip will describe that this lets you see your full collection overview from number of styles and colour options to pricing and margin insights.
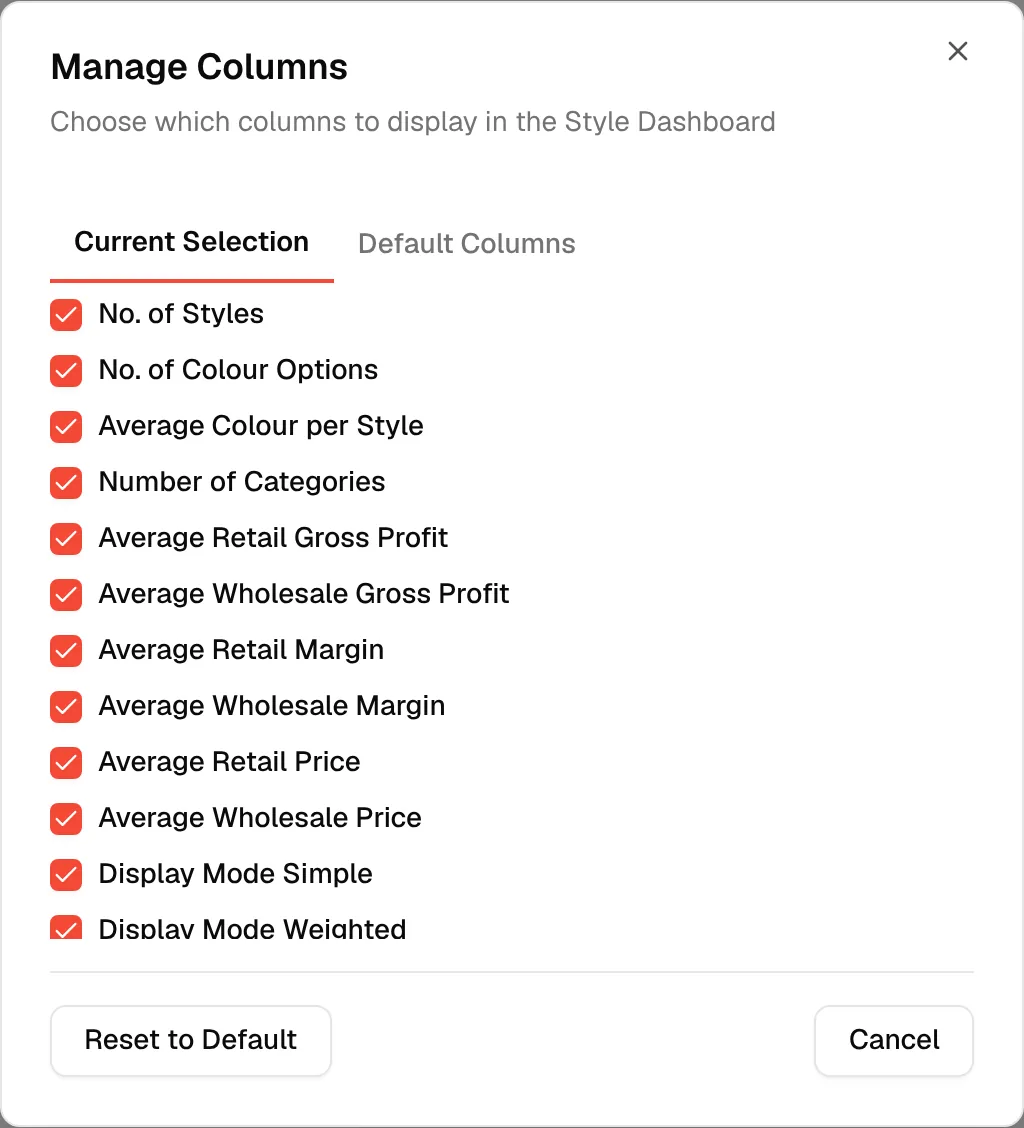
**Manage Columns (Current Selection)
**
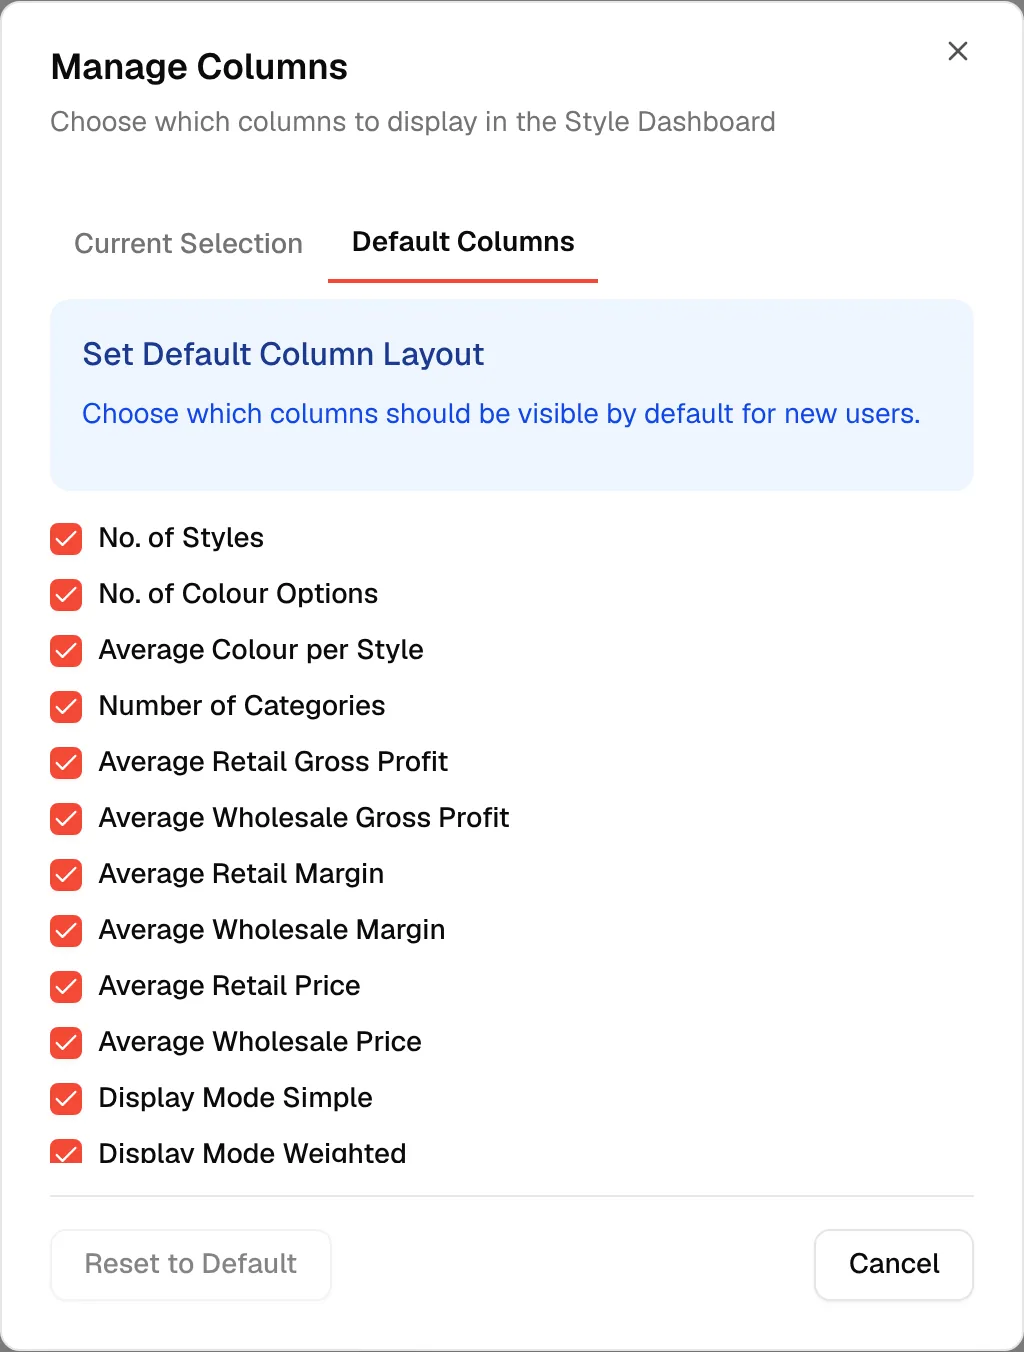
The Manage Columns dialog opens on the Current Selection tab. Here you can check or uncheck which data columns appear in your Style Dashboard. Available columns include:
- No. of Styles
- No. of Colour Options
- Average Colour per Style
- Number of Categories
- Average Retail and Wholesale Gross Profit
- Average Retail and Wholesale Margin
- Average Retail and Wholesale Price
- Display Mode Simple / Weighted
**Set Default Columns
**
Switch to the Default Columns tab to set which columns should be visible by default for new users on your team. Check or uncheck columns as needed, then click Reset to Default to restore the original defaults.
Selecting styles and using actions
**Select All Styles
**
Use the Select All checkbox in the toolbar above the style cards to select all styles on the current page. The count of selected styles is shown next to the checkbox.

Select the checkbox inside the style card to select it manually.
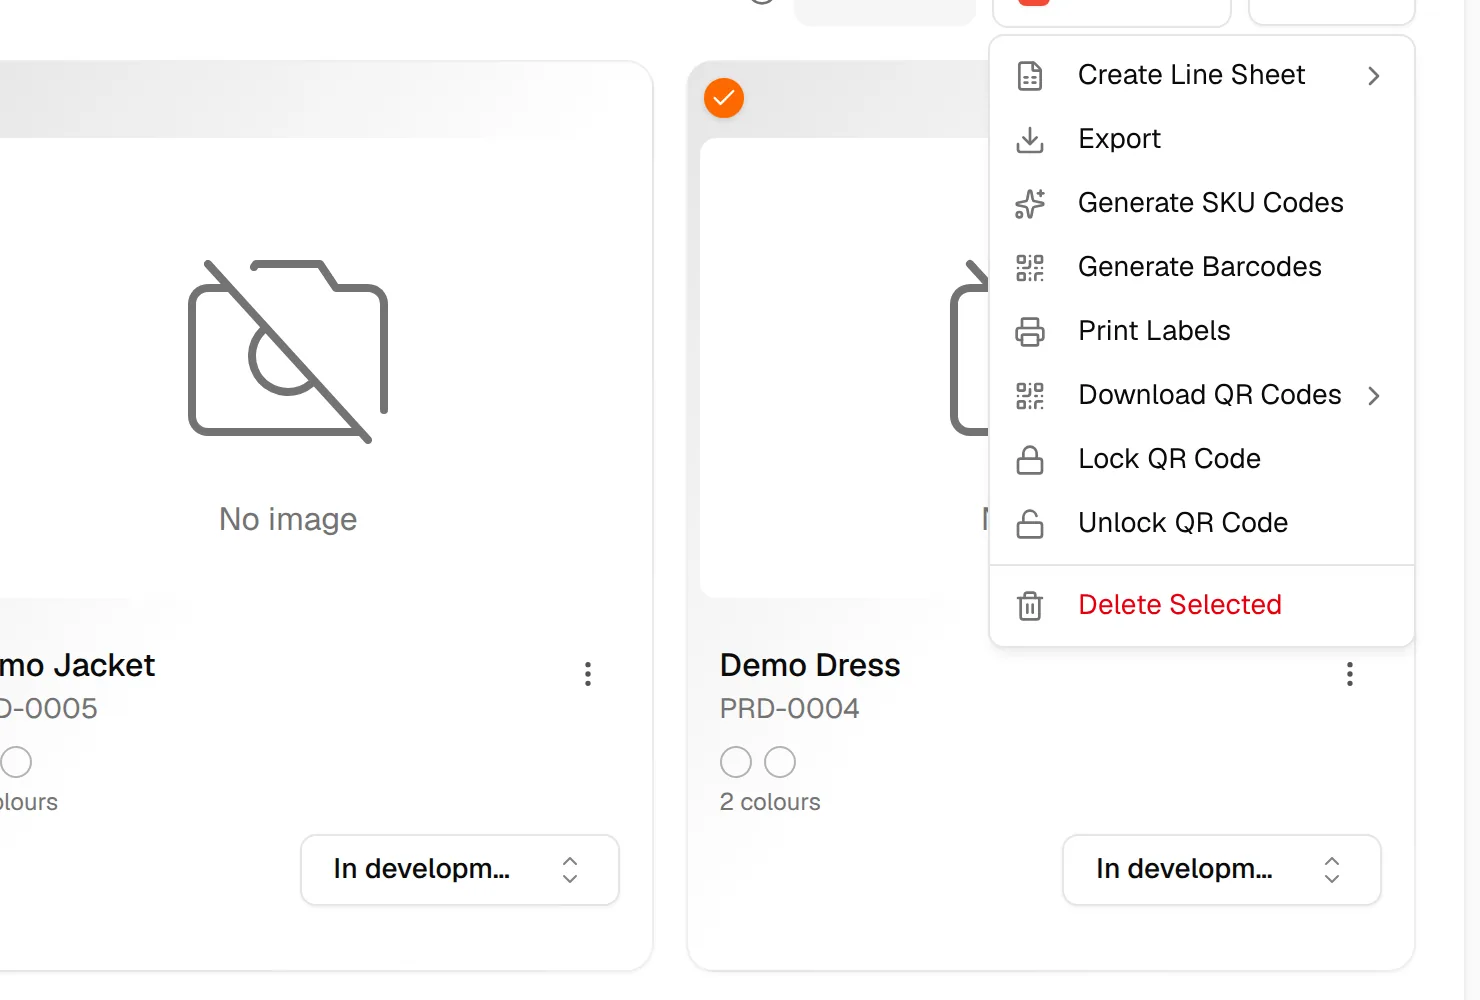
**Open the Actions Menu
** Once styles are selected, click the Actions button to see available bulk operations. The menu includes:
- Create Line Sheet
- Connect to Shopify
- Sync to Shopify (only when a selected style is already linked to Shopify)
- Export
- Generate SKU Codes (needs the Update style permission)
- Generate Barcodes
- Print Labels
- Download QR Codes (needs the View QR code permission)
- Lock QR Code / Unlock QR Code
- Delete Selected (needs the Delete style permission)
Note
Most actions stay greyed out until at least one style is selected.
Creating and exporting a line sheet
Choose a Line Sheet Template
After selecting styles and clicking Actions > Create Line Sheet, a template picker will appear on the left side. Choose from:
- Portrait Classic – Vertical layout, ideal for detailed product views
- Landscape Modern – Horizontal layout, great for multiple products
- Grid Layout – Organised grid view for collections
- Minimal Clean – Clean design with focus on products
Manage Line Sheet View
Click Manage View to customise which data fields appear on the line sheet. The Manage Line Sheets View dialog lets you choose from fields including Name, Code, Short description, Categories, Colours, Compositions, Wholesale Price, RRP, Wholesale Margin, Retail Margin, Suppliers, and Attributes.
Export the Line Sheet
Once you have selected your template and configured the view, click Export as PDF at the bottom of the template picker, then click the Export button to generate and download the line sheet.
Note
Use Grid Layout when presenting a collection overview to buyers. Use Portrait Classic for detailed individual style presentations.
Using the actions menu – detailed options
Connect to Shopify
With styles selected, open Actions and click Connect to Shopify to sync your selected styles directly to your Shopify store. This enables real-time product publishing from Vestis Labs.
Export Styles
Click Export in the Actions menu to export data for the selected styles. This downloads style information in a standard data format for use in other systems or for sharing.
Generate Barcodes
Select styles and click Generate Barcodes from the Actions menu. Vestis Labs will generate barcode labels for every colour option of the selected styles, ready for use in inventory and retail operations.
Print Labels
Click Print Labels to open the Print Labels dialog. Here you can:
- Select a Barcode Template from the dropdown (e.g. New Season 2026)
- Review Template Details: type (e.g. CODE128), method (sequential), size, and barcode size
- Preview the barcode label layout (showing product name, brand ID, size, colour, and logo placement)
- Click Continue to Print Selection to proceed
Note
The barcode preview shows a 10 x 5 cm label. Ensure your selected template matches your physical label stock before printing.
Download QR Codes
Click Download QR Codes in the Actions menu to reveal two sub-options:
- As ZIP archive – downloads all QR codes for selected styles in a single ZIP file
- Individual files – downloads each QR code as a separate file
Lock QR Code
Click Lock QR Code in the Actions menu. A confirmation dialog will appear: “Lock QR for 5 styles?” Locking freezes the QR code for every colour option of the selected styles. The QR will continue to point to the same destination until unlocked. Click Lock to confirm.
Note
Use Lock QR Code when you are ready to print and distribute QR codes and want to ensure the destination URL cannot change.
Unlock QR Code
Click Unlock QR Code in the Actions menu. A confirmation dialog will appear: “Unlock QR for 5 styles?” Unlocking allows the QR code for every colour option of the selected styles to be regenerated again. Click Unlock to confirm.
Creating styles
Click + New Style at the top of the Style Dashboard to open the create form (see Create a new style), or Create with AI to start from an AI-generated style. Both need the Create style permission. If your plan has a style limit and you have reached it, + New Style is disabled.
Search, filter and sort
Use the search box (Search by name or style code...) and the filters under the summary cards to narrow the list. You can filter by Collection, Season, Category, Size Range, Color, Supplier, Status, Style Attributes and Created date. Sort by Name, Code, Date Created or Last Modified, in Ascending or Descending order.
In List View, a Show inactive colours checkbox next to Select All adds the colours that were switched off.
Delete a style
Select one or more styles, open Actions and click Delete Selected. A Delete Styles confirmation asks you to confirm; this action cannot be undone. A single style can also be deleted from its card, with a Delete Style confirmation.
Warning
Deleting a style cannot be undone.