
Create digital material library
Digital Material Library is a page that allows users to Create Product Information (Raw Materials, Processes, and Packaging) that they use and can be used to connect tiers with the style…
Under review. This page is published while we check it against the live app, so some details may have changed.
Screenshots may be out of date.
Digital Material Library is a page that allows users to Create Product Information (Raw Materials, Processes, and Packaging) that they use and can be used to connect tiers with the style that will be shown on the product journey.
LibraryMaterialsNew
Permission: UPDATE_PRODUCT,VIEW_PRODUCT
Step 1
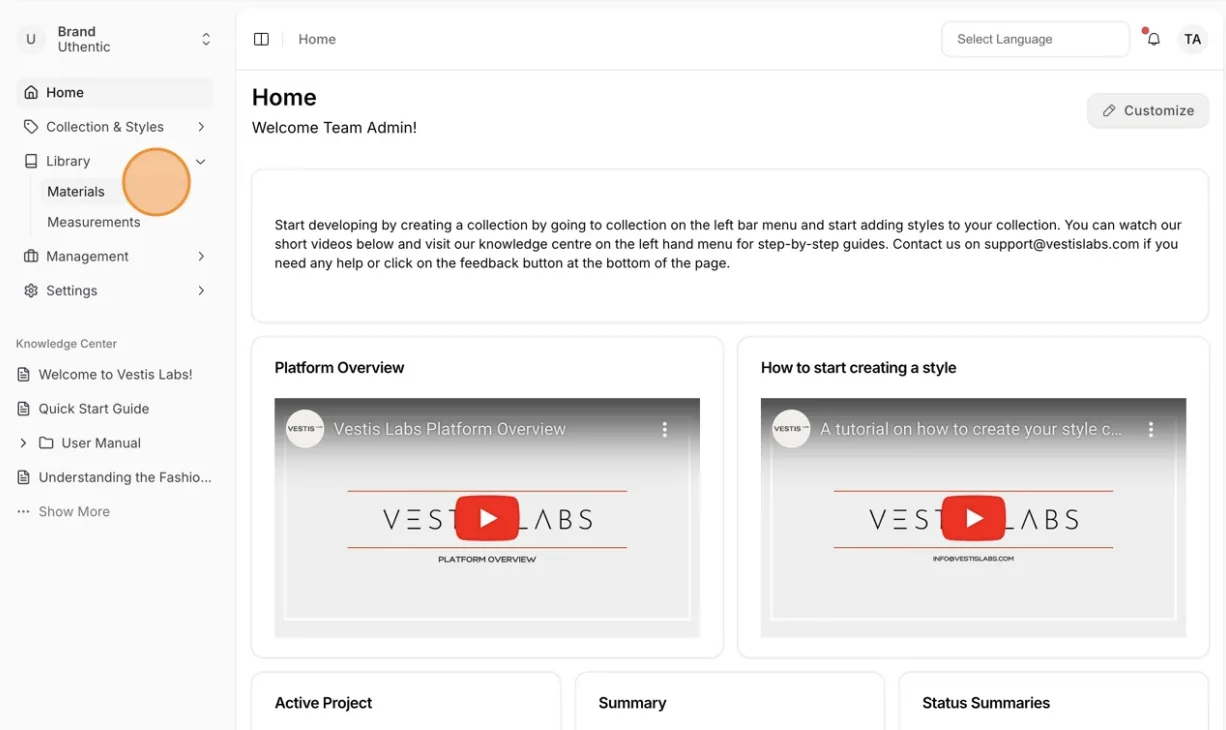
To access the Material Library, select Library > Materials from the left bar menu to view the full Product Library or create a new product.
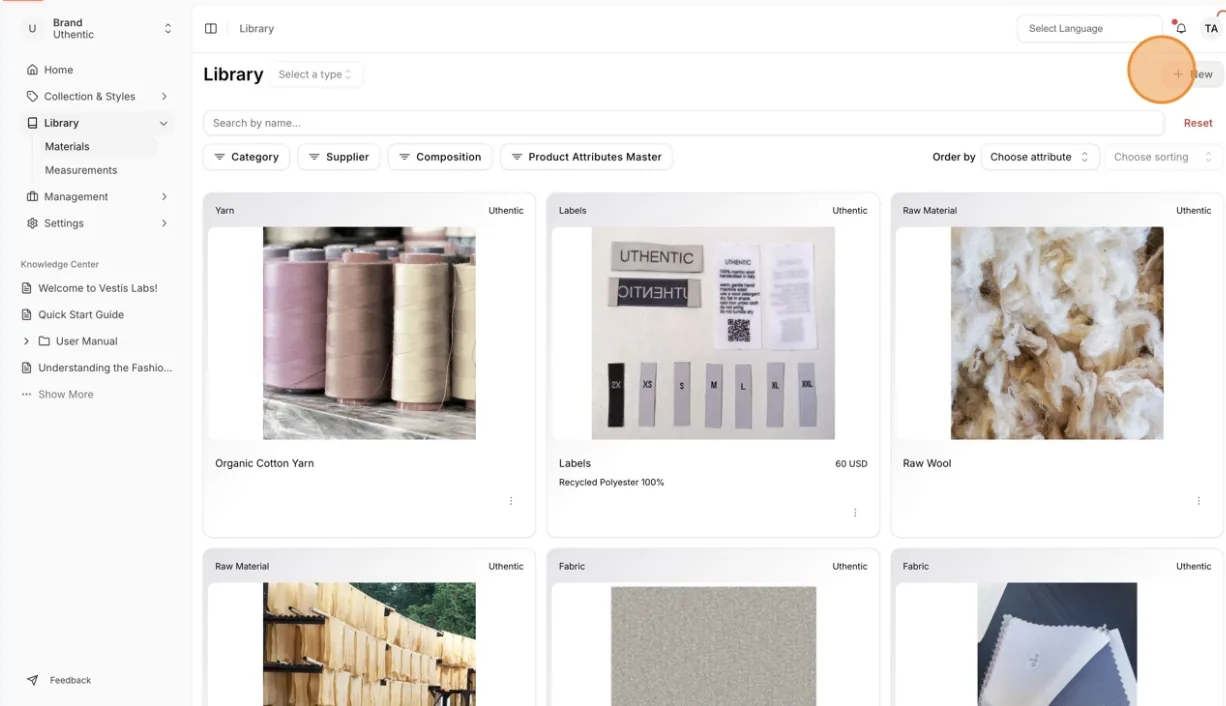
Select New in the upper-right corner to create a new product.
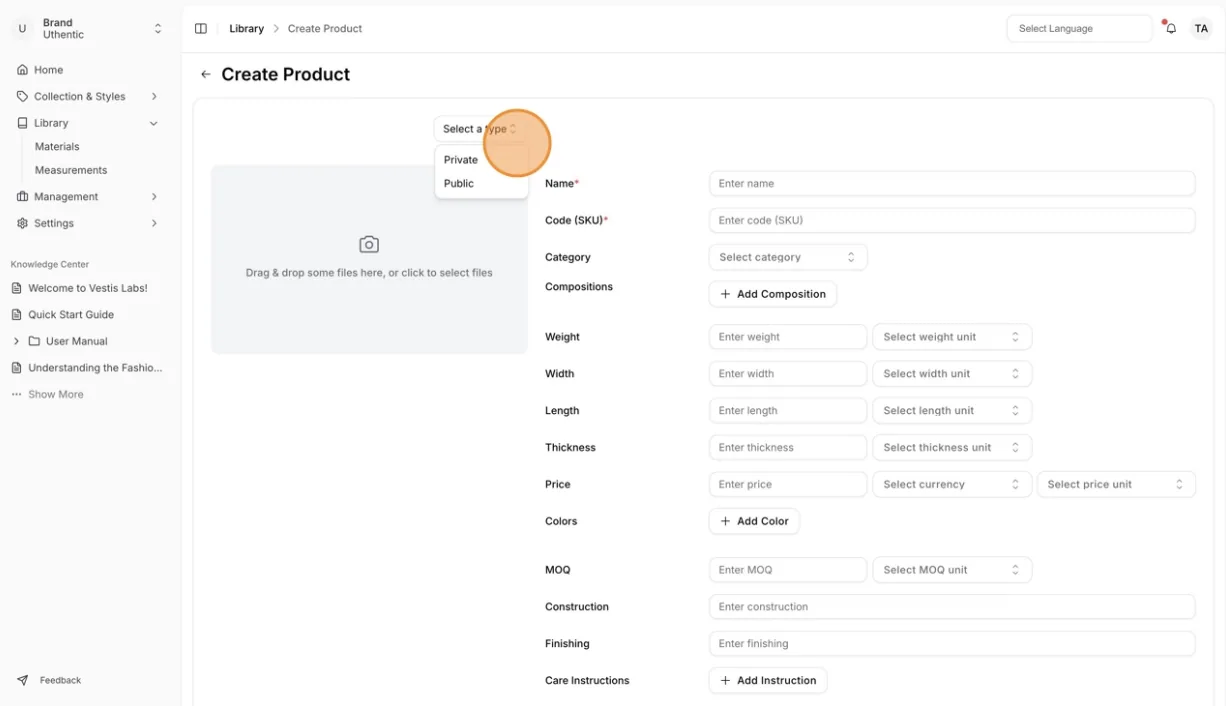
Select the type of product to be shown as public or private.
In the Create Product page, you must fill out all the required fields.
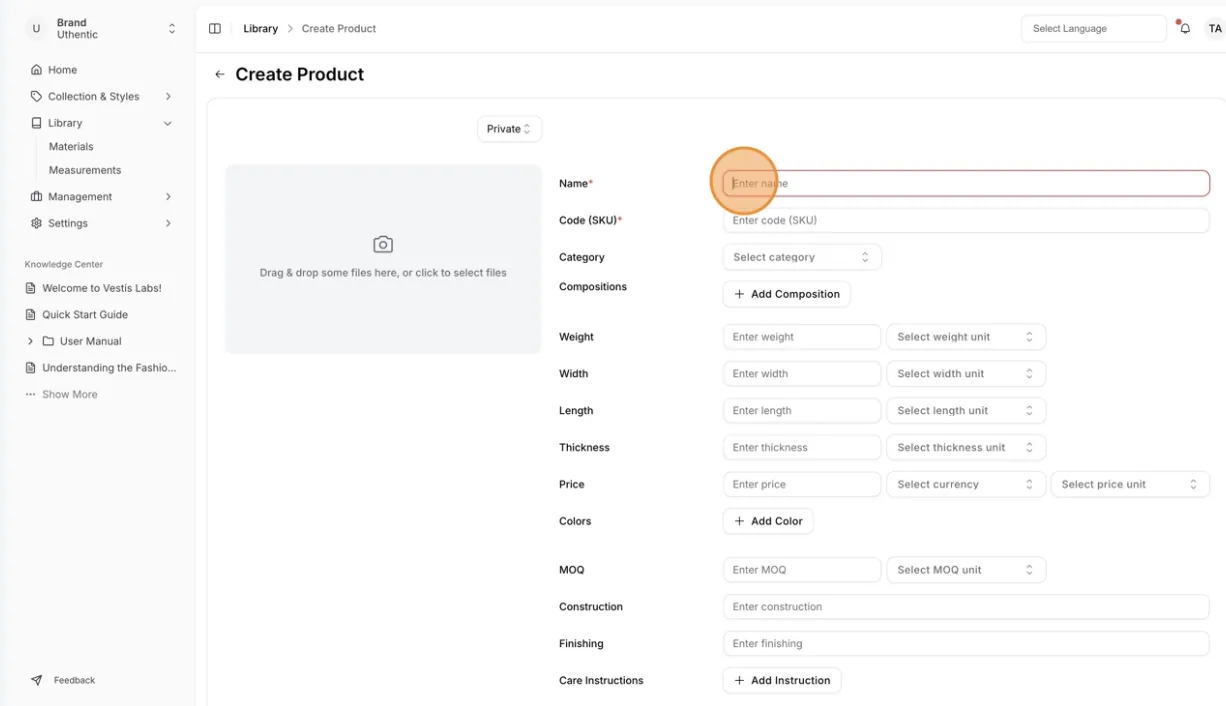
Material Images: Users can upload one or more pictures to represent the material.
Name: enter the name of the product.
Code (SKU): enter the Code (SKU) of the product.
Image Spesification:
- The files that are allowed are .jpeg, .jpg, .png, and .svg.
- The maximum size is 3 MB.
Category: Enter the category of the product.
Nb: Users can also create and manage the Category in the Library Category Page.
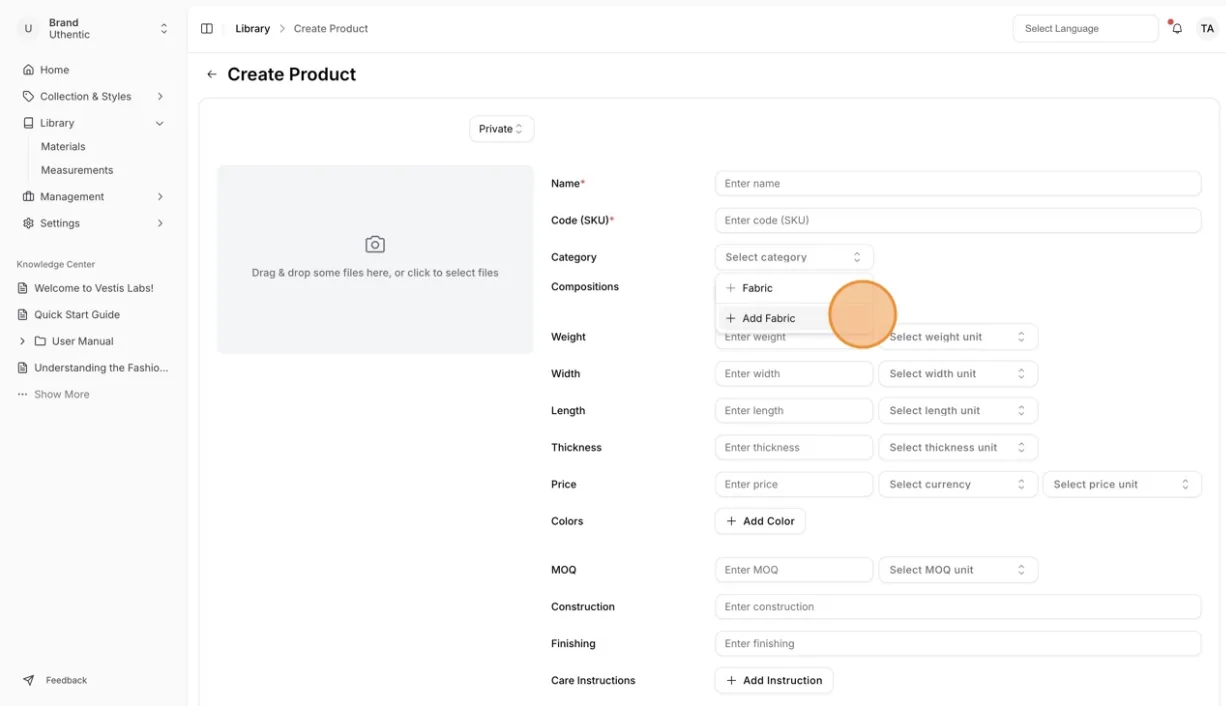
Composition: Enter the Composition of the product, including…
Composition: Enter the Composition of the product, including the percentage of each composition.
Nb: Users can also create and manage the Composition in the Composition Page.
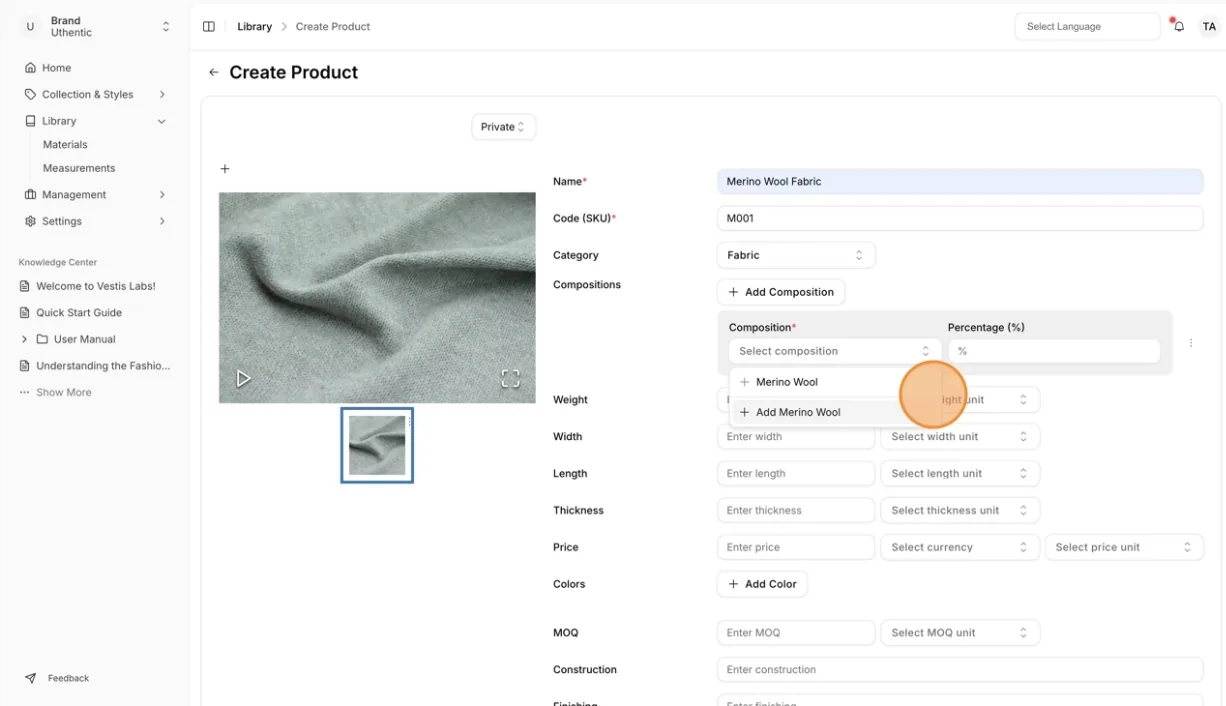
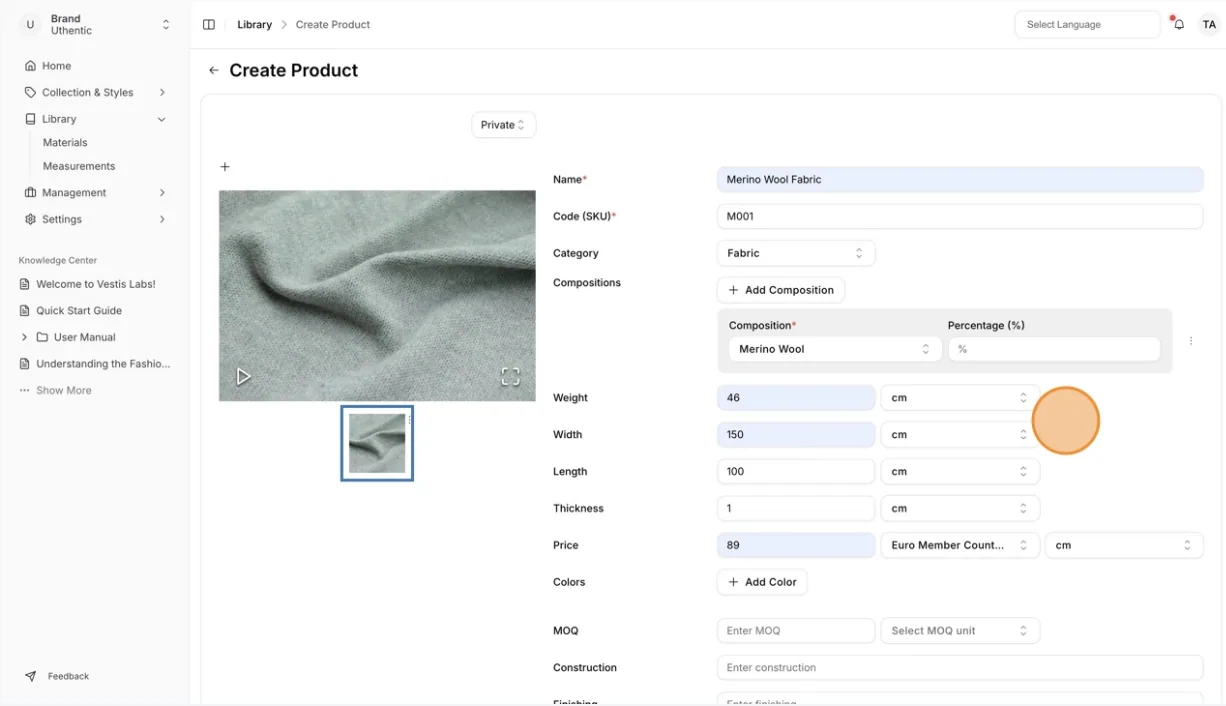
Fill out all the required fields of the Dimensions product.
Enter the Dimension of the material, including Weight, Width, Length and Thickness, each with its unit. The Price is set with the Set pricing button, where you also choose the Currency and Price unit (see Set quantity-break pricing for a material).
Color: Select the product color code and enter the color name in the color code field.
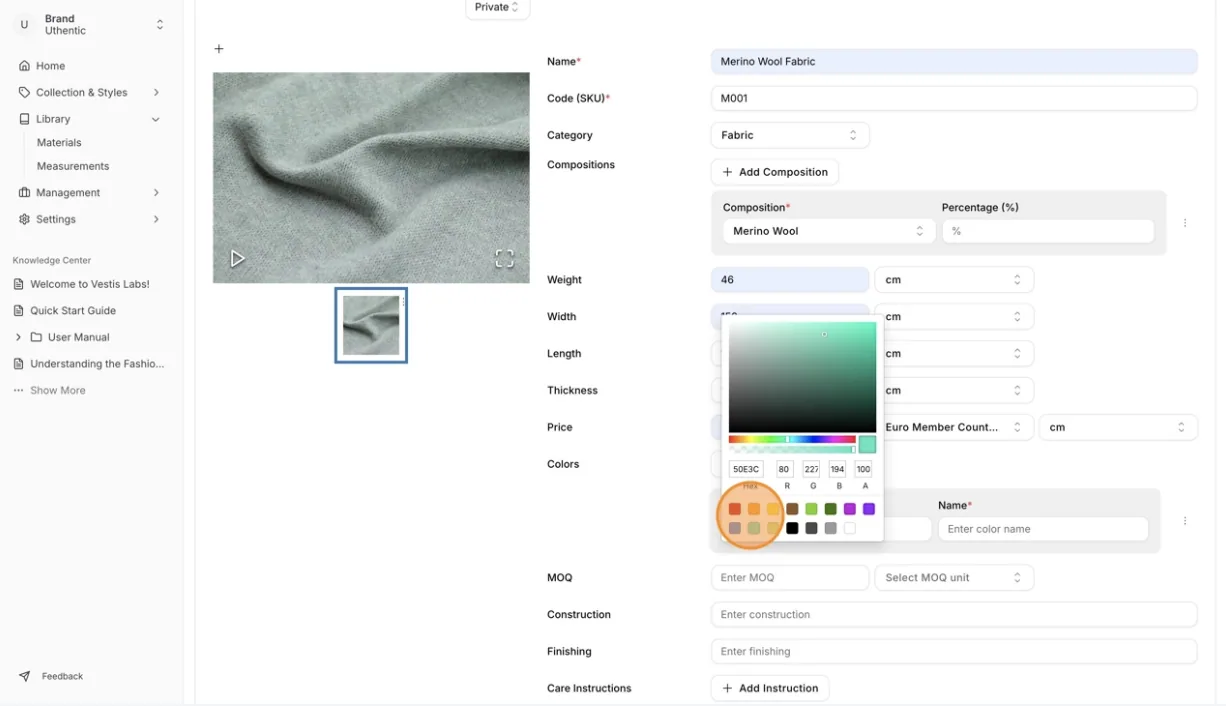
Nb: Users can assign multiple product colors to a product through the product page. Click Add Color, then choose From Library to pick colours from your colour palette or Custom Color to type the Code, Pantone Code and Name yourself.
MOQ: Enter the MOQ and unit of the product.
Construction: Enter the field to describe the product construction.
Finishing: Enter the field to describe the product finishing.
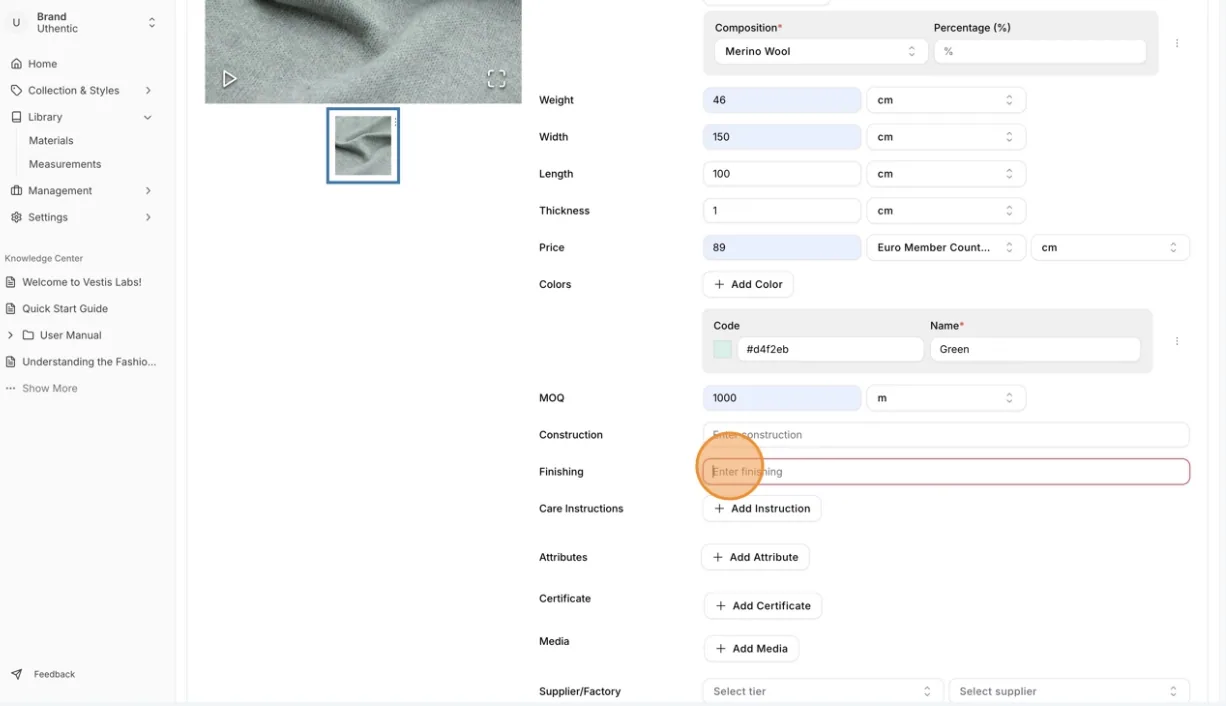
Care Instruction: Select the care instructions to describe…
Care Instruction: Select the care instructions to describe the care instructions of the product. Three dots to select action for the selected Product to Delete.
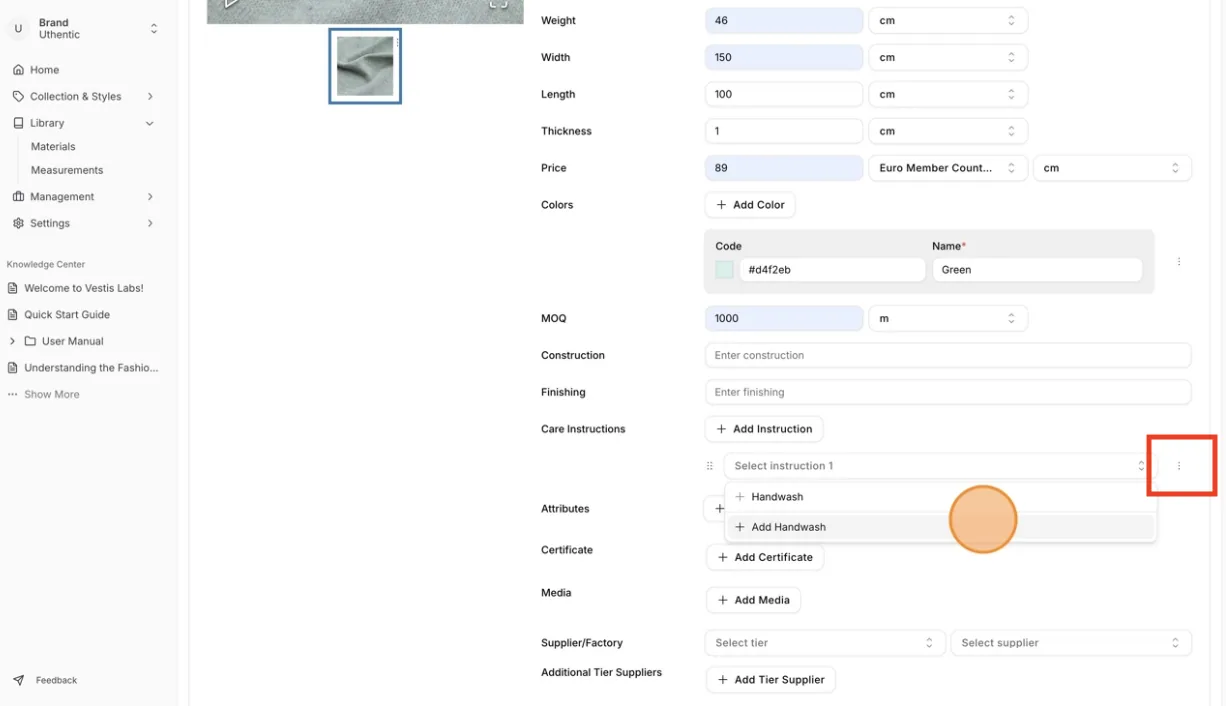
Users can add Product Attribute on the Create Product page.
Click Add Attribute. In the Add Product Attribute dialog, select a Product Attribute Master and a Product Attribute, then click Add.
Certificate: add certificates after you save.
The create form has no certificate section. After you save the material, open it and use its Certificates tab to link or create certificates. See Material certificates.
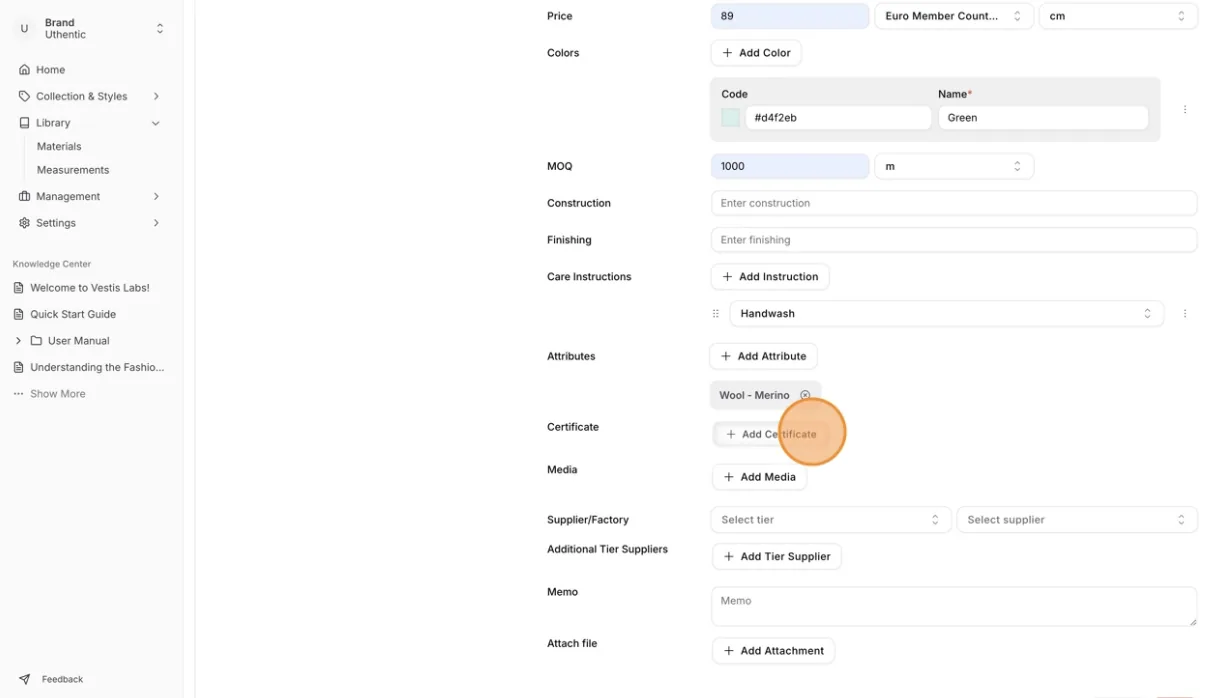
Upload the Product's media and assign multiple Media through the product page.
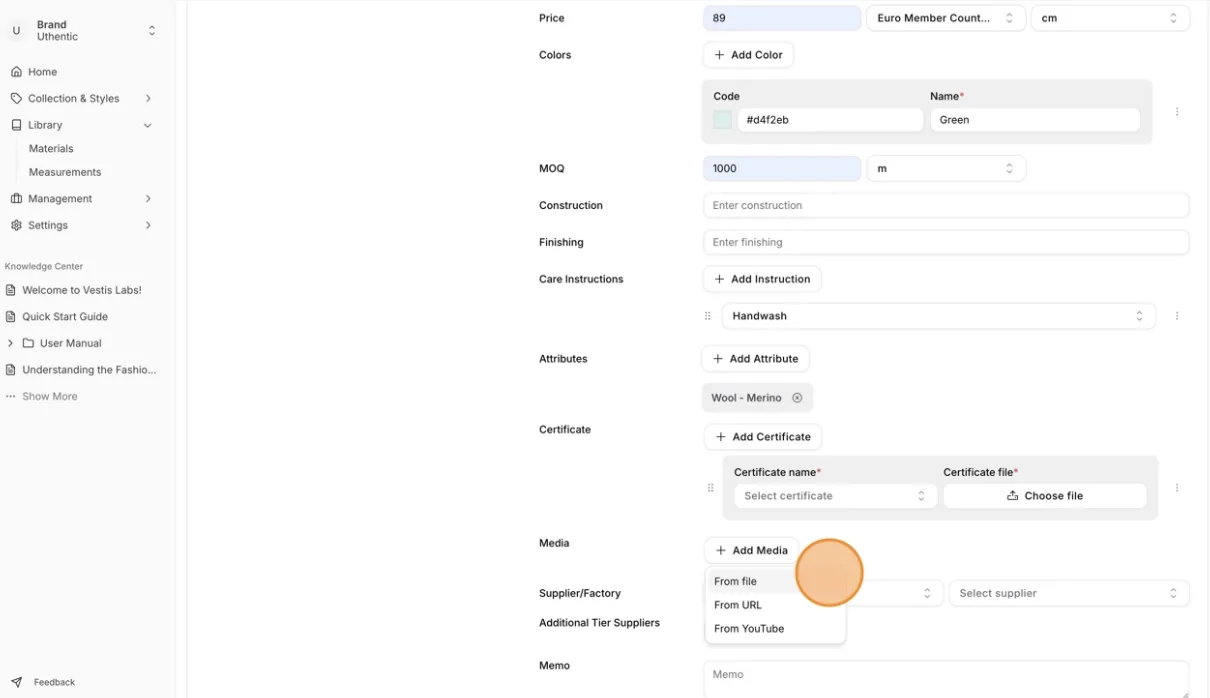
The dropdown option will appear on the page after you click Add Media, and users can select the option:
- From file: Enter a Media title, then click Upload media to choose the file.
- From URL: The file that is allowed to be uploaded is the website URL.
- From YouTube: The file that is allowed to be uploaded from YouTube is the Embed URL.
Users can create and connect the tier supplier/ Factory.
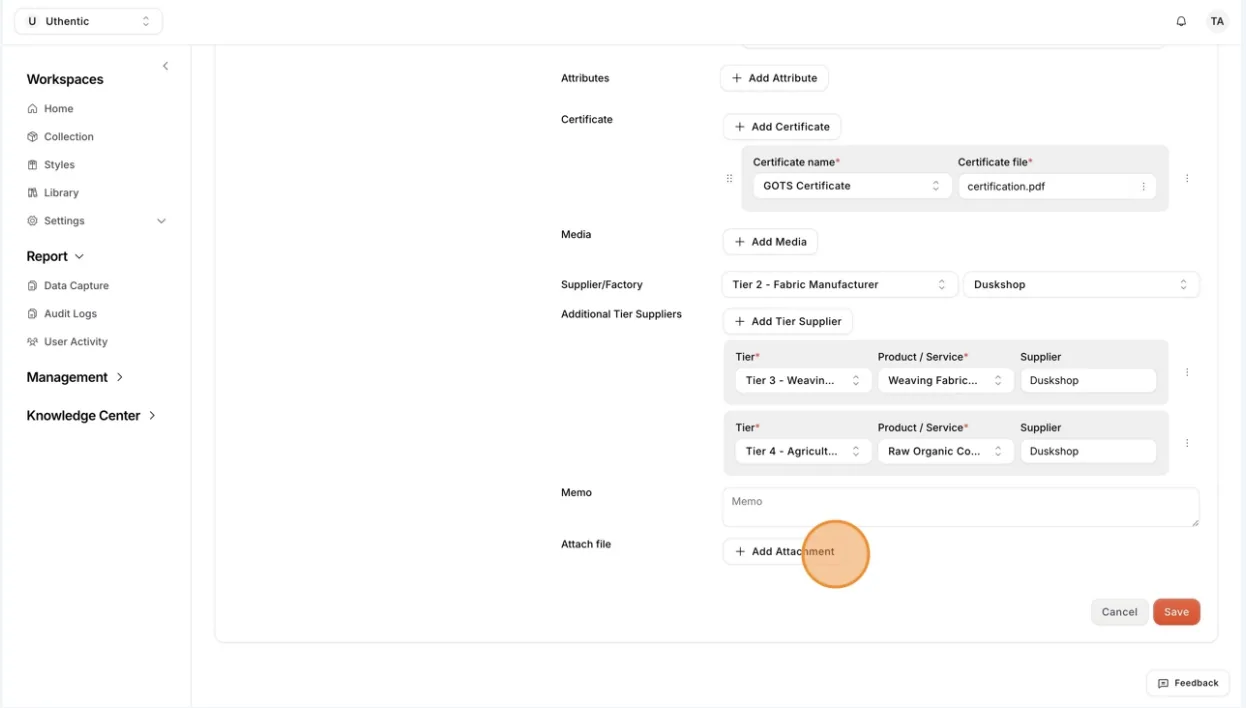
Choose a Tier and a Supplier/Factory. Click Add Tier Supplier to link more suppliers, each with a Product / Service, a Tier and a Supplier.
Users can Create suppliers through the Create Product page.
Type a new name in the Supplier/Factory dropdown to create it. Once a supplier is chosen, open the three dots next to the pair and select View/Edit Supplier to change its details.
Memo: Enter additional information about the Product.
Attach file: Click Add Attachment, then Upload attachment to upload additional attachment files associated with the product.
Select Save in the lower-right corner.
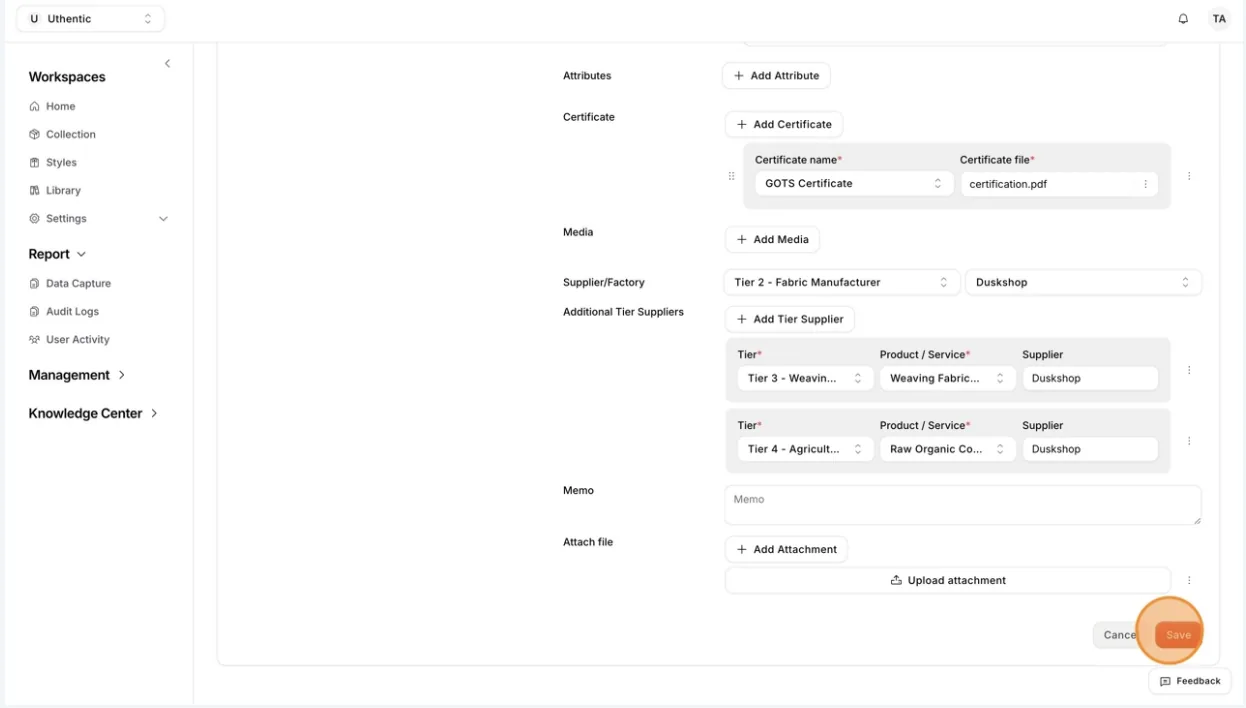
Select Cancel next to it to leave without saving. Vestis shows "Creating product..." and then "Product created successfully".
You should now see the material in the library list. The page you land on after saving is the list, and you can open the new material from there to add more detail.
Required fields
Only two fields stop you from saving:
- Name: "Name must not be empty" appears if it is blank.
- Code (SKU): "Code must not be empty" appears if it is blank.
Inside the optional sections, a row you add must be completed: each composition needs a Composition, each colour needs a Name ("Color name must not be empty"), each media row needs a Media title, and each attachment or tier supplier row needs its value.
Note
The create form is one page with no tabs. Certificates, the price of each colour, and the Sampling, Production, Inventory and Styles tabs appear after the material is saved. See Open and edit a material.
Make a material public
When you choose Public in Library Type, a Make Library Public dialog warns that the item becomes visible and available to all brands within Vestis Labs and that, once made public, you cannot change it back to private. Click Yes to continue or No to keep the current type.